Learning procedure of floors
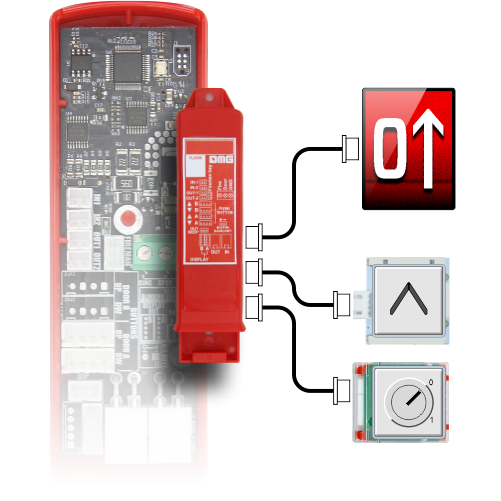
If the Controller is equipped with Absolute Encoder or DMG Encoder or Motor Encoder it is possible to take advantage of the floor position learning feature, which allows for a faster system configuration and fine tuning. The procedure is different according to the type of encoder, as described in following sections:
ELGO LIMAX 33CP: Manual Teach Procedure
If in the installation there are not enough clearance (Reduced Head) it is recommended to make the Manual Teach from outside the lift shaft (at least the first 3 steps): In this case you can use the Inspection BOX inside controller and after the Top of ar Inspection BOX.
 The procedure must be done before putting the system in Normal mode.
To start the procedure the Lift must be in Temporary operation. Until the end of the Manual Teach Procedure the Safety contacts are connected on the safety chain but are not yet operative (Final limit switch, Inspection limit switch, OSG, eSGC) because the ELGO doesn’t know the real position of the limit points of the shaft. The only control based on ELGO Device is Teach over speed (0,4 m/s), so if cabinspeed is higher than 0.4 m/s, the ELGO opens OC contact (and closes the OC contact after the Cabin is stationary).
 1) – Put the elevator car in the highest position (counterweight on buffers).
2) – Press simultaneously the UP and DOWN button of the Inspection BOX 3 times to put the ELGO device in Teach Mode. On the playpad is showing a WAIT blinking message (in case of problem procedure quits with a Fault ELGO, see Troubleshooting).
ELGO device switch on led MODE and starts to give acoustic feedback (one beep every 2 seconds). This acoustic signal will be present throughout the Manual Teach Procedure. On the playpad is showing a “TOP” blinking message.
 3) – Press again simultaneously the UP and DOWN button of the Inspection BOX 3 times to record inside ELGO the highest point of the Shaft. This point will be the reference point for Top limits (Top limit switch, Top inspection limit, TOP ETSL control, etc.).
The ELGO device gives a long acoustic feedback to confirm the Top limit data has been recorded.
On the playpad is showing a “Floor n” blinking message (n is the floor you are going to record).
4) – Move the Cabin up to the highest floor.
Press simultaneously the UP and DOWN buttons of the Inspection BOX 3 times to record inside the ELGO the floor position.
The ELGO device gives a short acoustic feedback to confirm the floor data has been recorded.
On the playpad is showing a “Floor n-1” blinking message (n-1 is the next floor you are going to record).
 5) – Move the Cabin Downward until the next floor.
Press simultaneously the UP and DOWN button of the Inspection BOX 3 times to record inside the ELGO the floor position.
The ELGO device gives a short acoustic feedback to confirm the floor data has been recorded.
6) – Repeat the previous point until the lowest floor is reached.
7) – After recording of the Bottom floor position on the playpad is showing a “BOTTOM” blinking message, move the Cabin to the lowest point of the shaft (cabin on the buffers).
Press simultaneously the UP and DOWN button of the Inspection BOX 3 times to record inside ELGO the lowest position. This point is the origin of Magnetic band (0 mm showed) and will be the reference point for Bottom limits (Bottom limit switch, Bottom inspection limit, Bottom ETSL control, etc.).
ELGO device gives a long acoustic feedback to confirm the record of data.
In this moment controller automatically records:
• Position of acquired floors;
• Door zone position, used by the controller to enable door contacts bypass (pre opening / re levelling).
• Deceleration distance, according to the lift speed.
 On the playpad is showing a “/\” blinking message: Move the lift up to the bottom floor position. The Controller will put the ELGO in Normal Mode. (not possible before because the ELGO would be on the limits opening OC and locking the cabin).
On the playpad is showing a “WAIT” blinking message for 10 seconds, wait until will be showed Floor 0.
The ELGO device stops the acoustic beep and led MODE starts blinking (1 blink per second).
Now the ELGO Device is operative for safety contacts:
• Electronic Safety Gear (if present)
• Electronic OSG.
• Final limit switches.
• Inspection limit switches are not yet managed because the lift is in Temporary mode.
Before the normal operation mode, it is mandatory to execute an automatic Shaft learning to set the correct Stopping distances in Upward and Downward direction for each floor.
Automatic Learning Procedure (ELGO LIMAX33-CP)
9) – The elevator must be in Temporary operation. Put the elevator on the bottom floor with half of maximum Load.

10) – Go into <Positioning> and set the Autosetting parameter to “Yes”.

Turn the Inspection Selector to Normal
The lift starts to move automatically:
• Upward trips with deceleration and stop at each floor.
• Downward trips with deceleration and stops at each floor.
When the Cabin comes back to the lowest floor the system is ready to pass in to Normal service.
After automatic learning procedure in <Positioning>, Monitor Encoder you can to set:
• Deceleration distances in Normal service for deceleration confort
– R1S (Pag. 3) upward deceleration distance
– R1D (Pag. 2) downward deceleration distance
These values are automatically set after automatic learning according the lift’s speed (see lift speed and deceleration distance).
• Stop distances in Shaft’s Inspection
– I_LIM_S upward stop distance before top floor position
– I_LIM_D downward stop distance before bottom floor position
In Reduced Head/Pit these values must be considered according the Pre-Triggered safety system.
• Stop distances in Normal service
– N_LIM_S upward stop distance after top floor position
– N_LIM_D downward stop distance after bottom floor position
These values are automatically set after automatic learning at a distance equal to 30 mm from extreme floors (in case of less distance from reference points it is considered the middle point between extreme floor and extreme reference positions).
• ELGO+eSGC pre-Trigger position
– TRIPS distance from top Reference position where eSGC electric command force the cabin to stop (only for Reduced Head lift).
– TRIPD distance from bottom Reference position where eSGC electric command force the cabin to stop (only for Reduced Pit installation)
These values are Read Only values and are greater than 0 mm only if ELGO is part of the Safety pre.-Triggered system (togheter with electric Safety Gear / Overspeed Governor).
The procedure must be done before putting the system in Normal mode.To start the procedure the Lift must be in Temporary operation. Until the end of the Manual Teach Procedure the Safety contacts are connected on the safety chain but are not yet operative (Final limit switch, Inspection limit switch, OSG, eSGC) because the ELGO doesn’t know the real position of the limit points of the shaft. The only control based on ELGO Device is Teach over speed (0,4 m/s), so if cabinspeed is higher than 0.4 m/s, the ELGO opens OC contact (and closes the OC contact after the Cabin is stationary).
1) – Put the elevator car in the highest position (counterweight on buffers).2) – Press simultaneously the UP and DOWN button of the Inspection BOX 3 times to put the ELGO device in Teach Mode. On the playpad is showing a WAIT blinking message (in case of problem procedure quits with a Fault ELGO, see Troubleshooting).
ELGO device switch on led MODE and starts to give acoustic feedback (one beep every 2 seconds). This acoustic signal will be present throughout the Manual Teach Procedure. On the playpad is showing a “TOP” blinking message.
3) – Press again simultaneously the UP and DOWN button of the Inspection BOX 3 times to record inside ELGO the highest point of the Shaft. This point will be the reference point for Top limits (Top limit switch, Top inspection limit, TOP ETSL control, etc.).The ELGO device gives a long acoustic feedback to confirm the Top limit data has been recorded.
On the playpad is showing a “Floor n” blinking message (n is the floor you are going to record).
4) – Move the Cabin up to the highest floor.
Press simultaneously the UP and DOWN buttons of the Inspection BOX 3 times to record inside the ELGO the floor position.
The ELGO device gives a short acoustic feedback to confirm the floor data has been recorded.
On the playpad is showing a “Floor n-1” blinking message (n-1 is the next floor you are going to record).
5) – Move the Cabin Downward until the next floor.Press simultaneously the UP and DOWN button of the Inspection BOX 3 times to record inside the ELGO the floor position.
The ELGO device gives a short acoustic feedback to confirm the floor data has been recorded.
6) – Repeat the previous point until the lowest floor is reached.
7) – After recording of the Bottom floor position on the playpad is showing a “BOTTOM” blinking message, move the Cabin to the lowest point of the shaft (cabin on the buffers).
Press simultaneously the UP and DOWN button of the Inspection BOX 3 times to record inside ELGO the lowest position. This point is the origin of Magnetic band (0 mm showed) and will be the reference point for Bottom limits (Bottom limit switch, Bottom inspection limit, Bottom ETSL control, etc.).
ELGO device gives a long acoustic feedback to confirm the record of data.
In this moment controller automatically records:
• Position of acquired floors;
• Door zone position, used by the controller to enable door contacts bypass (pre opening / re levelling).
• Deceleration distance, according to the lift speed.
On the playpad is showing a “/\” blinking message: Move the lift up to the bottom floor position. The Controller will put the ELGO in Normal Mode. (not possible before because the ELGO would be on the limits opening OC and locking the cabin).On the playpad is showing a “WAIT” blinking message for 10 seconds, wait until will be showed Floor 0.
The ELGO device stops the acoustic beep and led MODE starts blinking (1 blink per second).
Now the ELGO Device is operative for safety contacts:
• Electronic Safety Gear (if present)
• Electronic OSG.
• Final limit switches.
• Inspection limit switches are not yet managed because the lift is in Temporary mode.
Before the normal operation mode, it is mandatory to execute an automatic Shaft learning to set the correct Stopping distances in Upward and Downward direction for each floor.
Automatic Learning Procedure (ELGO LIMAX33-CP)
9) – The elevator must be in Temporary operation. Put the elevator on the bottom floor with half of maximum Load.
10) – Go into <Positioning> and set the Autosetting parameter to “Yes”.
Turn the Inspection Selector to Normal
The lift starts to move automatically:
• Upward trips with deceleration and stop at each floor.
• Downward trips with deceleration and stops at each floor.
When the Cabin comes back to the lowest floor the system is ready to pass in to Normal service.
After automatic learning procedure in <Positioning>, Monitor Encoder you can to set:
• Deceleration distances in Normal service for deceleration confort
– R1S (Pag. 3) upward deceleration distance
– R1D (Pag. 2) downward deceleration distance
These values are automatically set after automatic learning according the lift’s speed (see lift speed and deceleration distance).
• Stop distances in Shaft’s Inspection
– I_LIM_S upward stop distance before top floor position
– I_LIM_D downward stop distance before bottom floor position
In Reduced Head/Pit these values must be considered according the Pre-Triggered safety system.
• Stop distances in Normal service
– N_LIM_S upward stop distance after top floor position
– N_LIM_D downward stop distance after bottom floor position
These values are automatically set after automatic learning at a distance equal to 30 mm from extreme floors (in case of less distance from reference points it is considered the middle point between extreme floor and extreme reference positions).
• ELGO+eSGC pre-Trigger position
– TRIPS distance from top Reference position where eSGC electric command force the cabin to stop (only for Reduced Head lift).
– TRIPD distance from bottom Reference position where eSGC electric command force the cabin to stop (only for Reduced Pit installation)
These values are Read Only values and are greater than 0 mm only if ELGO is part of the Safety pre.-Triggered system (togheter with electric Safety Gear / Overspeed Governor).
DMG Encoder or Motor Encoder: Automatic Learning Procedure of floors
After the installation and during the TEMPORARY OPERATION mode, the controller performs a number of upward/downward test runs (high speed first, then low speed with stops at floors) with the purpose of learning the exact floor positioning.
Self Learning Procedure:
1) – Make sure the installation is in the “Temporary operation” mode
2) – Make sure that the encoder traces the correct direction of run, (increasing distance when upward, decreasing distance when downward); if necessary, in the “positioning” menu set parameter Positioning system from clockwise to counterclockwise (or vice versa) and save the new setting.

3) – Check the correct reading of ZP (door zone) input (ZP LED on the PLAYPAD module must be lit up when in door zone)
4) – Check the correct reading of AGB/AGH (deceleration limit switches) inputs (AGB/AGH must be open when in deceleration limit positions)
5) – Make sure the cabin is at the bottom floor (AGB open, ZP LED on)
6) – Enter the “Positioning” menu, select the Auto setting parameter and enter:
• On the DMG encoder: the encoder resolution (64 or 100 pulse number according to the encoder model), then the length of floor magnets. (Door Zone length). Confirm the total number of floor, then press “Yes” to start the procedure.
• On the motor encoder: the encoder resolution, the motor ratio, the traction pulley, and the roping. Confirm the total number of floor, then press “Yes” to start the procedure.
7) – Set the inspection panel selector on NORMAL (if present), otherwise make sure that the safety chain is closed.
The system performs the following automatic procedure:
• Moving up, until the signal ZP of the bottom floor is deactivated
• Moving down, until the signal ZP of the bottom floor is activated
• Moving up at high speed and position detection for each floor (bottom edge of door zone magnets); the exact position of the bottom edge of the magnet is stored in the controller memory.
• When reaching the top deceleration point (AGH) the system switches to low speed and when reaching the top floor door zone (ZP) it stops.
• Moving down at high speed and position detection for each floor (top edge of door zone magnets); the exact position of the top edge of the magnet is stored into the controller memory.
• When reaching the bottom deceleration point (AGB) the system swithes to low speed and when reaching the bottom floor door zone (ZP) it stops.
• Moving up slowing down and stoping at each floor (at ZP magnet level)
• Moving down slowing down and stoping at each floor (at ZP magnet level)
After the second set of runs (which ends at the lowest floor), the installation is ready to go into SERVICE mode.
At the end of the procedure, go to menu <Positioning> Monitor Encoder and check that the distances of AGB and AGH (4/5) are fine for your installation (compare distances shown on diagrams provided). It is always possible to set R1D (2/5) and R1S (3/5) slow down distances to improve deceleration comfort without changing the limit switches position and without repeating the self learning procedure.
NOTE: the self learning procedure must be performed every time either AGB/AGH limit switches and/or door zone magnets are moved from their original position.
After automatic learning procedure in <Positioning>, Monitor Encoder check if AGB/AGH distances are enough for the lift speed. Is it possible to increase/decrease deceleration distances in Normal service R1S and R1D without needed to repeat Automatic learning Procedure.
For AGB/AGH positions and Deceleration distances use table according the lift’s speed.
In systems where the minimum required dimensions in the top and bottom of the shaft are guaranteed according to the requirements of the regulation EN 81, it is possible use two parameters to stop the lift in Inspection.
In <Positioning>, Monitor Encoder
• I_LIM_S upward stop distance before top floor position
• I_LIM_D downward stop distance before bottom floor position
These stopping distances are valid for Inspection from the Shaft (are not active in case of Inspection from Machine Room) and can be used to avoid the risk of the technician being trapped inside the elevator shaft.
Mind that these stop positions are not safety contacts.
Self Learning Procedure:
1) – Make sure the installation is in the “Temporary operation” mode
2) – Make sure that the encoder traces the correct direction of run, (increasing distance when upward, decreasing distance when downward); if necessary, in the “positioning” menu set parameter Positioning system from clockwise to counterclockwise (or vice versa) and save the new setting.
3) – Check the correct reading of ZP (door zone) input (ZP LED on the PLAYPAD module must be lit up when in door zone)
4) – Check the correct reading of AGB/AGH (deceleration limit switches) inputs (AGB/AGH must be open when in deceleration limit positions)
5) – Make sure the cabin is at the bottom floor (AGB open, ZP LED on)
6) – Enter the “Positioning” menu, select the Auto setting parameter and enter:
• On the DMG encoder: the encoder resolution (64 or 100 pulse number according to the encoder model), then the length of floor magnets. (Door Zone length). Confirm the total number of floor, then press “Yes” to start the procedure.
• On the motor encoder: the encoder resolution, the motor ratio, the traction pulley, and the roping. Confirm the total number of floor, then press “Yes” to start the procedure.
7) – Set the inspection panel selector on NORMAL (if present), otherwise make sure that the safety chain is closed.
The system performs the following automatic procedure:
• Moving up, until the signal ZP of the bottom floor is deactivated
• Moving down, until the signal ZP of the bottom floor is activated
• Moving up at high speed and position detection for each floor (bottom edge of door zone magnets); the exact position of the bottom edge of the magnet is stored in the controller memory.
• When reaching the top deceleration point (AGH) the system switches to low speed and when reaching the top floor door zone (ZP) it stops.
• Moving down at high speed and position detection for each floor (top edge of door zone magnets); the exact position of the top edge of the magnet is stored into the controller memory.
• When reaching the bottom deceleration point (AGB) the system swithes to low speed and when reaching the bottom floor door zone (ZP) it stops.
• Moving up slowing down and stoping at each floor (at ZP magnet level)
• Moving down slowing down and stoping at each floor (at ZP magnet level)
After the second set of runs (which ends at the lowest floor), the installation is ready to go into SERVICE mode.
At the end of the procedure, go to menu <Positioning> Monitor Encoder and check that the distances of AGB and AGH (4/5) are fine for your installation (compare distances shown on diagrams provided). It is always possible to set R1D (2/5) and R1S (3/5) slow down distances to improve deceleration comfort without changing the limit switches position and without repeating the self learning procedure.
NOTE: the self learning procedure must be performed every time either AGB/AGH limit switches and/or door zone magnets are moved from their original position.
After automatic learning procedure in <Positioning>, Monitor Encoder check if AGB/AGH distances are enough for the lift speed. Is it possible to increase/decrease deceleration distances in Normal service R1S and R1D without needed to repeat Automatic learning Procedure.
For AGB/AGH positions and Deceleration distances use table according the lift’s speed.
In systems where the minimum required dimensions in the top and bottom of the shaft are guaranteed according to the requirements of the regulation EN 81, it is possible use two parameters to stop the lift in Inspection.
In <Positioning>, Monitor Encoder
• I_LIM_S upward stop distance before top floor position
• I_LIM_D downward stop distance before bottom floor position
These stopping distances are valid for Inspection from the Shaft (are not active in case of Inspection from Machine Room) and can be used to avoid the risk of the technician being trapped inside the elevator shaft.
Mind that these stop positions are not safety contacts.
Video Tutorial
How to configure the ELGO positioning system with a controller Pitagora 4.0