Light curtains

(v 1.1)

To check and download all versions of this guide, go at the following link.

Safety and usage cautions

Before installing our products, we recommend you to consult the section about safety and usage cautions at the link below

The control unit should be fixed on the top of the cabin. TX and RX detectors must be jointed to the control unit by the two signal cables that can be connected – without distinction – to both of the two connectors of the control box. Cables should be fastened firmly and properly with the pertinent clips. As their working life depends on their precise mounting itʼs necessary to check if their sliding is properly continuous. Redundant cables could be packaged into loops. Check to keep them away from other cables to avoid possible electromagnetic interferences.

EL light curtains mounting can be either dynamic or static in the lift car doors.

Static Installation: Both TX and RX detectors must be installed firmly so that they do not swing when the cabin is lifting up or down. During the installation make sure that the TX and RX detectors are as much as possible parallel and aligned within each other while accepting a significant misaligning. Make sure also that no projecting object or no swinging element obstructs the beams even temporarily. Should you install the barrier in the sunlight (panoramic plants) itʼs better to fix the RX on the side that is less exposed to sunshine.

Dynamic Installation: First of all itʼs necessary to check the right sliding of the cabin doors and adjust them so as to obtain a continuous slipping without wavings or jolts. RX and TX detectors must be perfectly fixed to both the cabin door sides using our fixing kit. Highest accepted misaligning: +/- 20 mm vertically, +/- 3 mm horizontally. Itʼs advisable to install the RX and TX detectors as back as possible in comparison with the edge of the doors. Itʼs preferable to fasten the RX on the side less exposed to the sunshine.

Cables should be fastened firmly and properly with the pertinent clips included in the barrier set. The signal cables have been designed to support a high number of door movements providing that the mounting was correct. Therefore, we advise you to put the cables in movement making sure their sliding is properly continuous as shown in the illustrating diagram.

The manufacturer disclaims all responsibility and do not provide any warranty for damages affecting the cables due – in its final opinion- to a wrong wiring.

LED diagnostic: After installation, check the Led’s on the RX light curtain as indicated:
– Green LED (power) : ON
– Red LED (obstruction) : Normally OFF (switched on in case of obstruction of the rays)

Daily maintenance:
– Keep the external light curtainʼs surface clean, especially keep the light filter plate clean and avoid attaching any sticker that might influence the receiving of the infrared light.
– Check the wiring of the cables, the status of the cable clips, the power cables and the signal cables.
– Do not wash the detectors by water jets and/or solvents. Use a soft and damped cloth to keep the light filter plate cleaned.

Installation

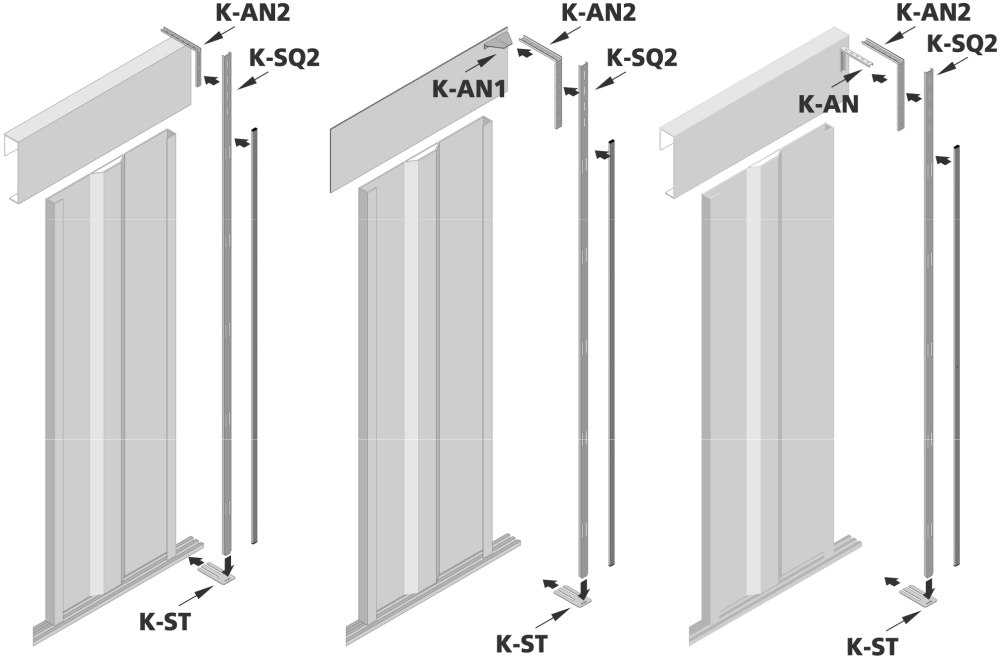
Dimensions and fixing systems


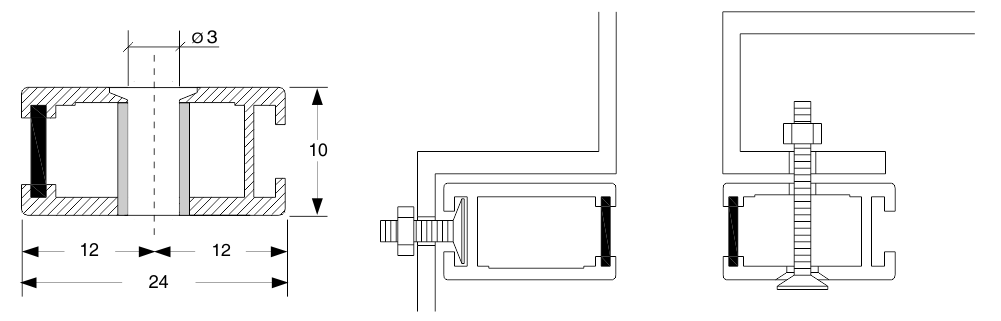
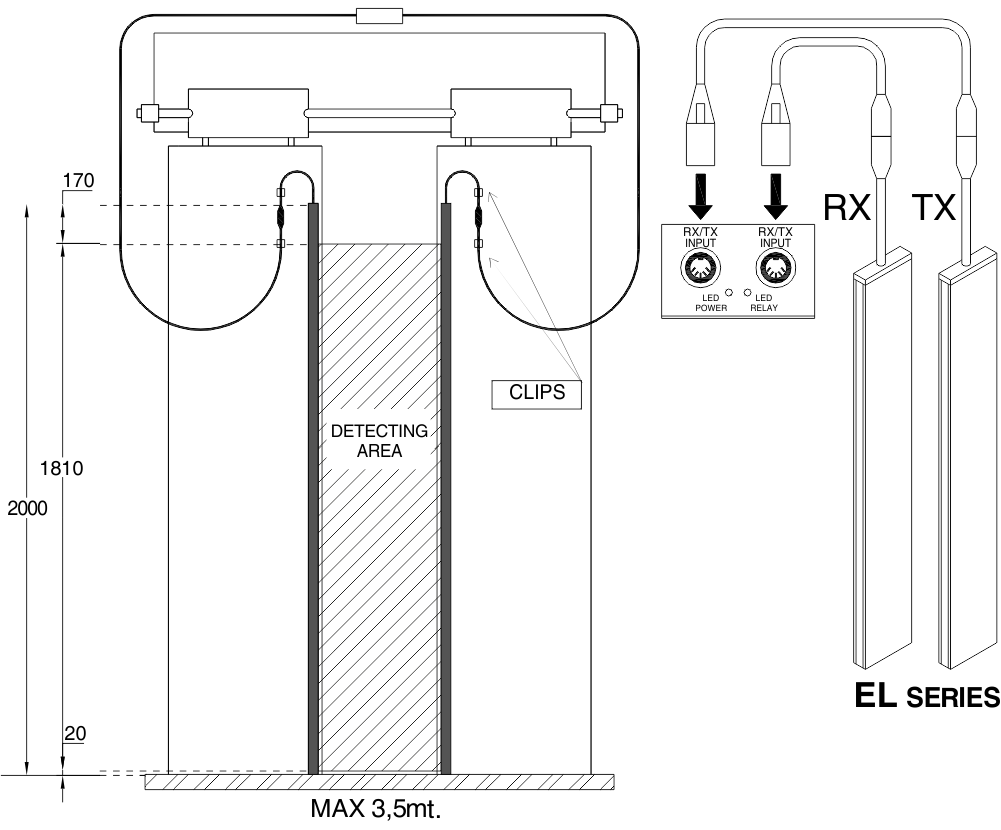
Drilling center distances
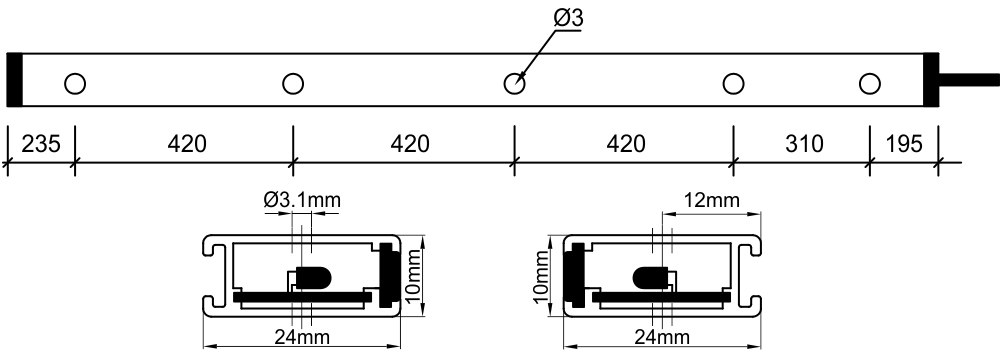
 

Cables fixing mode

Power supply 12/24V – 220V
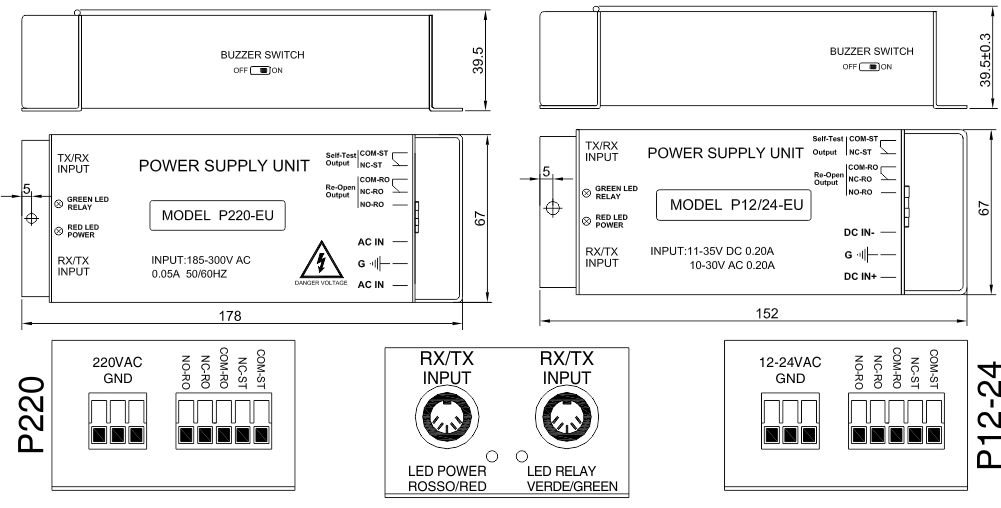
Green relay led:

ON: Normal working – OFF: Obstruction or error

Datasheet

Power supply voltage220A ac (EL194E-01)
11÷35V dc ; 10÷30V ac (EL194E-02)
Number of beams194
Range0 ÷ 3,5 mt.
Degree of protectionIP44
Power consumption≤ 4 W
Operating temperature-20° C ÷ +65°C
OutputCom / N.O. / N.C. Relay contact
Output contact30V DC 2A
125V AC 1A
Optical RayInfrared 900 nm
Approvals2004/108/EC, 2006/95/EC
Dimensions10X24X2000 mm
Control unit dimensions152X68X40 mm OR 179X68X40 mm
Cables’ lenght4 mt.
Response time< 90 ms
Light immunity100000 LUX
Displacement at 0mmVertical: ±20mm; Horizontal: ±3mm
InstallationStatic or Dynamic
Self Test ModePeriodic self-testing.
In case of power failure or self testing faulty, self test output
COM-ST and NC-ST will open.

Download

ReferenceVersionLink
1.1 (current version)Download PDF
(English)
Updated on 12 Ottobre 2021

Was this article helpful?

Related Articles