(v 1.3)
Safety and usage cautions
Before installing our products, we recommend you to consult the section about safety and usage cautions at the link below

Description
The SmartKEY Plus is a call management and control device for elevators.
Additional functions and features compared to the basic SmartKEY:
- Possibility of configuration and key management via Smartphone (iOS, Android) and Web (Fusion Dashboard); therefore, the backup key used with the basic version is not required.
- The control unit can be up to 4m away from the key reader device.
- Possibility of connecting expansions up to 32 inputs / outputs for direct activation of calls or for enabling call buttons.
Parts identification
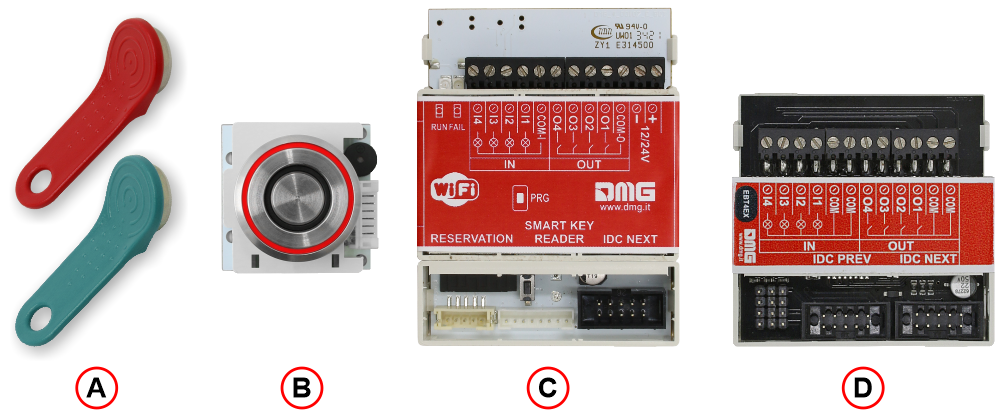 The Smartkey Plus consists of:
A) – Electronic key – The SmartKEY PLUS system allows you to memorize a maximum of 500 electronic keys and to associate 2 types of permissions to them:
MASTER key (red): a maximum of 5 keys generally provided to the condominium administrator.
USER key (green): supplied to lift users.
Each electronic key supports up to 32 associated outputs.
B) – Electronic key reader device – It is equipped with a buzzer for acoustic feedback of contact with the electronic key. See assembly instructions below.
C) – Electronic control unit – All information (identification and functionality) relating to the electronic keys associated with it are stored here.
It has a WiFi interface for local connectivity with Smartphone; it is used for programming, configuration and management of electronic keys and related parameters associated with them. It can manage up to 4 floors.
D) – Expansion module – For adding 4 more floors in addition to those managed by the control unit; a maximum of 7 expansion modules can be connected for a total of 32 floors (4 + 28).
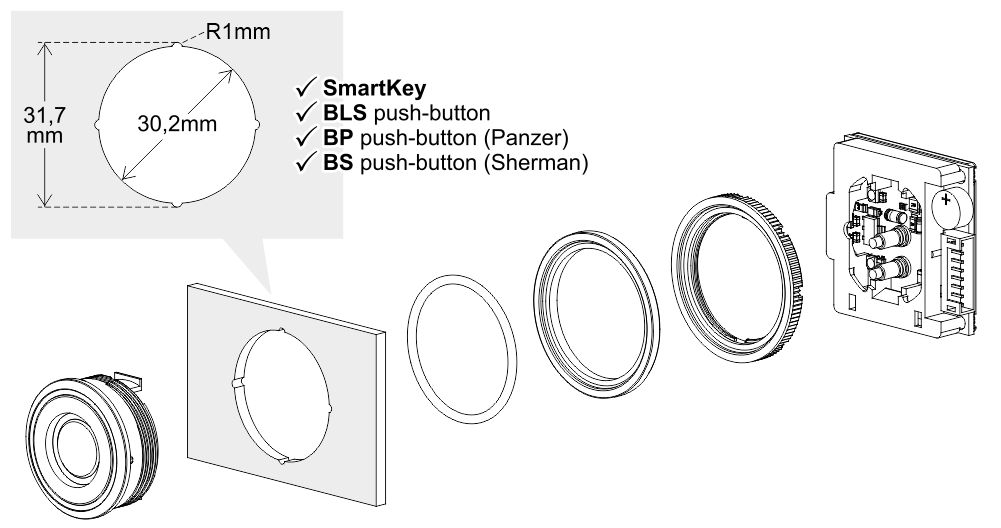
Cut-out for: BM Macro push-button (Ø 32mm)
B) Since there is no anti-rotation, position the electronic key reader device as shown in the rear view.
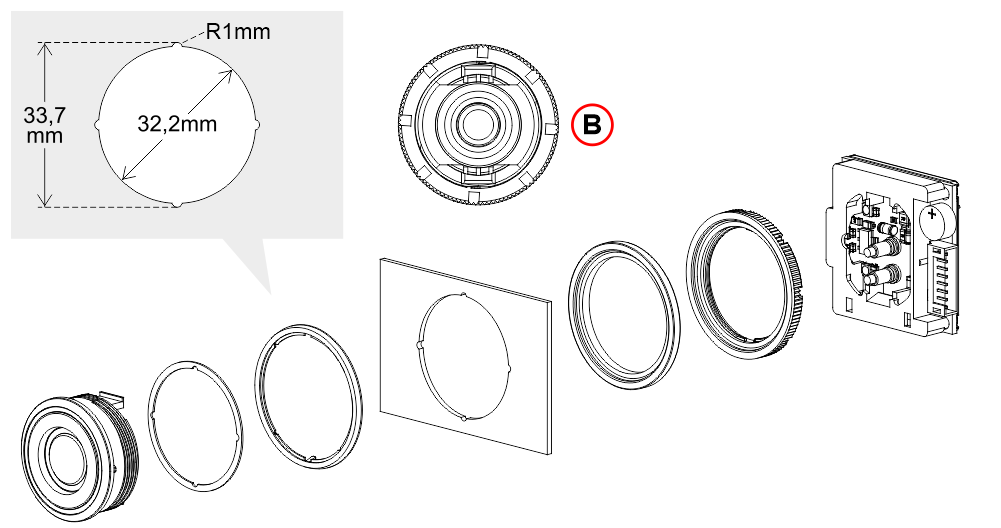
Cut-out for: BM Macro push-button (Ø 35mm)
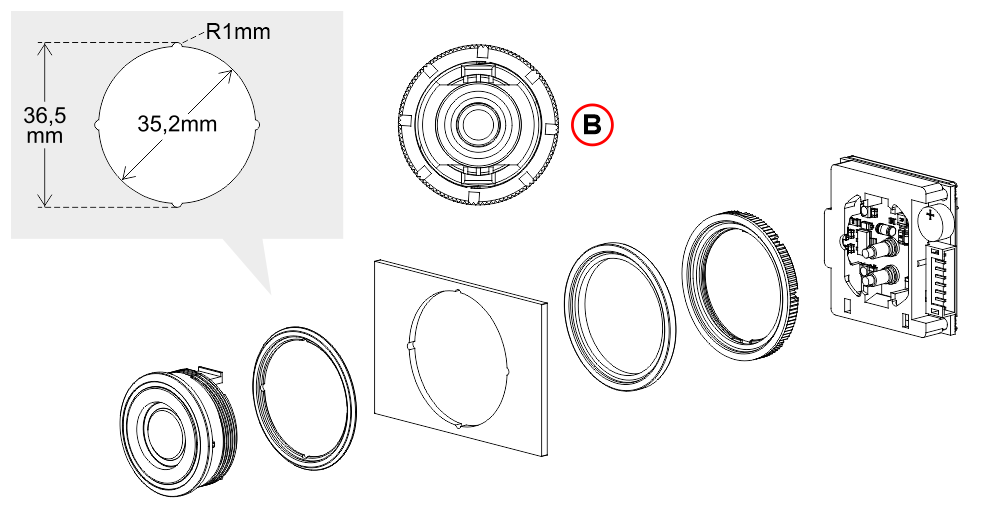 B) Since there is no anti-rotation, position the electronic key reader device as shown in the rear view.
Principle of operation
The SmartKEY PLUS system can be programmed to work in two different modes:
1) – “Astable” mode (default).
This mode provides two types of operation depending on the connection of the electronic control unit (C) with the call buttons.
- 1a) – Button enabling – When the user electronic key (A) is placed on the reader device (B), the contact remains closed for 5 seconds; during this time it is possible to press the call button.
- 1b) – Direct call – When the user electronic key (A) is placed on the reader device (B), the contact closes and the call to the programmed floor starts.
2) – “Man present” mode.
The contact remains closed for as long as the user electronic key (A) rests on the reader device (B).
SmartKEY PLUS system users

Installer
He is able to physically operate on the central unit and activate the first electronic master keys to be provided to the administrator.
He can access the Fusion APP to perform the operations of synchronization, backup, restore or cloning of the key database and can access the “Fusion Dashboard” to perform the operations of modifying the key data and deleting keys.

Condominium administrator
He can access the Fusion APP to perform the operations of synchronization, backup, restore or cloning of the key database and view the activations.
He can access the “Fusion Dashboard” to perform the operations of modifying the key data and deleting keys and view the activations.

End users of the lift
They have the electronic user keys provided to them by the administrator and have no access to the Fusion APP.
Wiring Instructions
Connection of the key reader device with the control unit.
This connection is common to all operating modes.
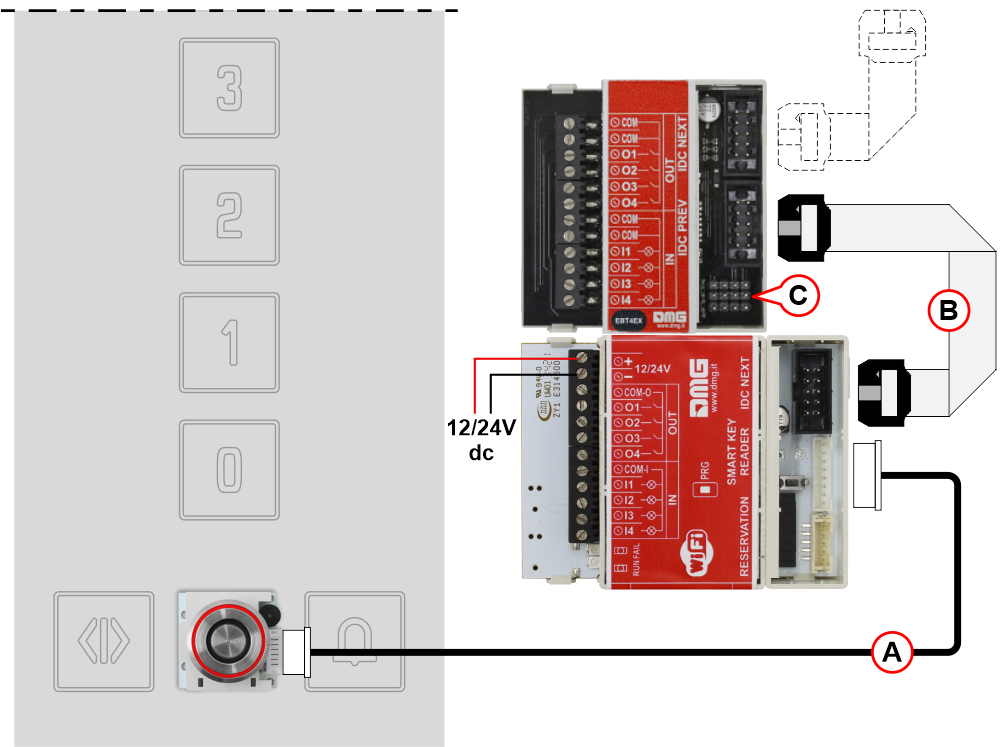
A) – JST cable 1m long to connect the key reader device with the control unit (optional cable length 4m).
B) – IDC cable to connect the the control unit with the expansion board (connect a maximum of 7 total expansions).
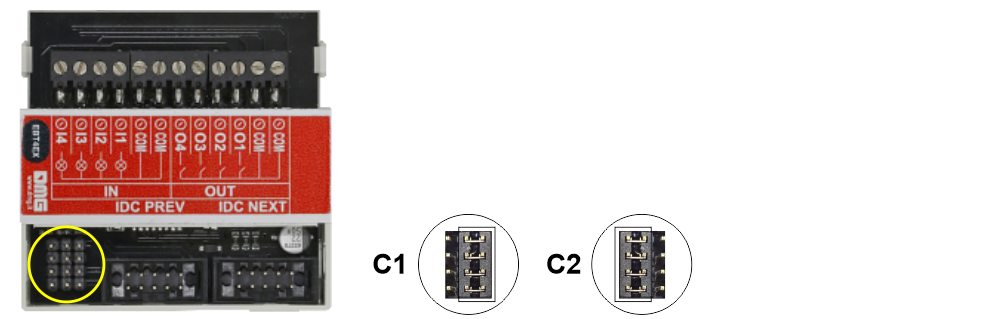 C1) – Continue the expansion module chain
C2) – Closes the expansion module chain
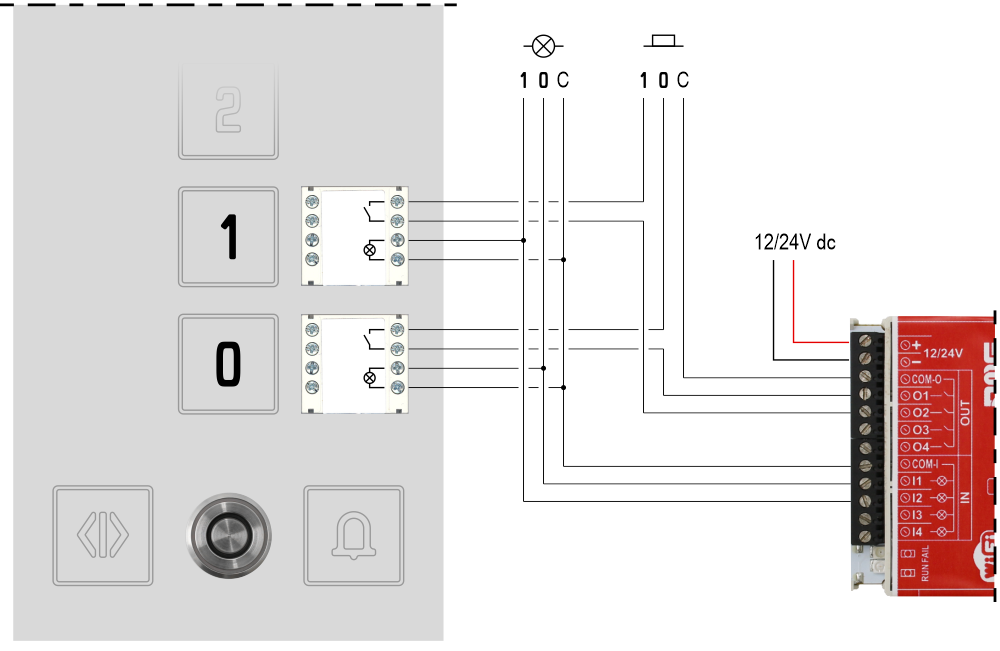
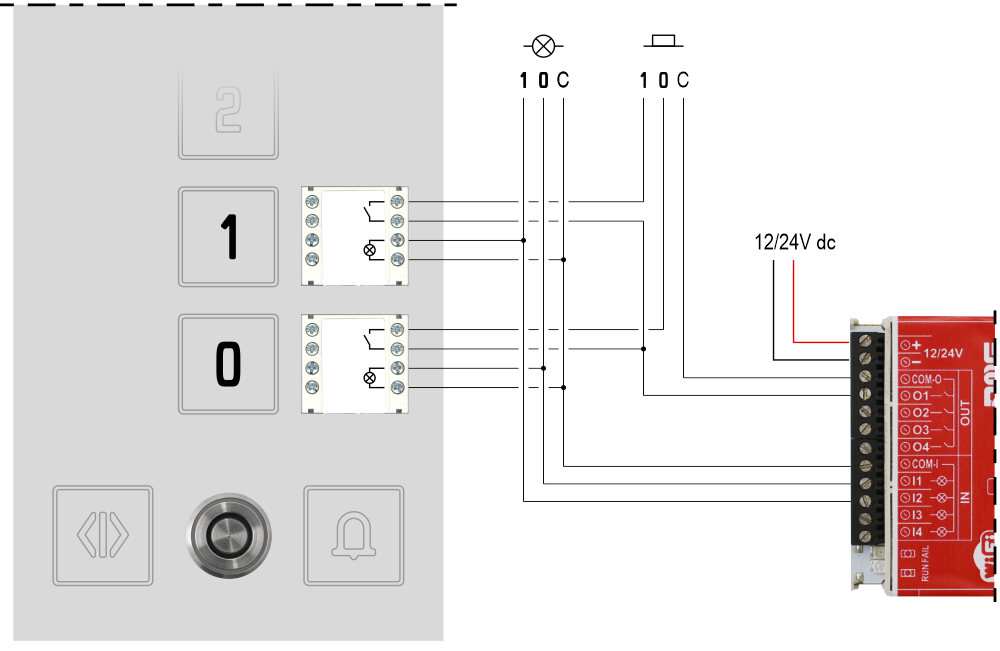
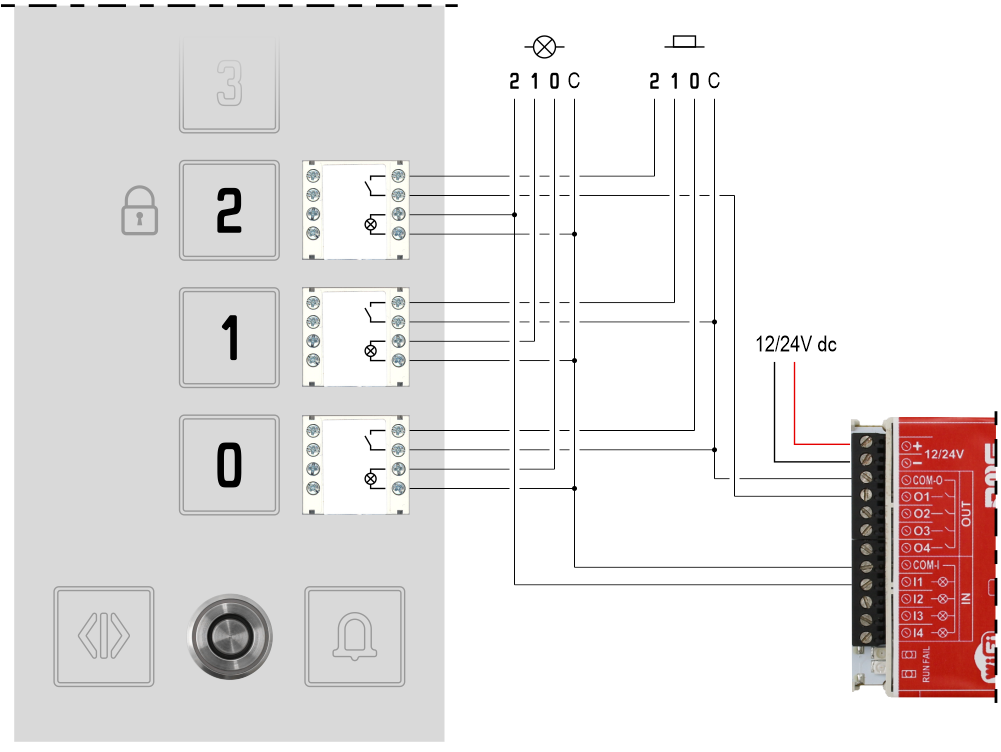
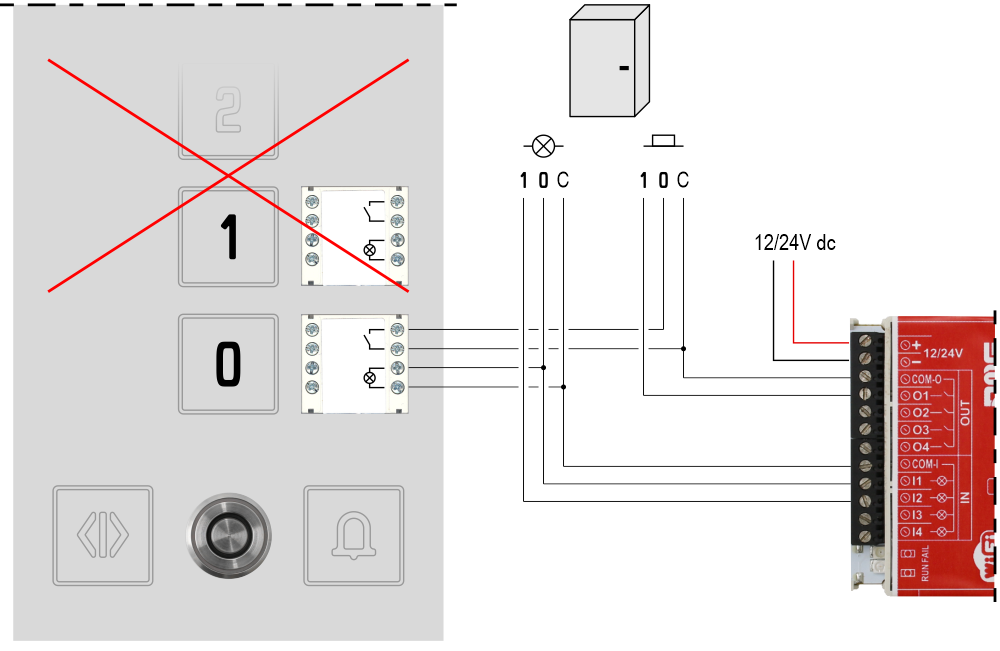
Connection of the electronic control unit with the call buttons

Electronic keys deletion and memorization
Deletion of all the electronic keys stored on the control unit.
It is advisable to reset the memory of the electronic control unit before storing a new set of “Master” and “User” keys.
To activate the reset procedure, press and hold the PRG button for 3 seconds as shown in the video below; it may be necessary to wait a few seconds before receiving the final acoustic feedback that all the electronic keys have been canceled.
Memorization of the MASTER electronic key
The last phase for the installer is the programming of the electronic key MASTER to be supplied to the condominium administrator.
Up to a maximum of 5 electronic key MASTERs can be stored.
Memorization of the USER electronic key
With the electronic key MASTERs provided by the installer, the condominium administrator can now manage all user keys independently.
The total number of electronic keys (MASTER and USER) that can be stored on each electronic control unit is of 500 units.
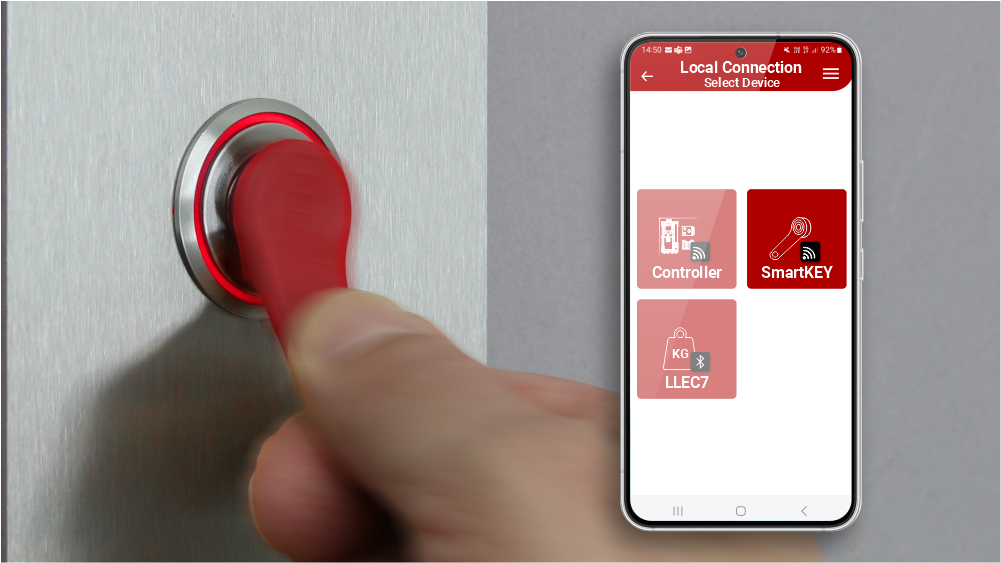
Electronic keys management
The functionalities of the SmartKEY PLUS system are managed through the use of two tools:
Fusion Dashboard is the reference tool for managing the database of all electronic keys and their deletion from the control unit memory.
The key manager (usually the condominium administrator) must initially create an account on the “Fusion Dashboard” to the following link:
https://fusiondashboard.dmg.it/
Then he must register all the control units present in the building; for more details see the section “How to manage the electronic key database via the “Fusion Dashboard”.

The FUSION app is the tool for synchronizing data between the “Fusion Dashboard” and the electronic control unit; the interaction with the control unit takes place locally via WiFi connection. The access data to the WiFi network are indicated ont the label provided (default SSID and password).
With the FUSION app it is possible to modify the parameters of the electronic keys, the creation and restoration of a backup and the cloning of the entire content from one control unit to another.
The use of FUSION app requires having an account with “Fusion Dashboard” (see above) related to the supplier company.
The FUSION app is available for iOS and Android.


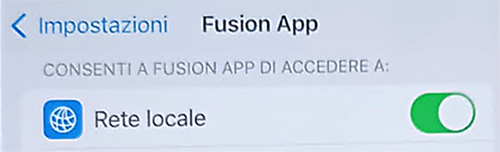 In case of IOS operating systems, it may be necessary to activate the “Local network” option in the phone settings related to the Fusion app.
How to manage the electronic key database via the Fusion Dashboard.
After registering to the “Fusion Dashboard” as mentioned above, log in to access the following screens.
1) – Select “Companies”.
2) – In the list of companies, select the one responsible for managing the devices.
3) – Select the building with the devices to be managed installed. In this screen it is also possible to insert new buildings, delete them or change their name and location.
4) – Here you can register a new device by assigning in order: Type, Name, Description and the Serial number that was provided by D.M.G.
5) – Here you can manage the devices installed in the building, in this case the SmartKEY PLUS system. In addition to deleting the electronic control unit and modifying its data, it is possible to manage both the operators assigned to the device and the database of the keys registered in the control unit.
6) – Here it is possible to assign to the chosen device the operator will be able to manage it. Two levels of access to the device can be associated with the operator: Administrator or Installer.
7) – For each electronic key it is possible to enter the name of the end user and, if one is registered in “Administrator” mode, it is also possible to see the total number of calls made by each condominium.
Datasheet
| Power supply | 12/24V dc |
| IN section | Electronic control unit: 12/24V ac/dc Expansion module: 12/24V ac/dc |
| OUT section | Electronic control unit: 24V 50mA max Expansion module: 24V 50mA max |
| Protections | Cut-out for SmartKey: IP54 Cut-out for BM Macro push-button: IP40 |
Download
| Reference | Version | Link |
|---|---|---|
| 1.0 | Download PDF (English) | |
| Software interface | 1.1 (current version) | Download PDF (English) |
| Fusion app and new cut-out | 1.3 (current version) | Download PDF (English) |