(v 1.1)
Safety and usage cautions
Before installing our products, we recommend you to consult the section about safety and usage cautions at the link below.

Mounting
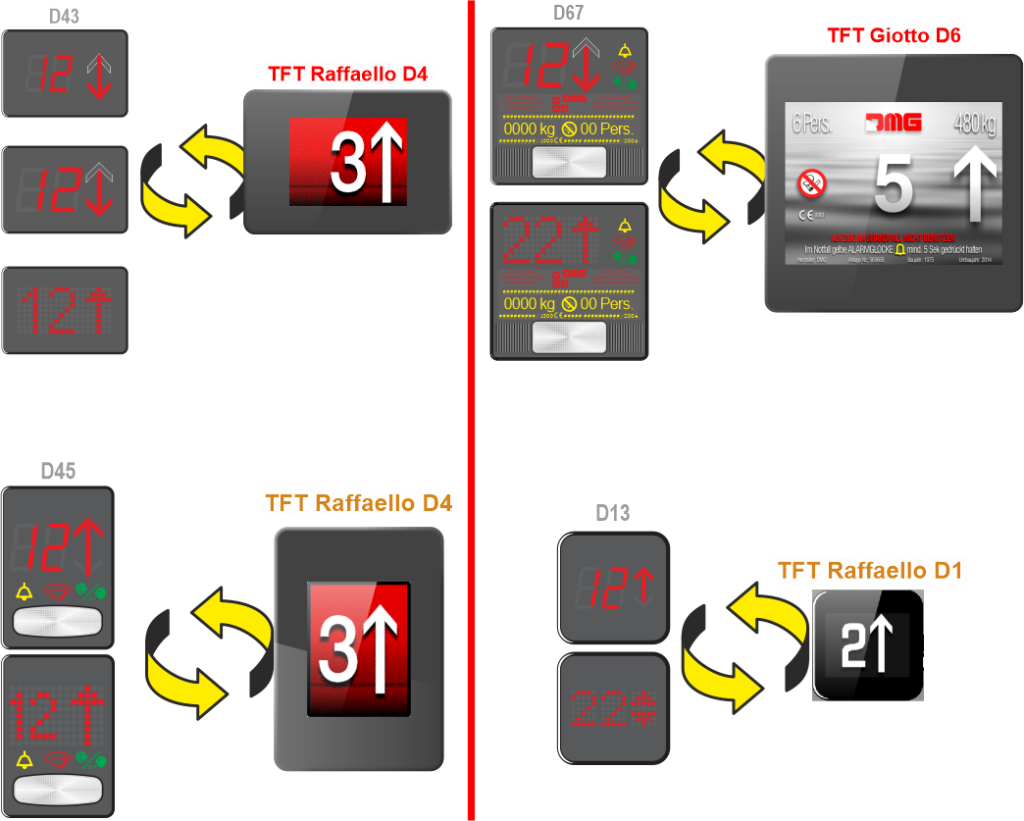
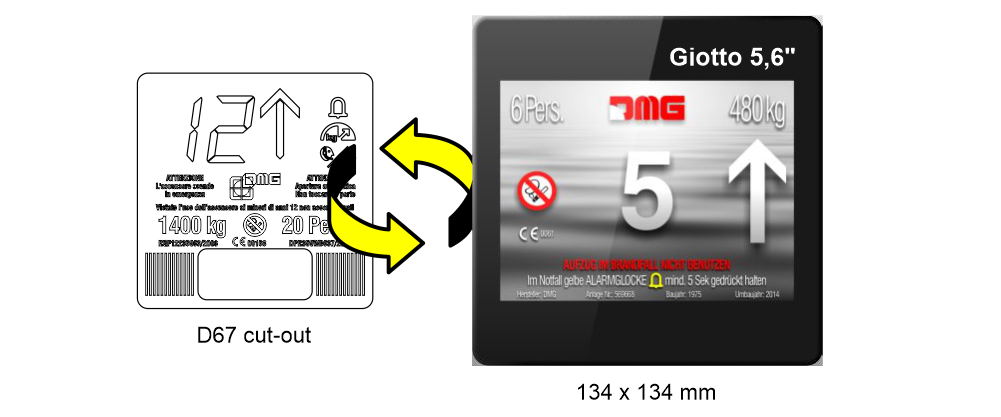
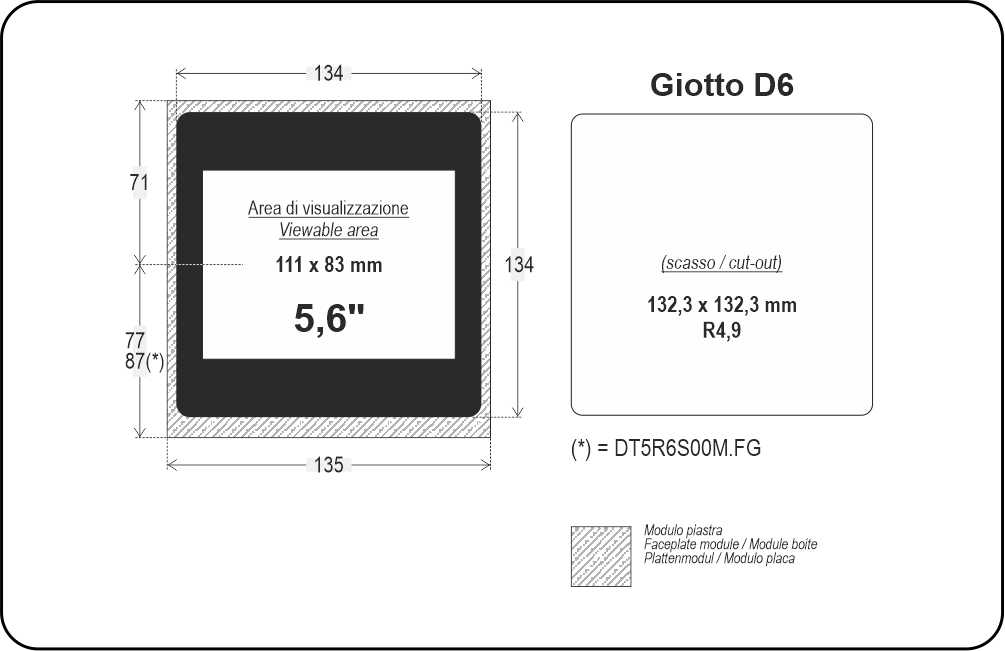
D67 -> Giotto D6
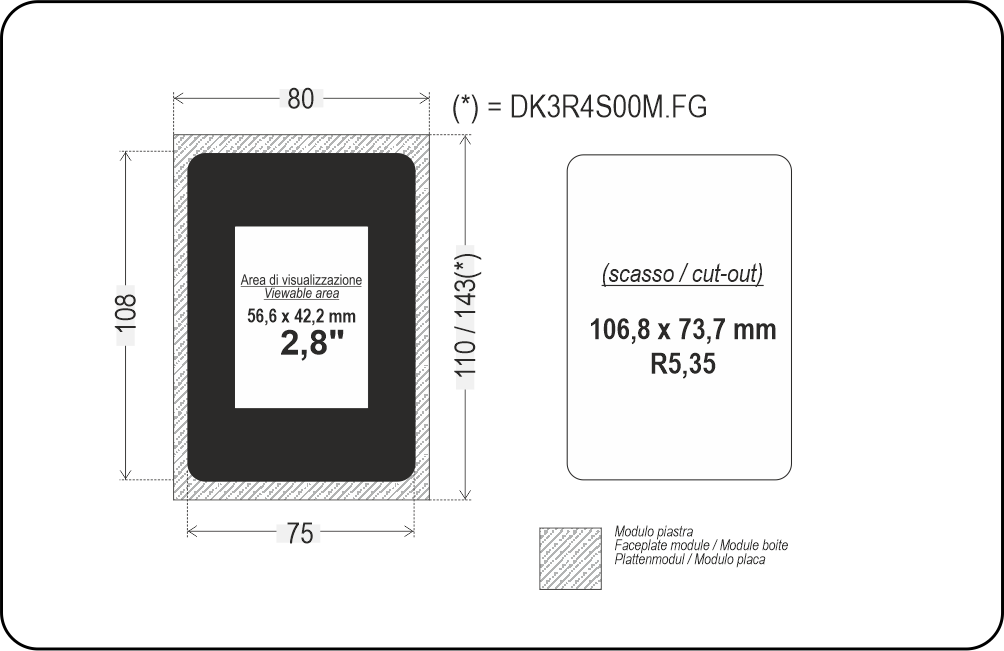
Frontal mounted version for retrofitting, same cut-out of D67 position indicator.
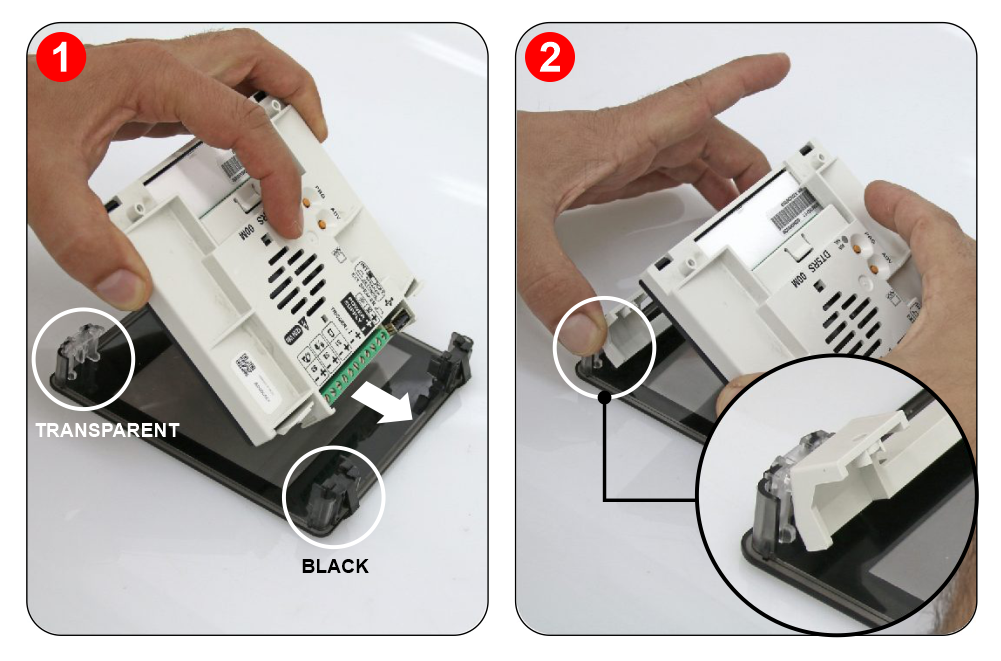
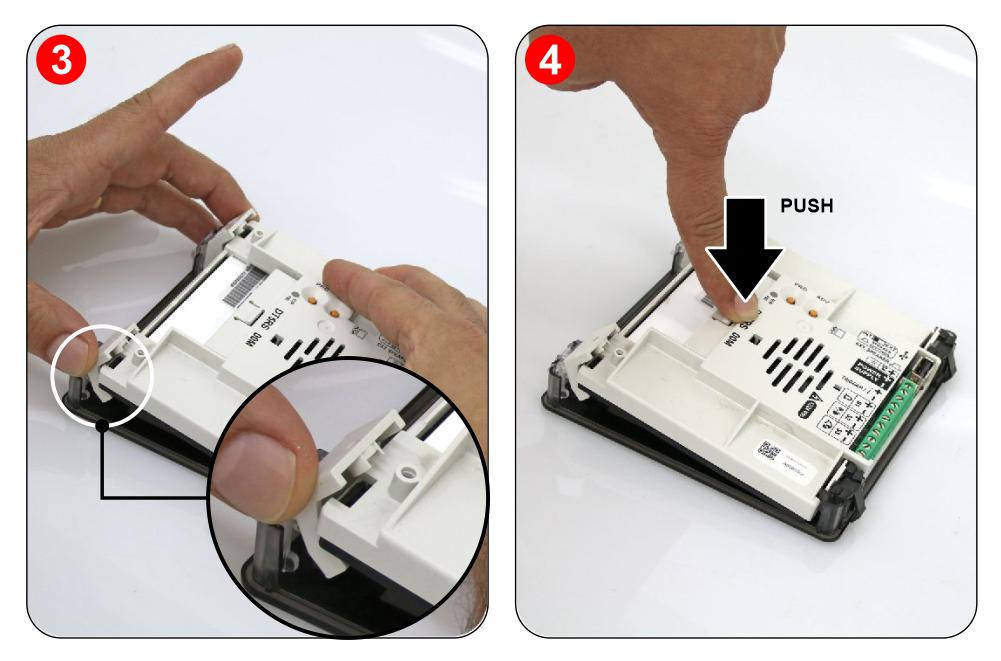
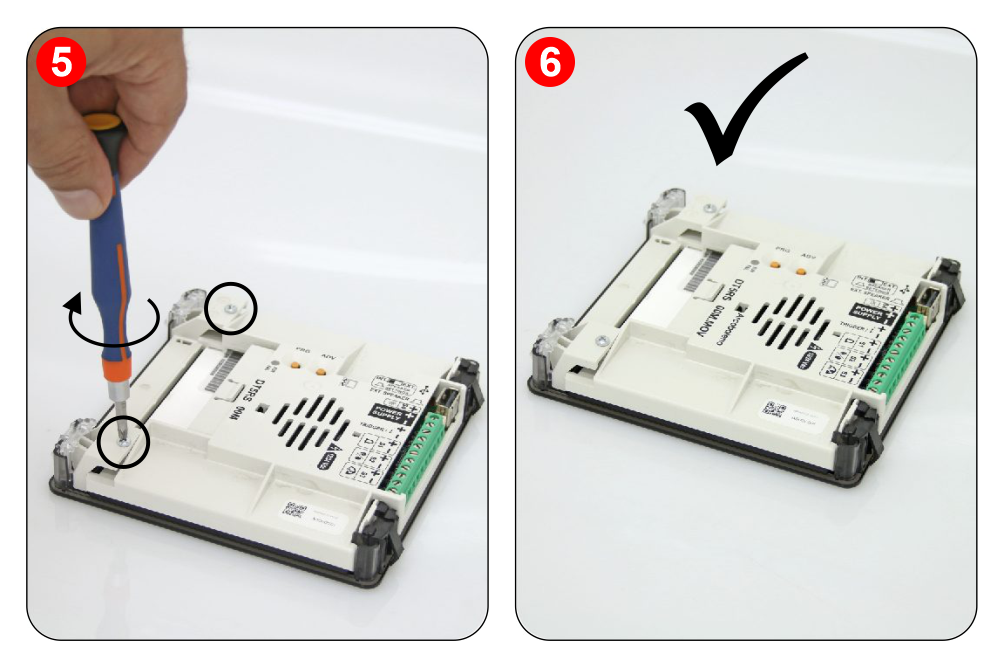
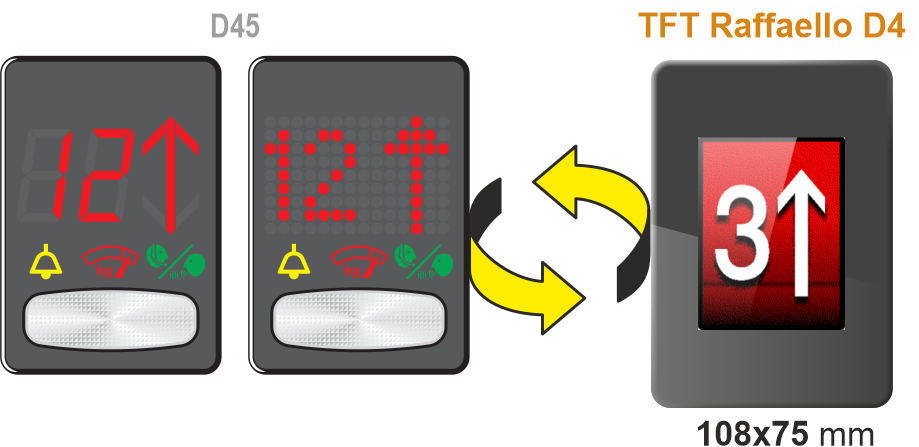
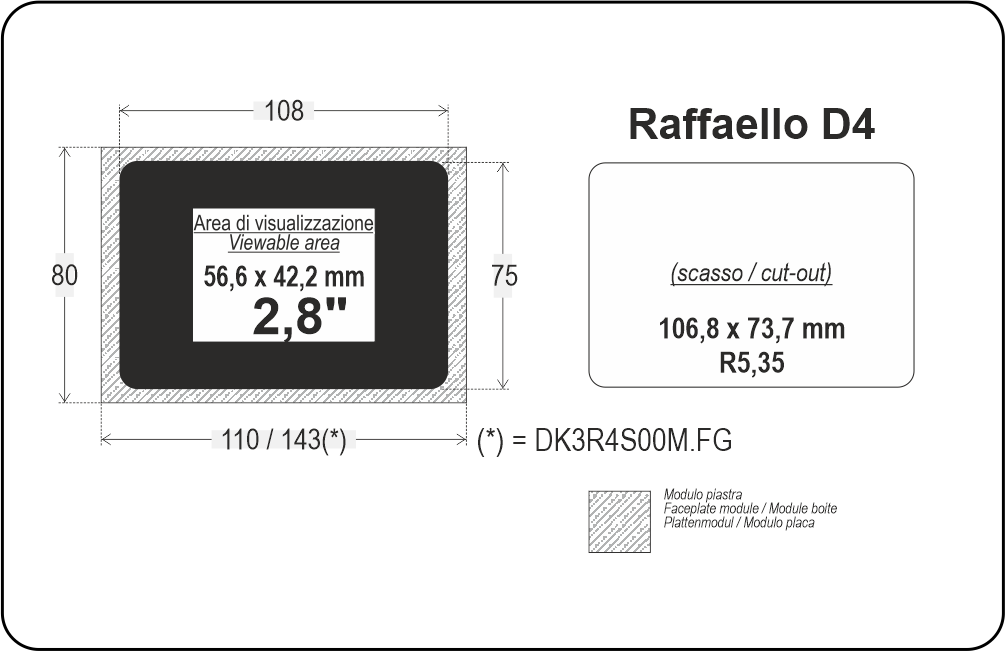
D45 -> Raffaello D4
Frontal mounted version for retrofitting, same cut-out of D45 position indicator.
D43 -> Raffaello D4
Frontal mounted version for retrofitting, same cut-out of D43 position indicator.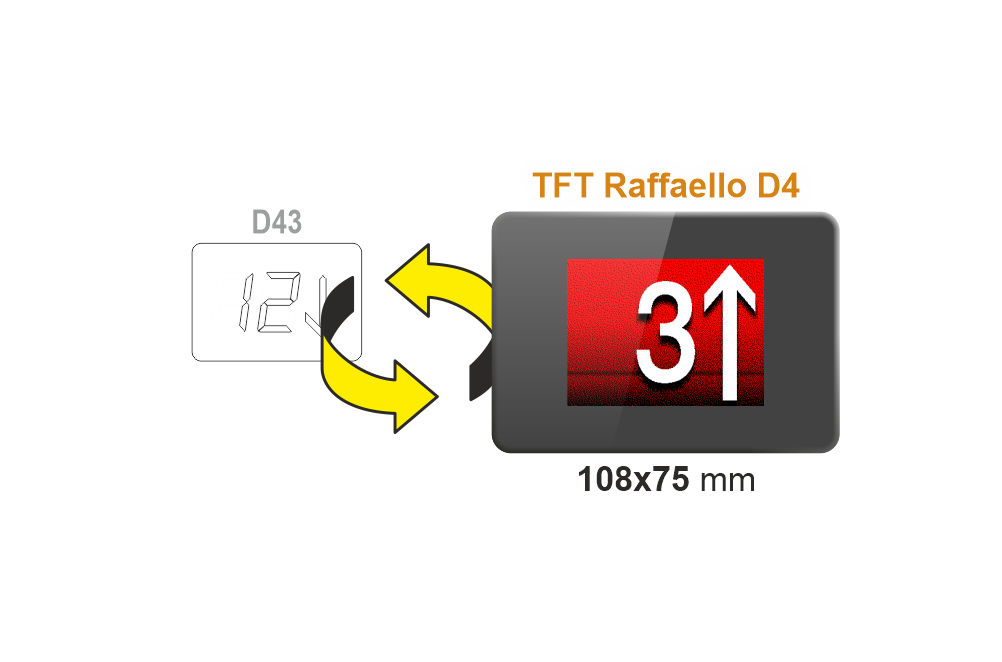
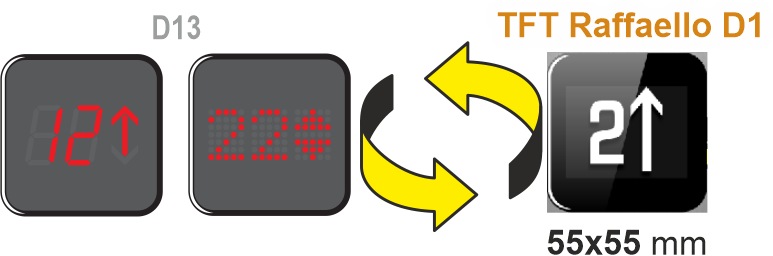
D13 -> Raffaello D1
Frontal mounted version for retrofitting, same cut-out of D13 position indicator.
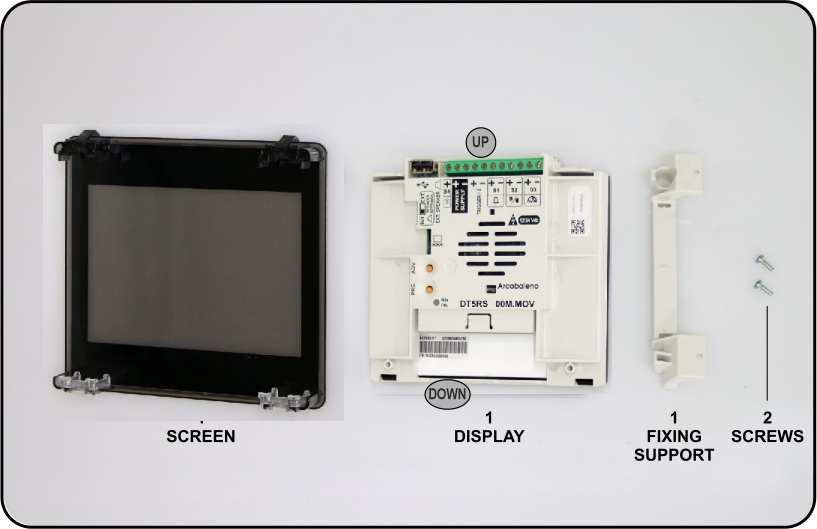
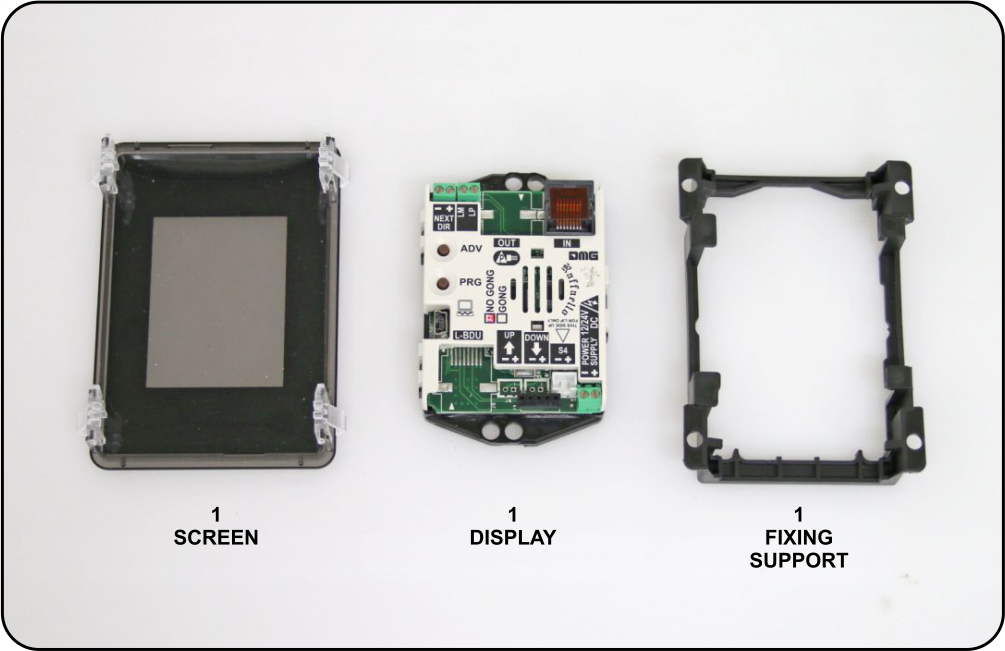
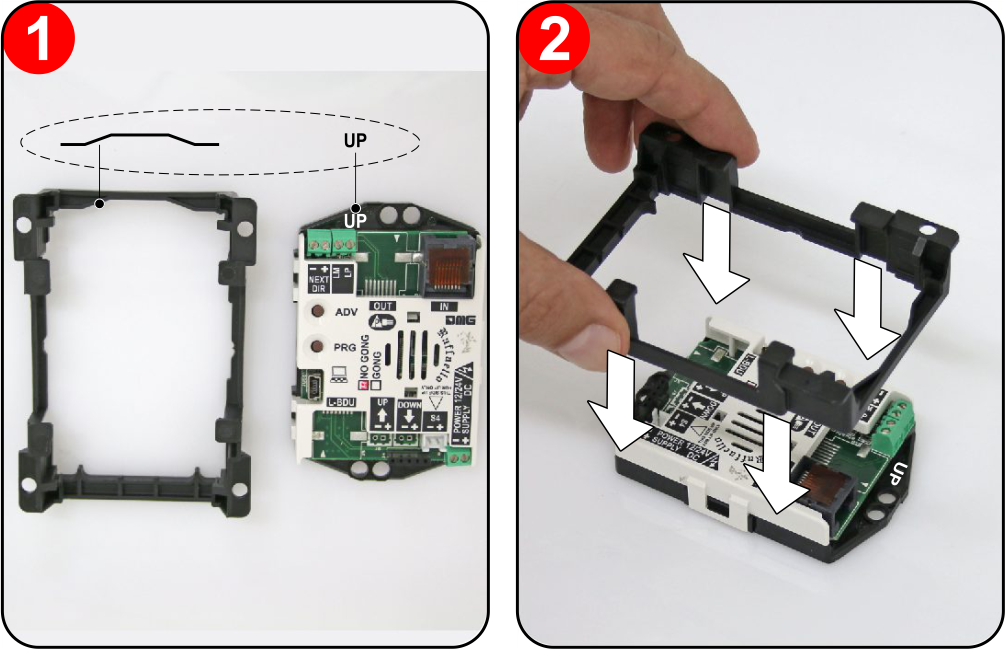
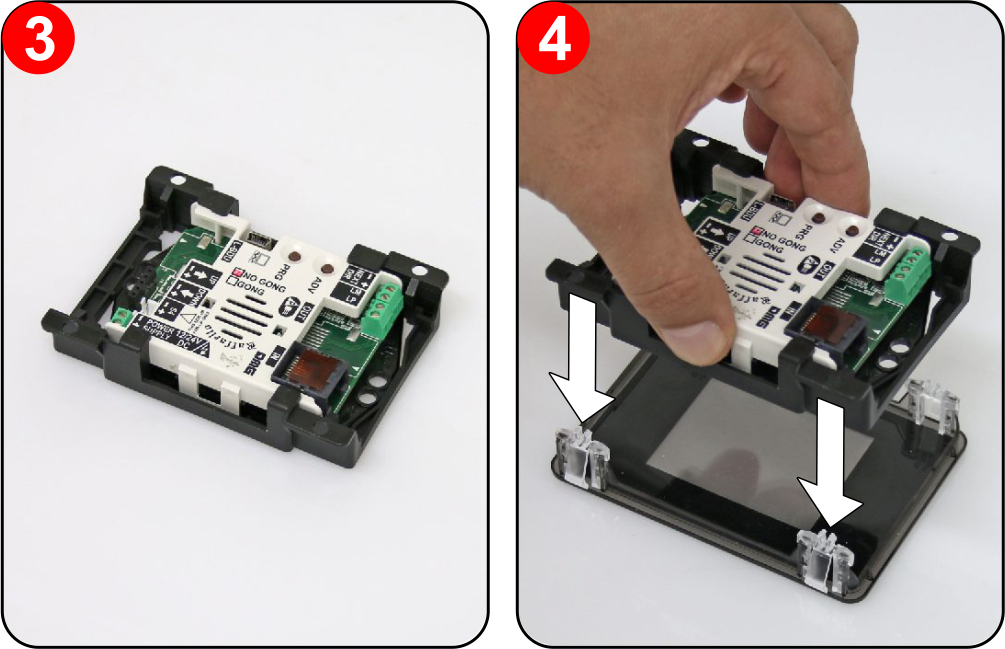
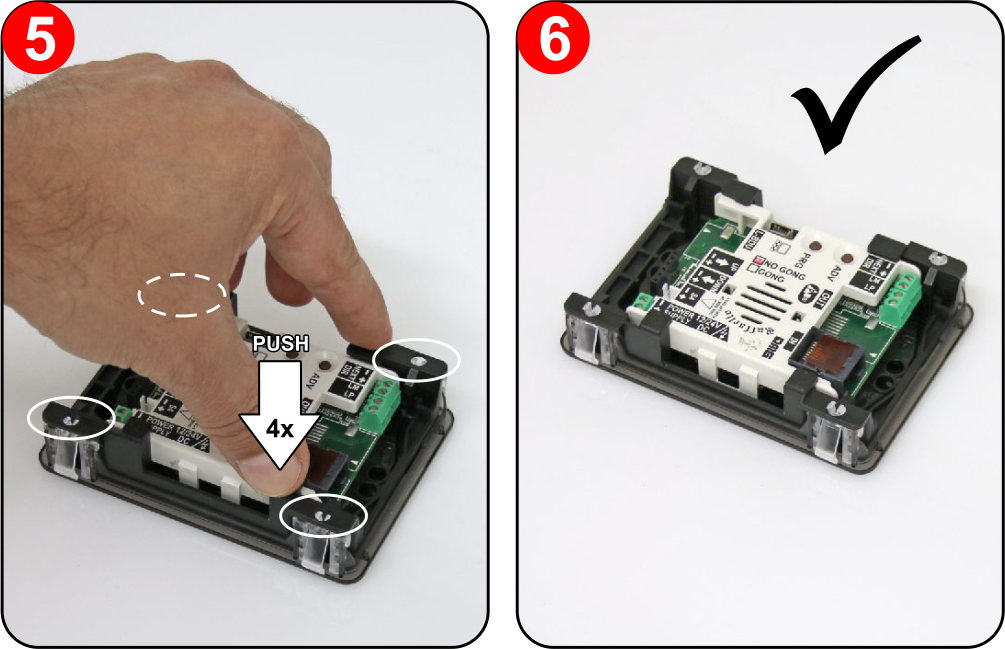
For mounting, click here.
For mounting, click here.
Wiring
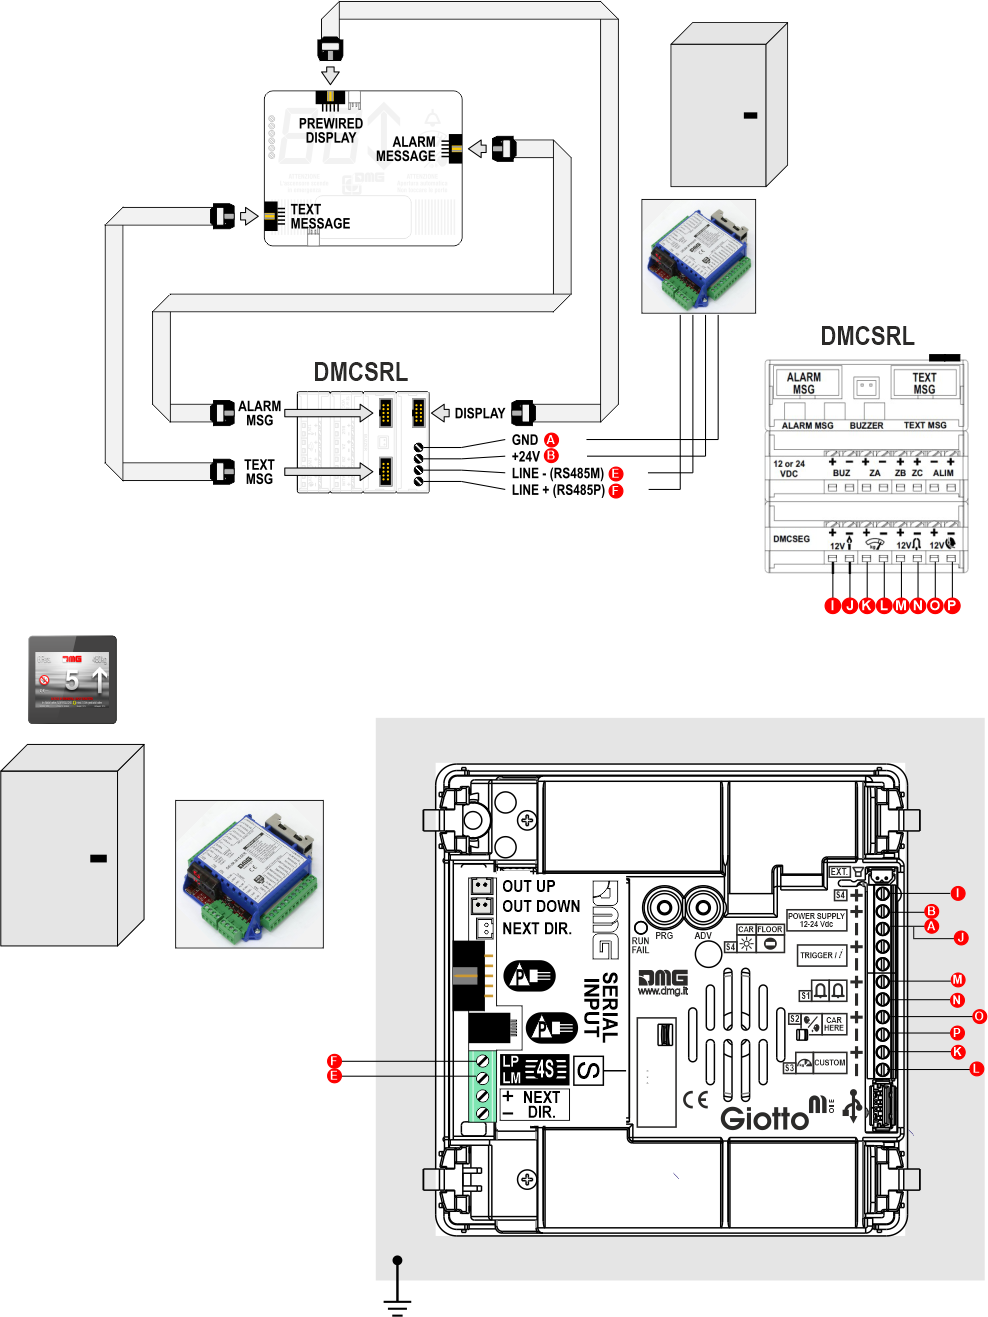
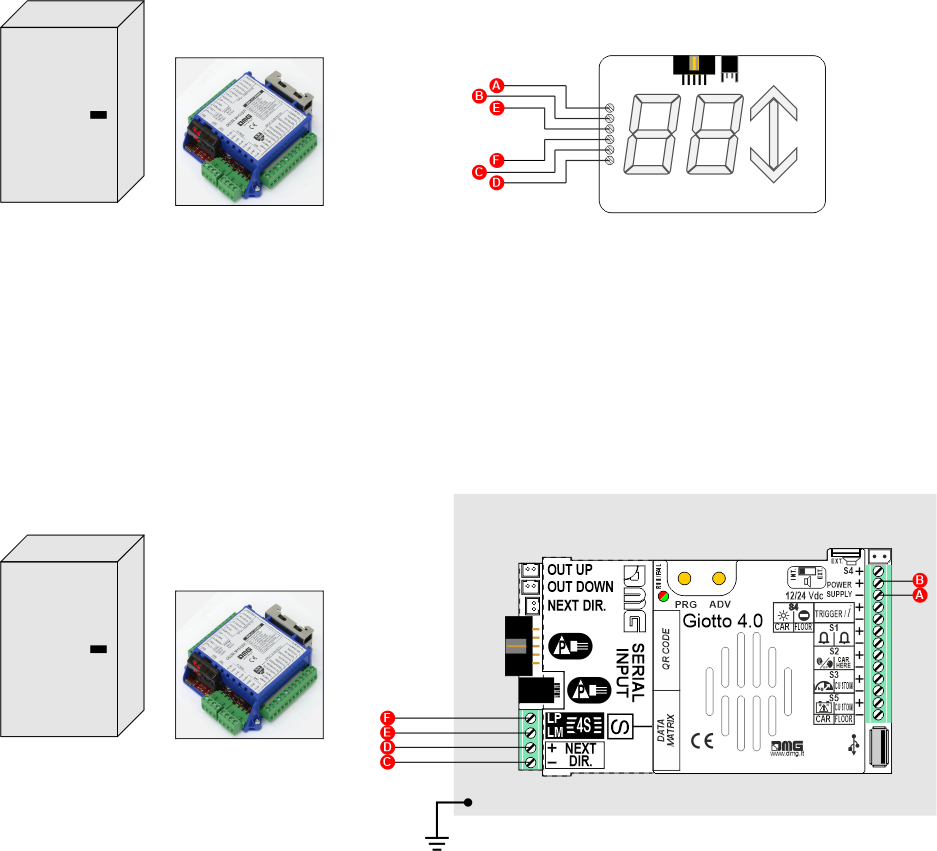
Serial DMG D67 -> Giotto D6
Car
Floor
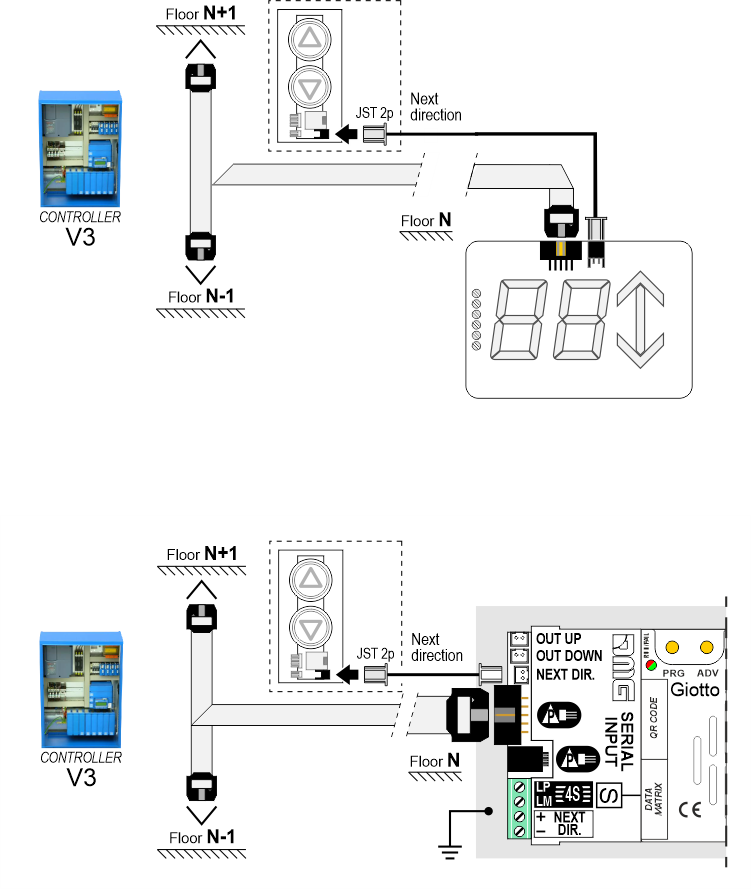
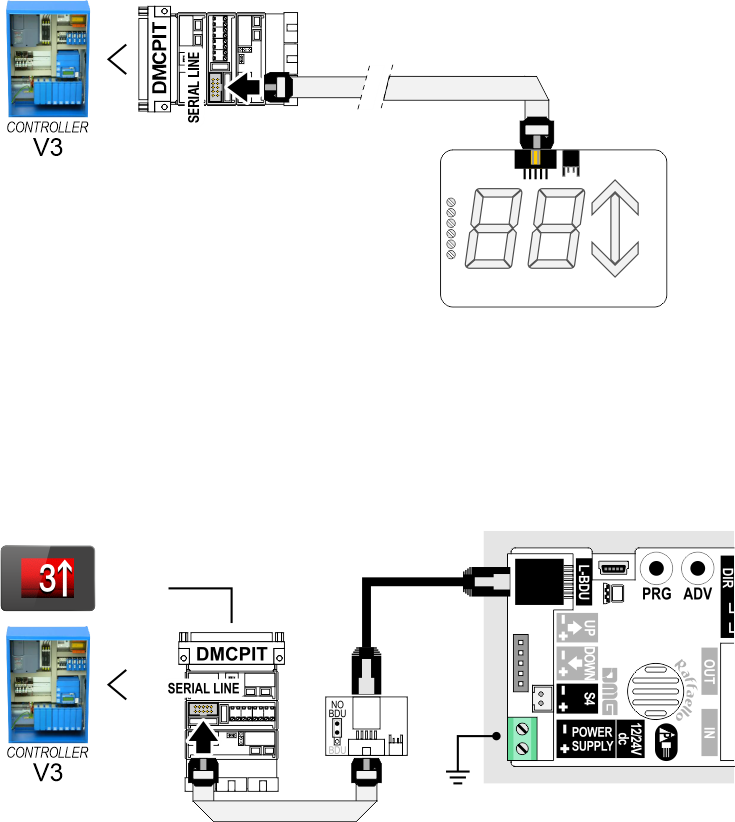
Other Controllers D67 -> Giotto D6
Encoder DEUM
Car
Floor
Floor
1 Wire / Segment
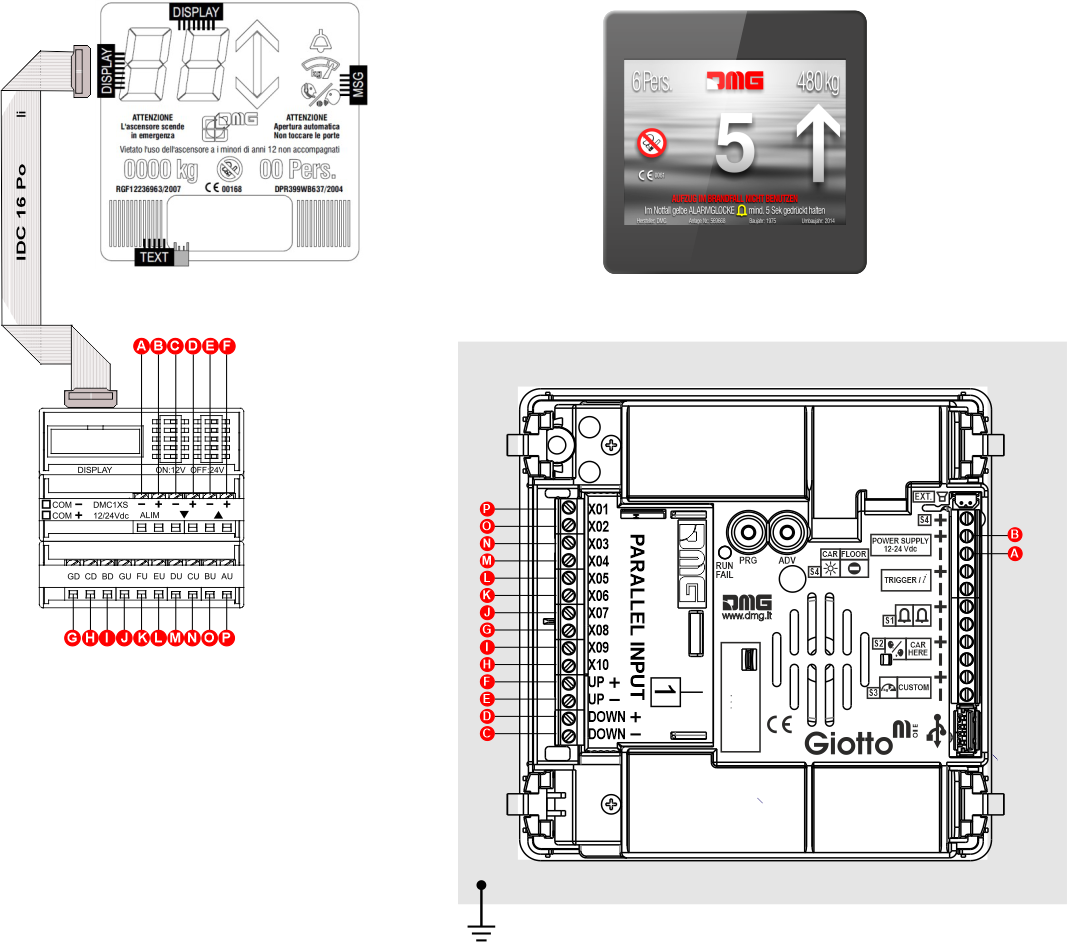


MEA-AUTINOR
GRAY
Signalizations

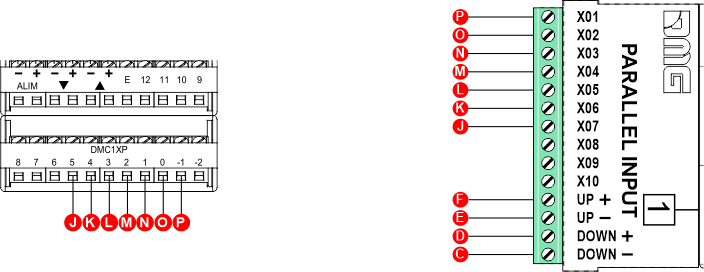
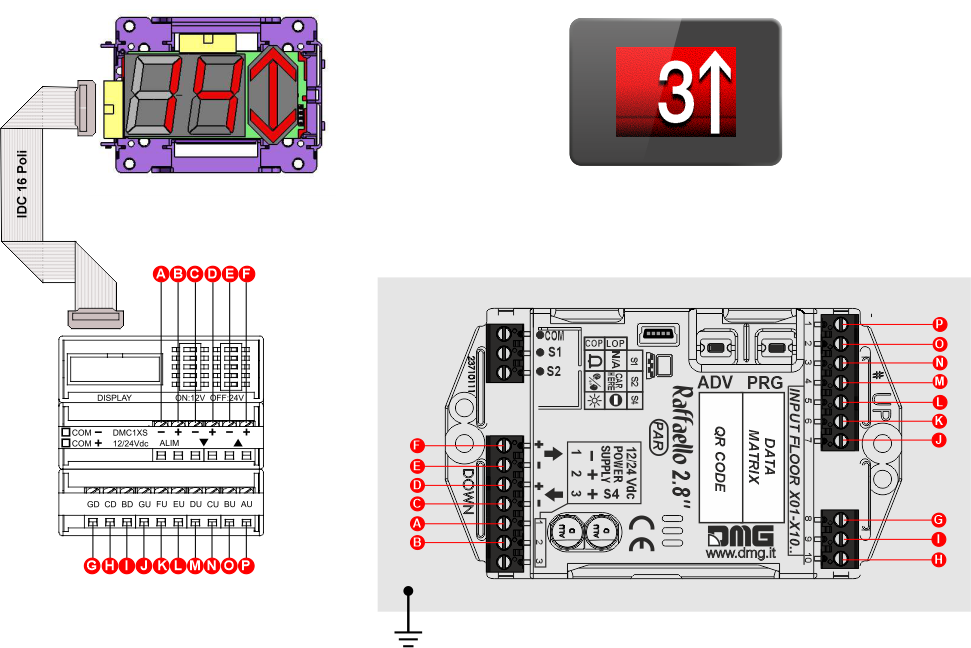
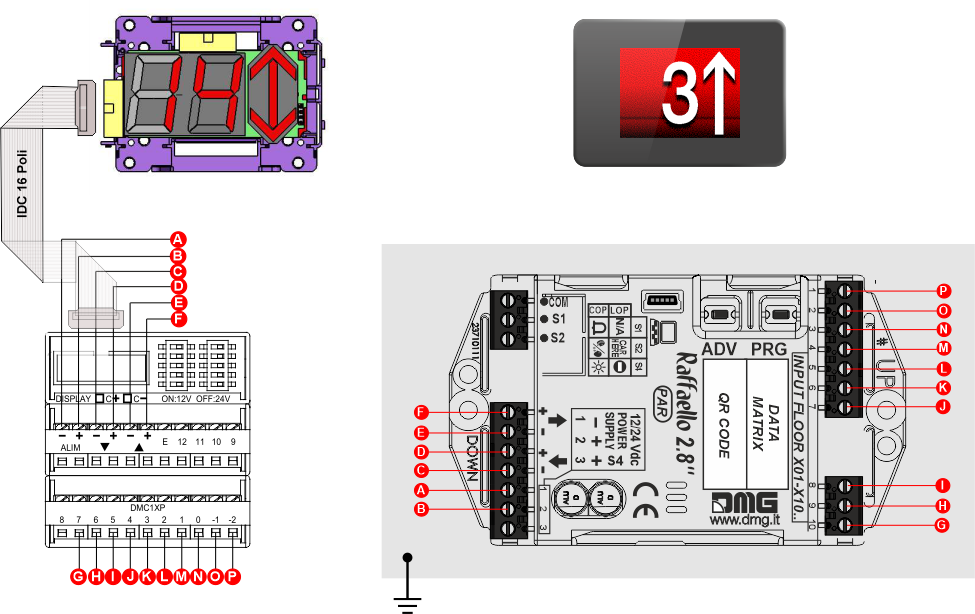
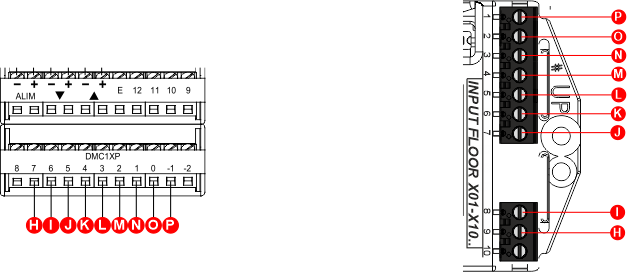
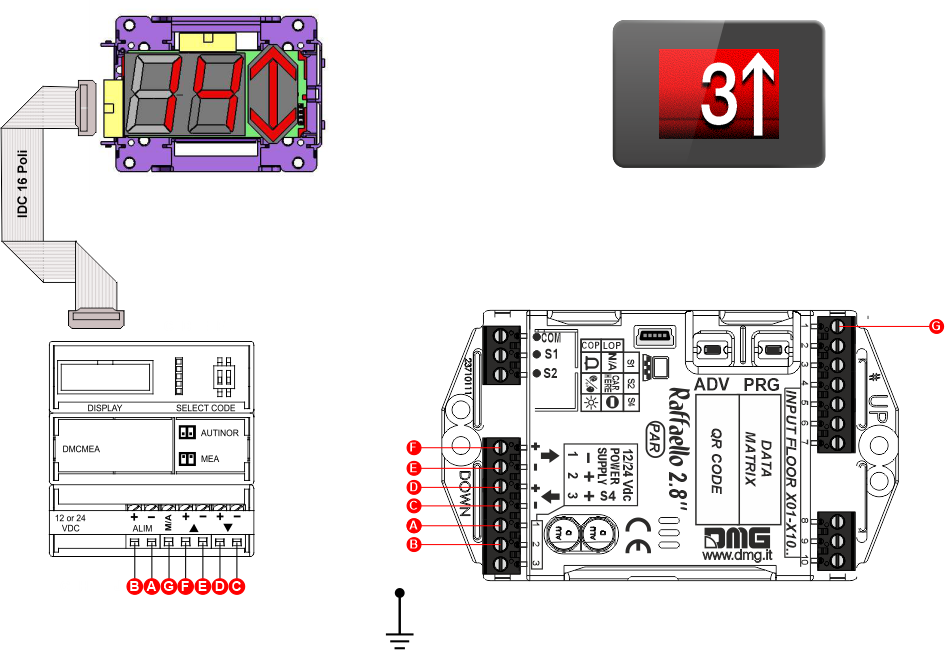
Other Controllers D45 -> Raffaello D4
1 Wire / Segment
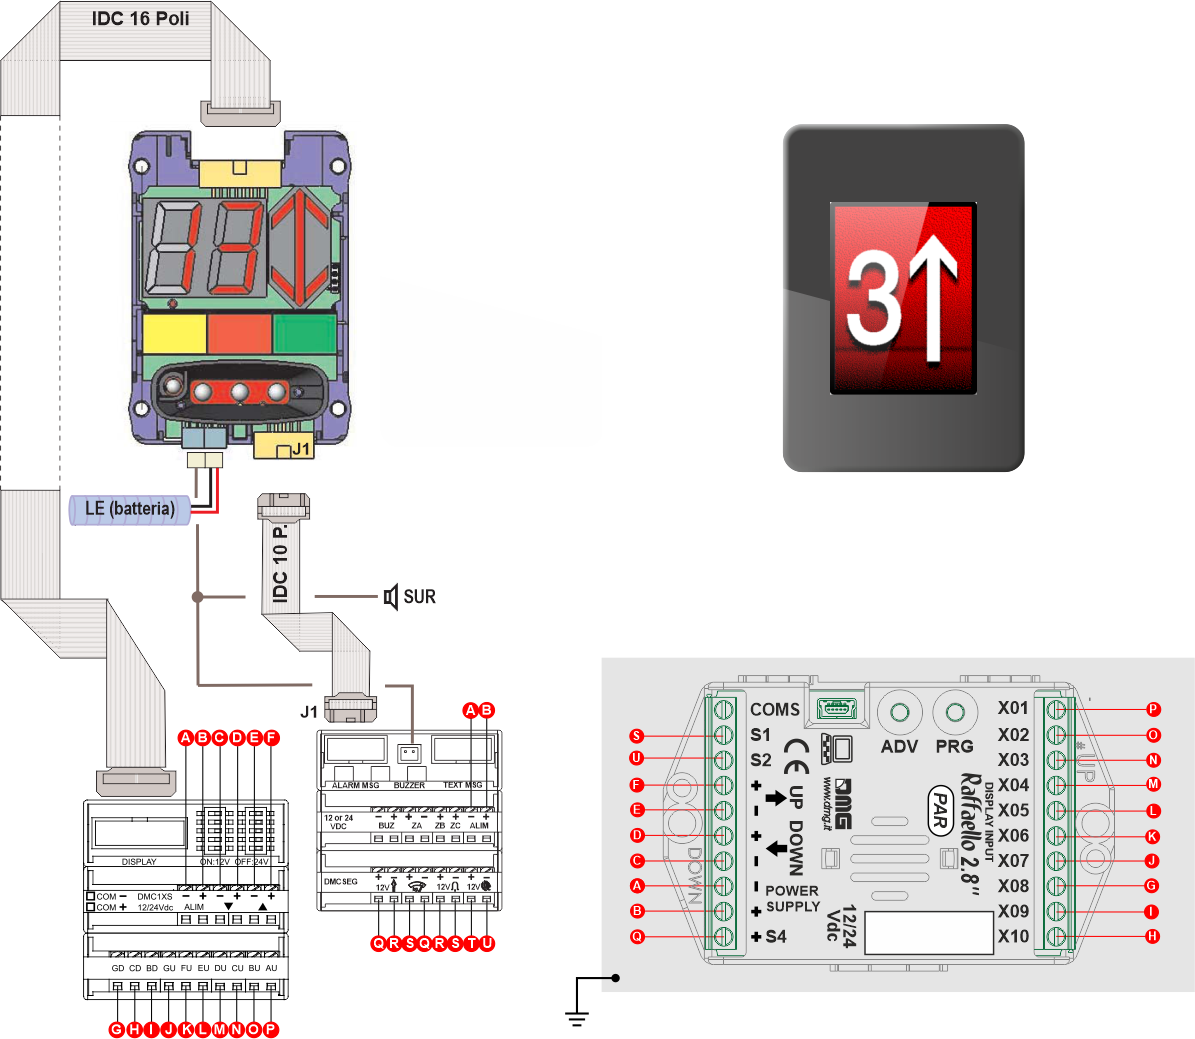
1 Wire / Floor

MEA-AUTINOR
GRAY
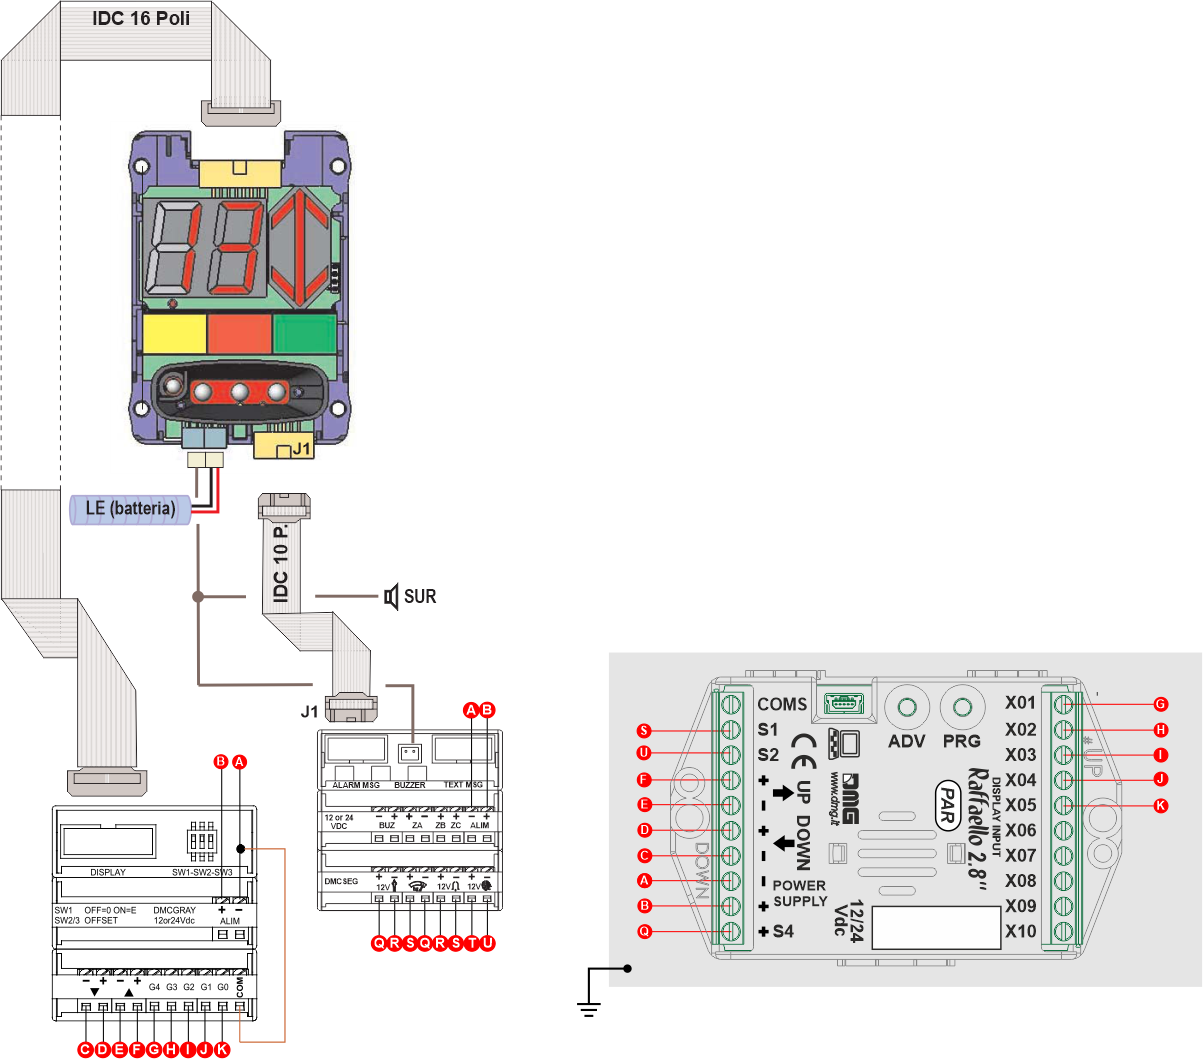
Serial DMG D43 -> Raffaello D4
Car
Floor
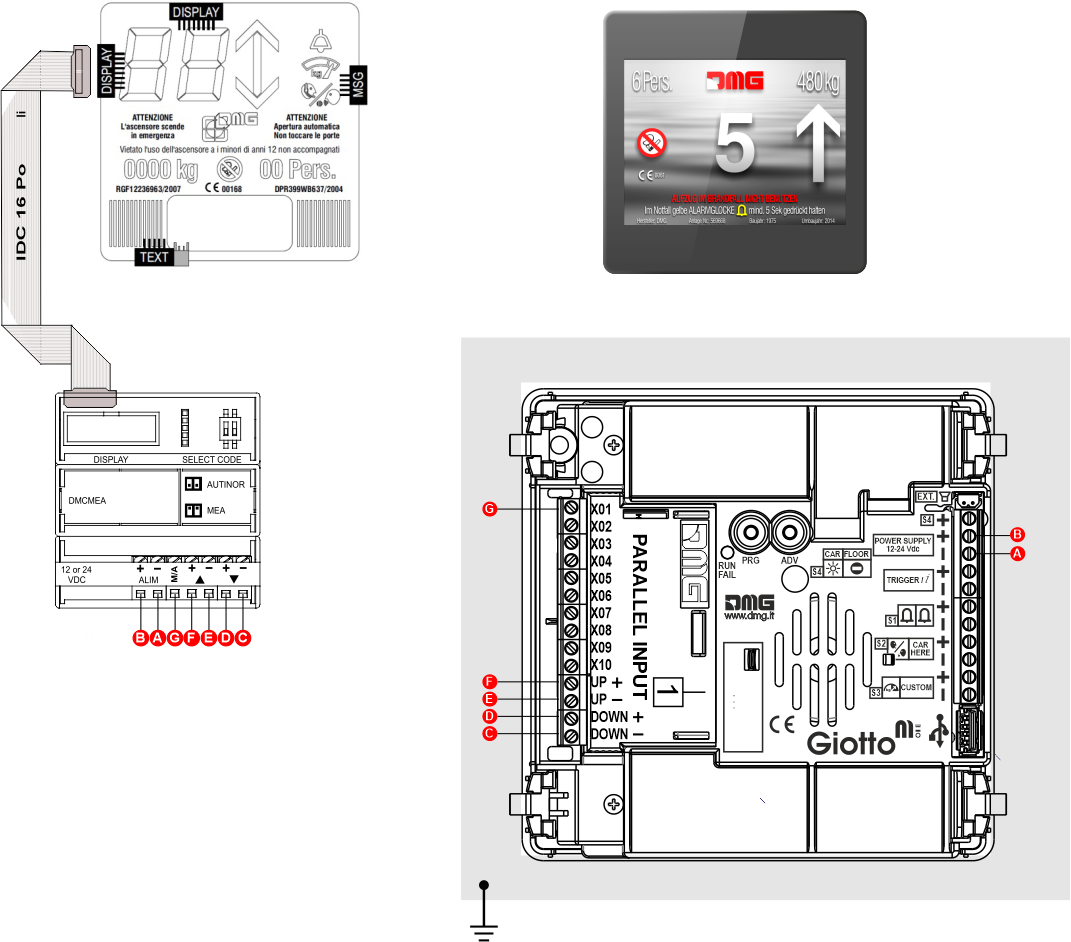
Other Controllers D43 -> Raffaello D4
Encoder DEUM
Car

Floor
Floor
1 Wire / Segment
MEA-AUTINOR
GRAY
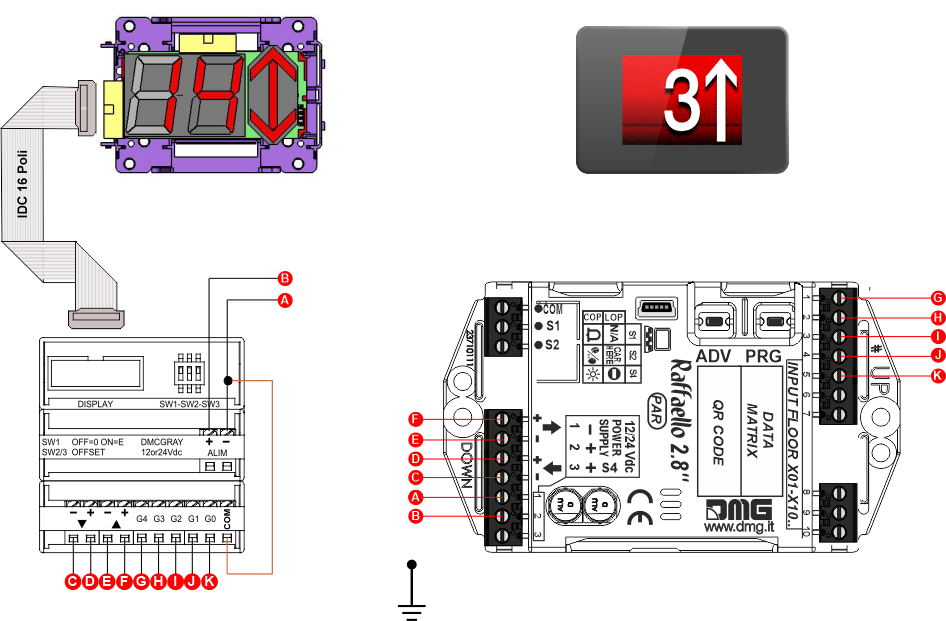
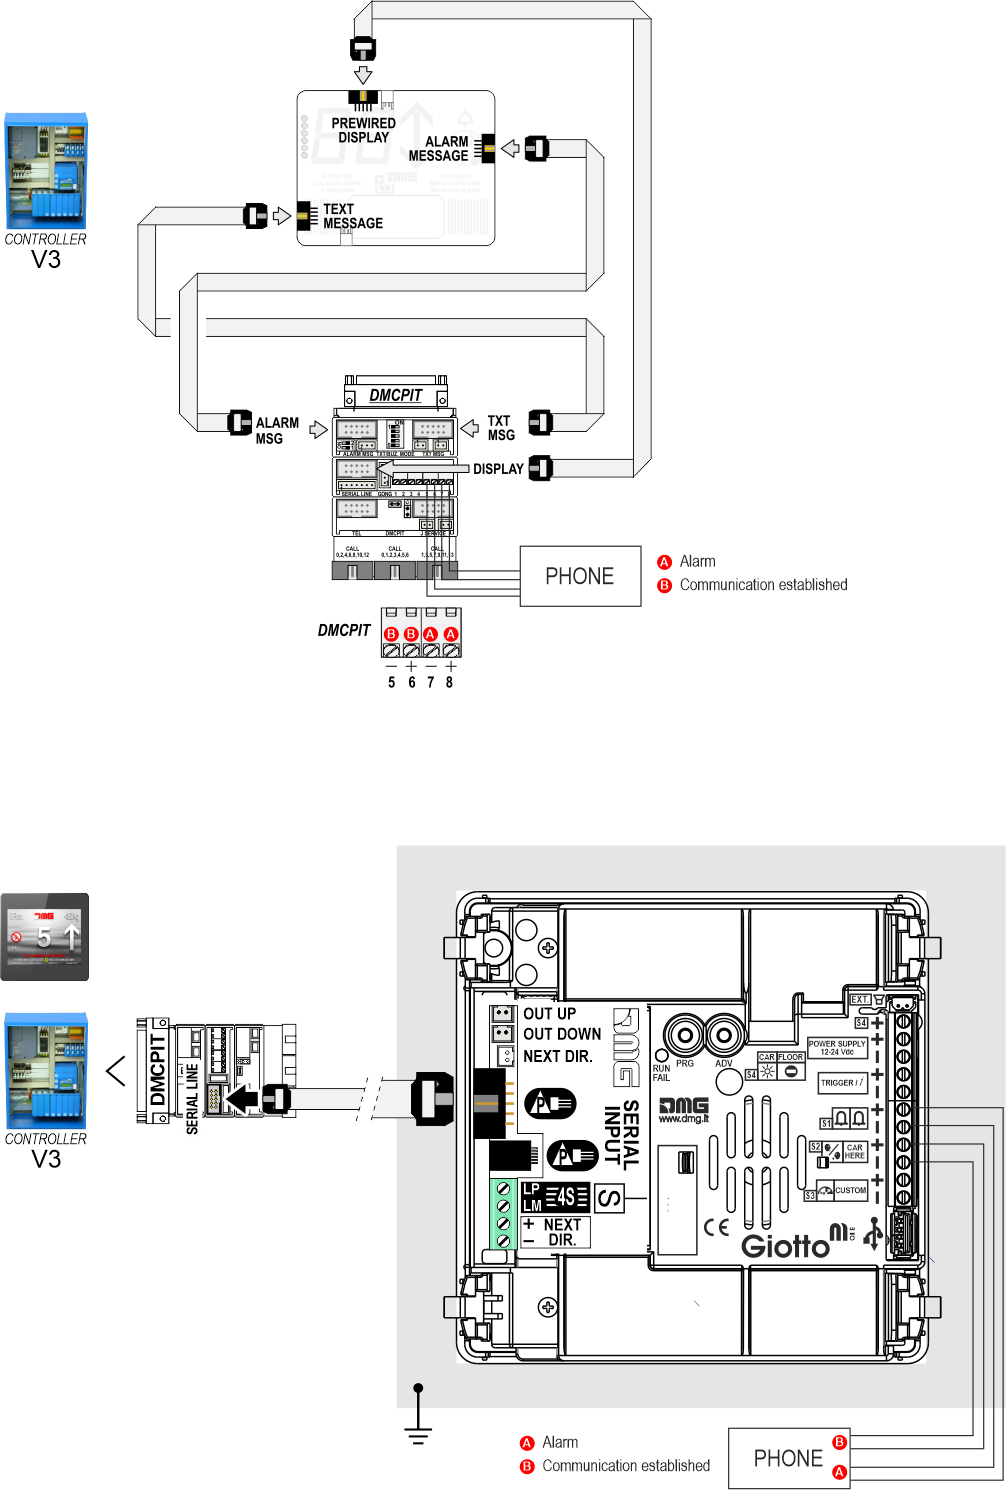
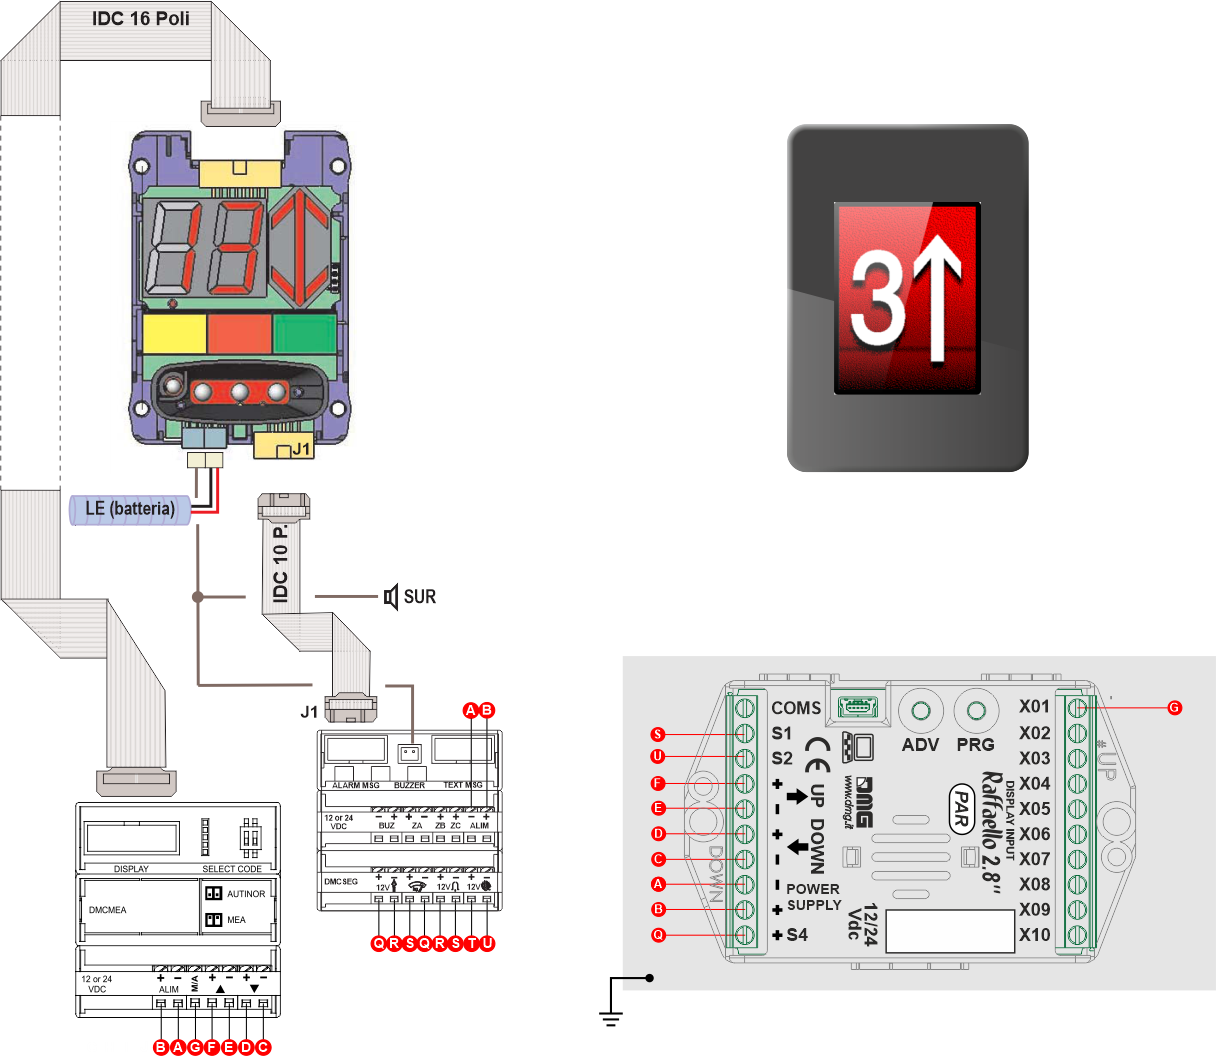
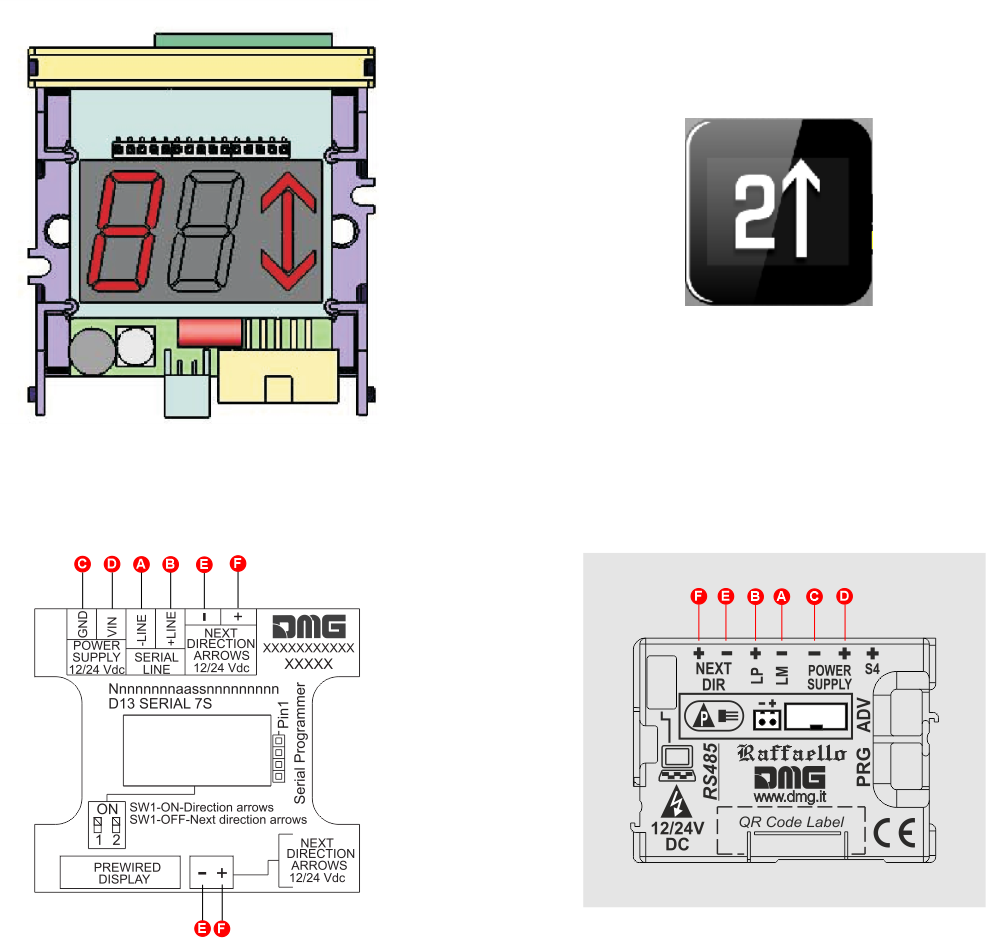
Serial DMG D13 -> Raffaello D1
Floor
Pitagora
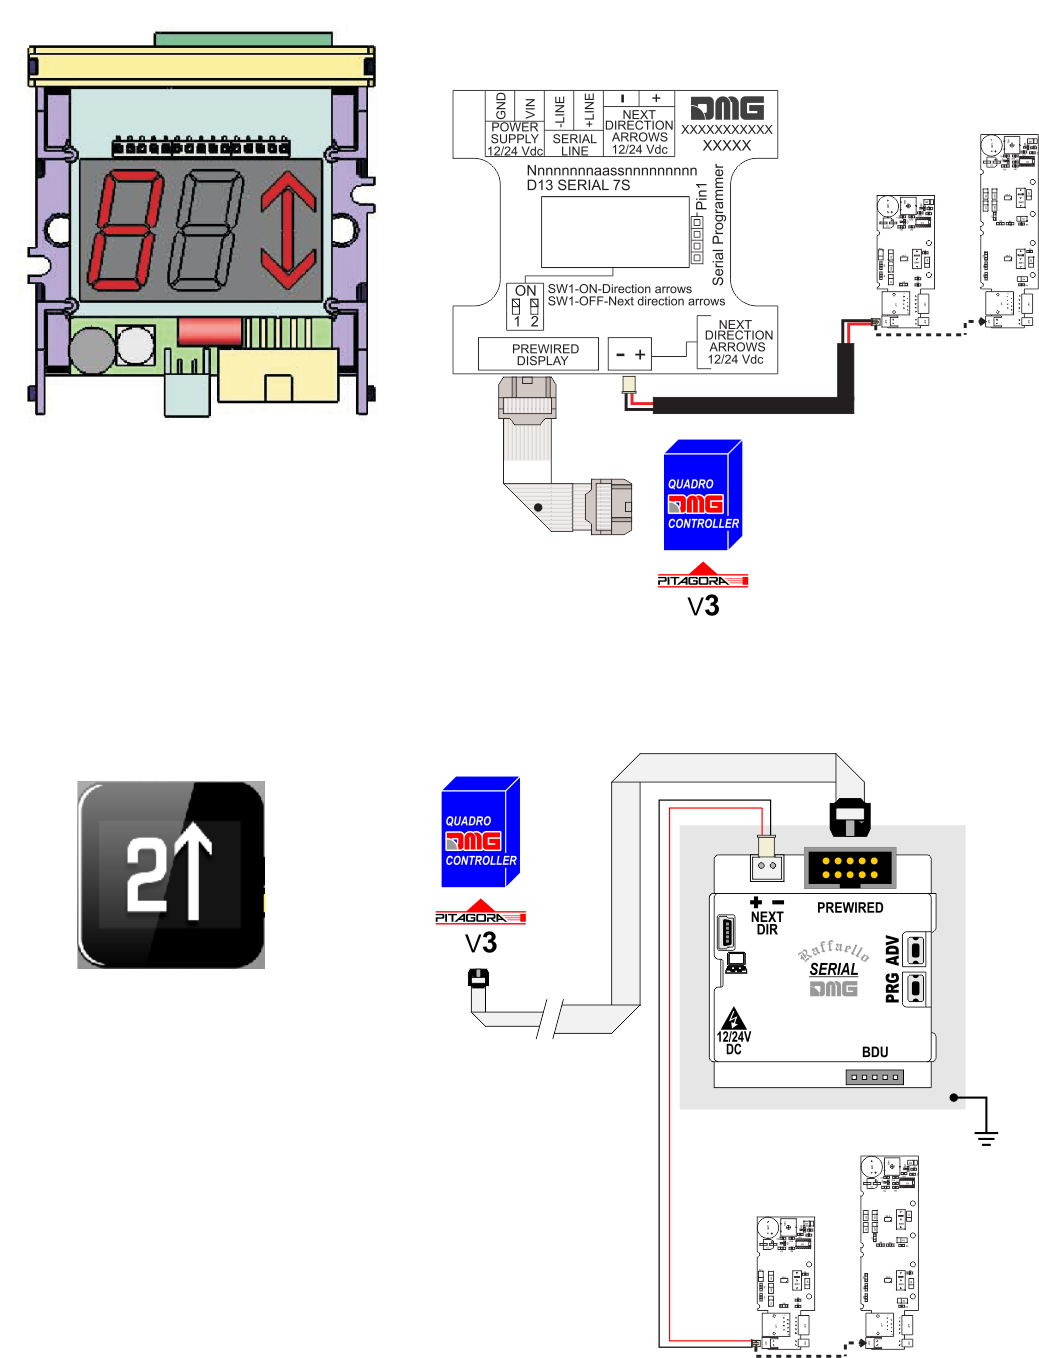
Other controller
Other controller
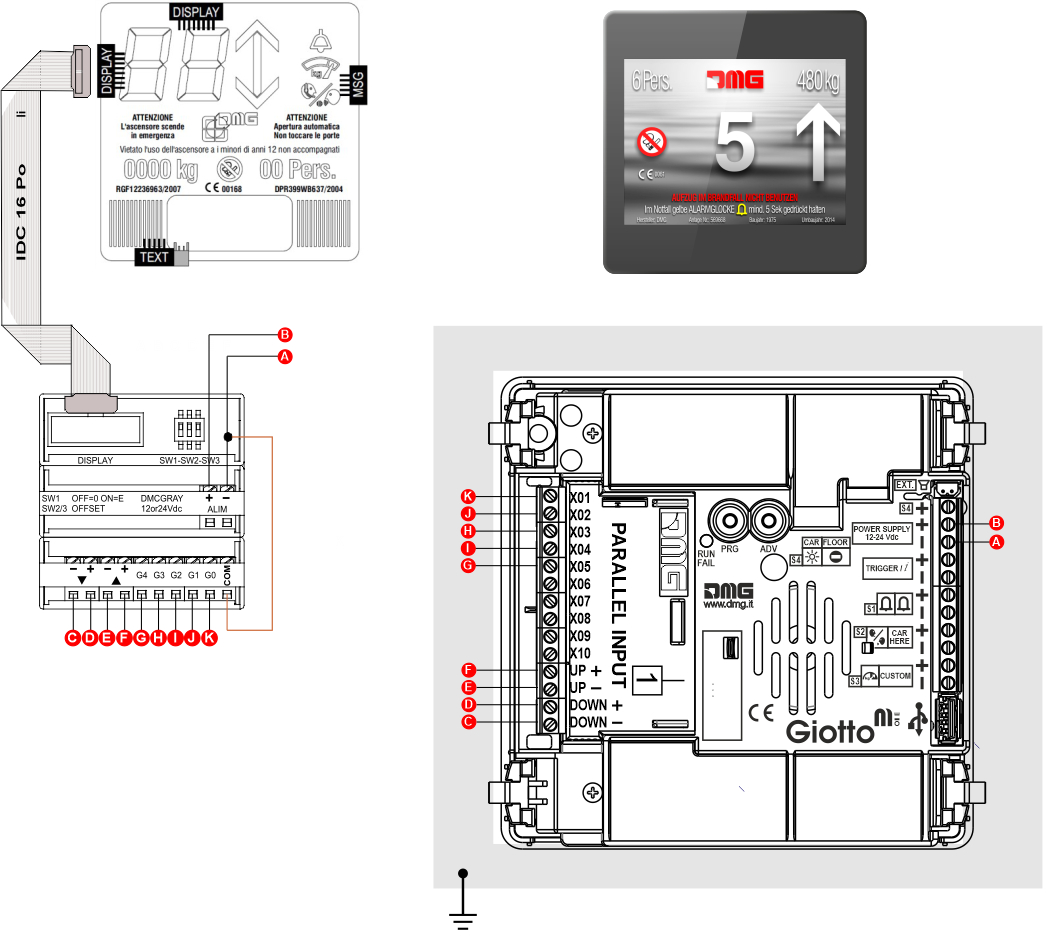
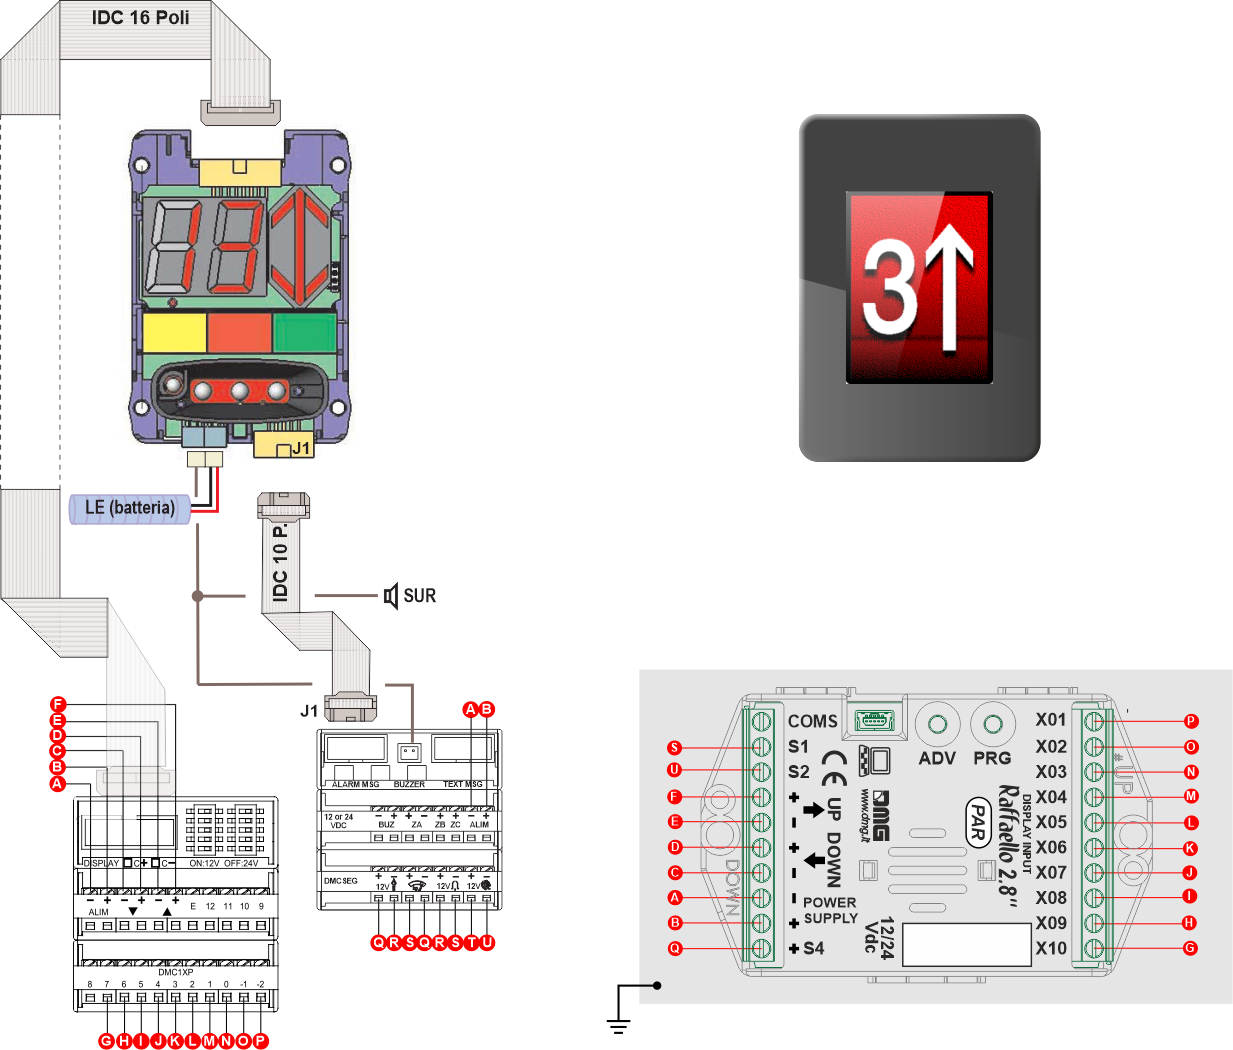
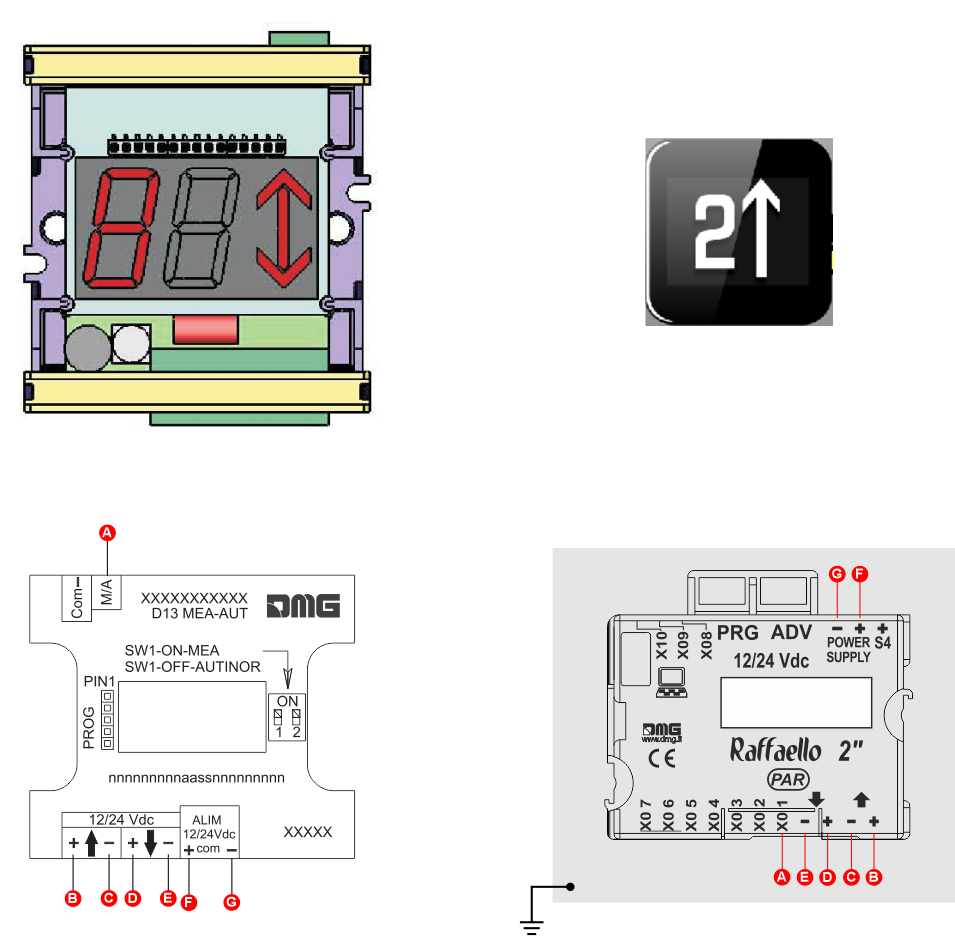
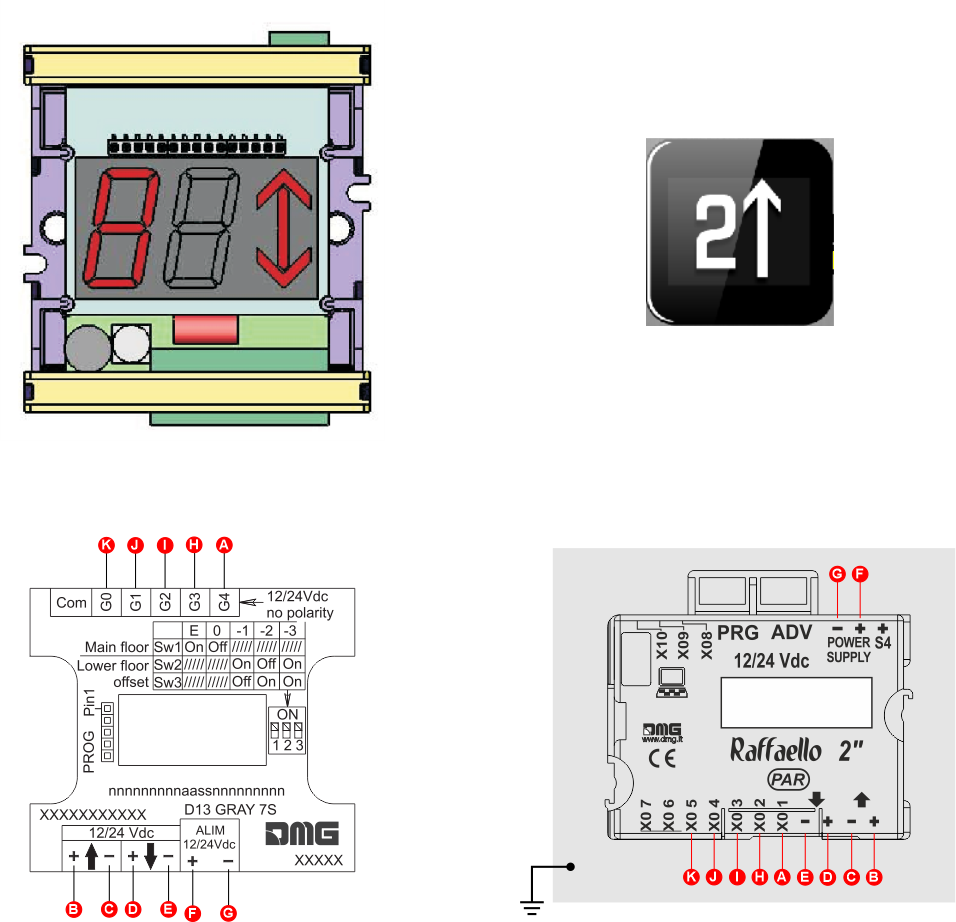
Other Controllers D13 -> Raffaello D1
1 Wire / Segment
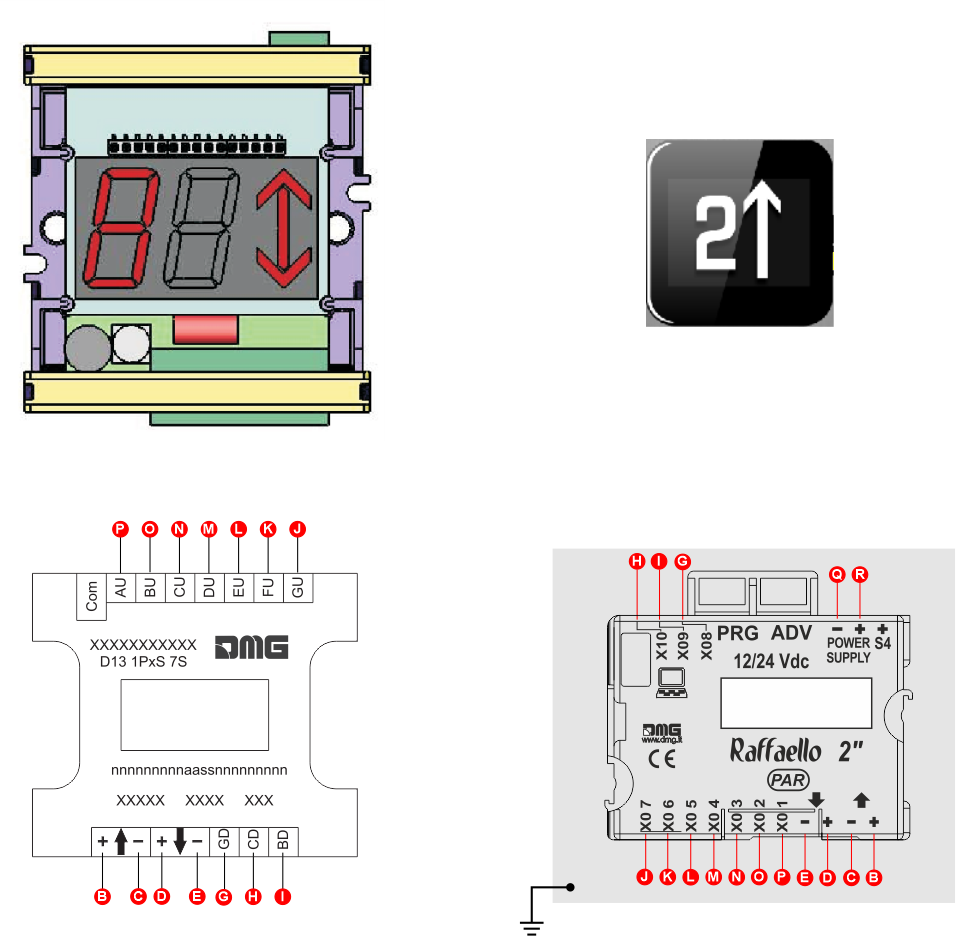
1 Wire / Floor
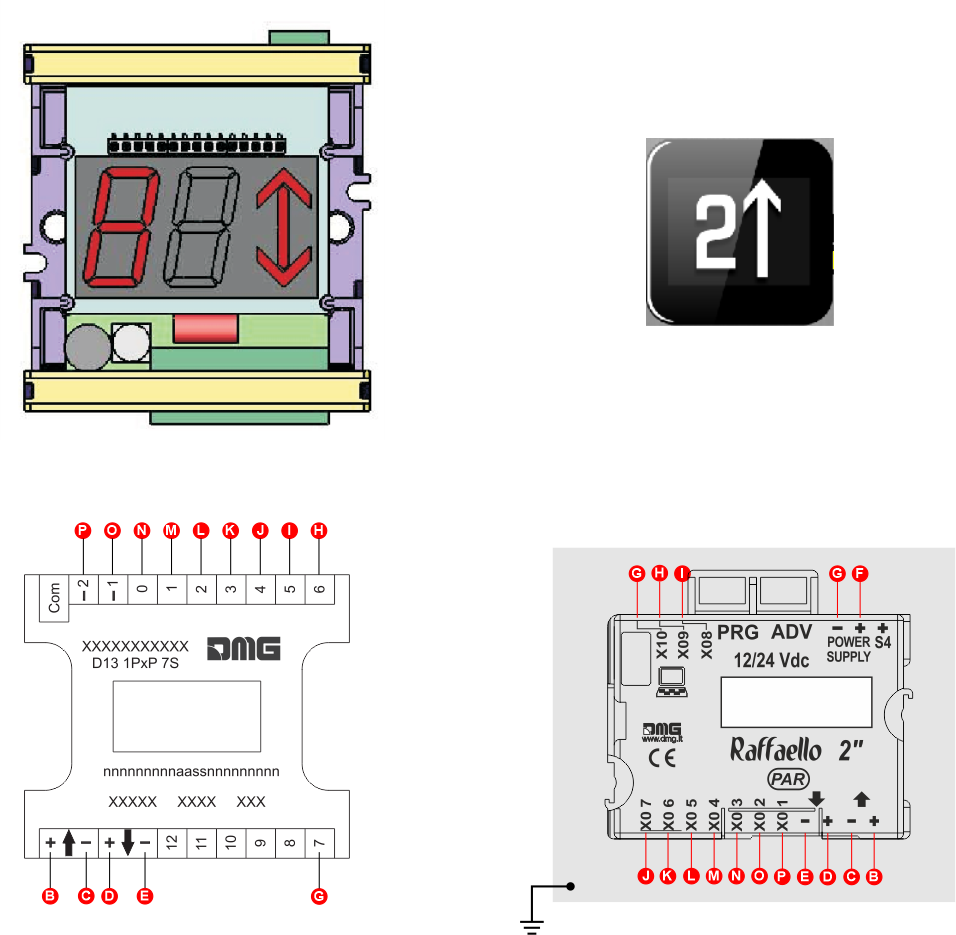
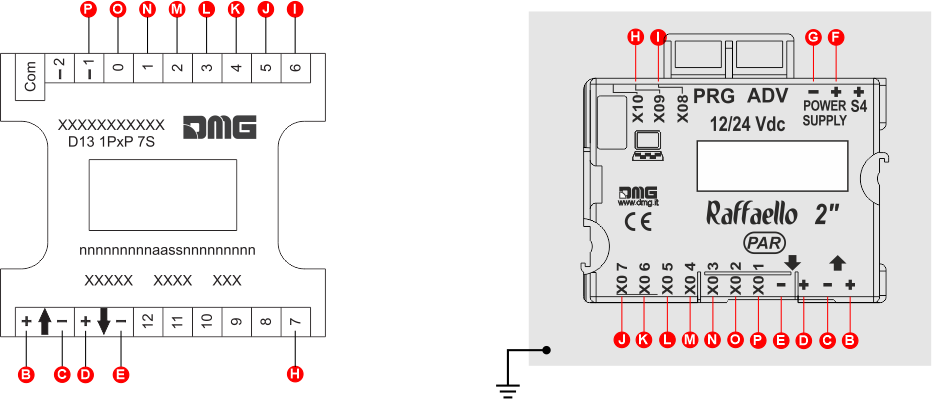
MEA-AUTINOR
GRAY
Settings
 Setup Key Setup Key |  Exit / Back Exit / Back |  Access Menu Key Access Menu Key |  Value setting (>3 sec.) Value setting (>3 sec.) |
D67 -> Giotto D6
Coding
| MENU | MENU ITEM | AVAILABLE CHOICES | INPUTS | |||
|---|---|---|---|---|---|---|
| Serial / Pitagora | Parallel | CANBUS | ||||
| Input | Serial / 1 wire per floor / segment Gray / Binary / Pos.Sensor TKE / MEA / Autinor / CAN DMG | • | • | • | ||
| Audio Settings | Volume (Gong, floor message, etc.) | 0-OFF / 1-MIN / 2 / 3 / 4-MAX | • | • | • | |
| Trigger Delay | 0, 1, ..., 30 | • | • | • | ||
| Message Sequence | Gong - Floor - Up/Down | • | • | • | ||
| Options | Interface Options | Display Configuration | COP / LOP / LIP | • | • | • |
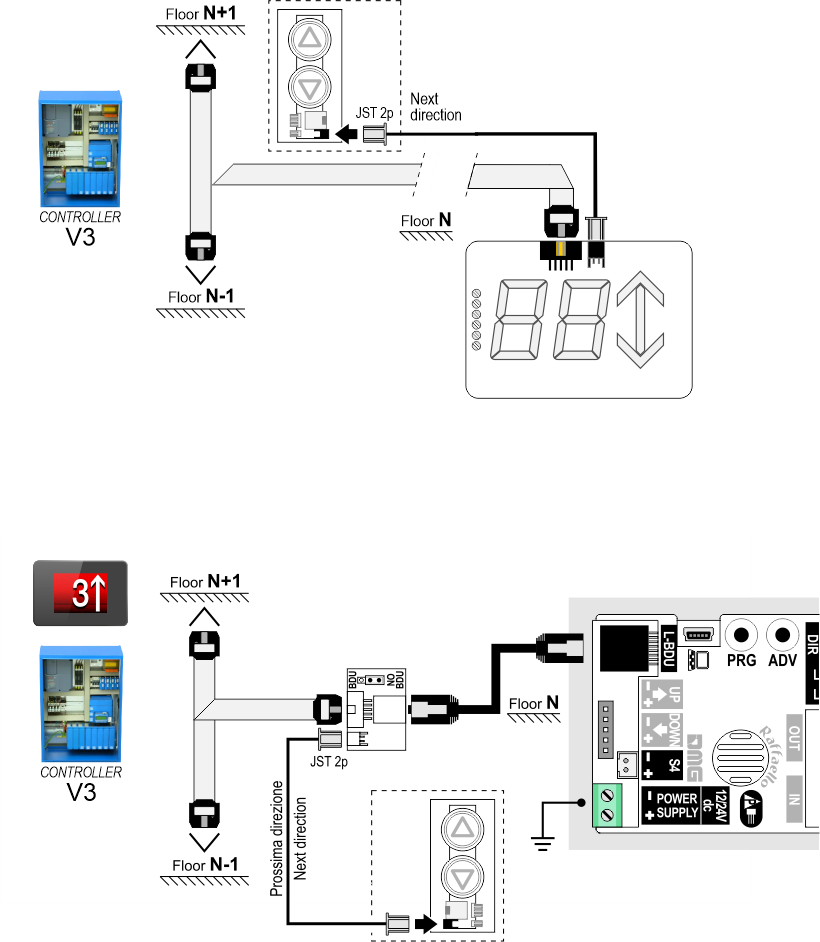
| Arrow Configuration | Direction / Next Dir. | • | ||||
| Car at Floor | No / Yes | • | • | |||
| Gong with NO Arrows | No / Yes | • | ||||
| CAN Baudrate | 250k, 125k, 10k, Auto | • | ||||
| Convert Mezzanine | No / Yes | • | ||||
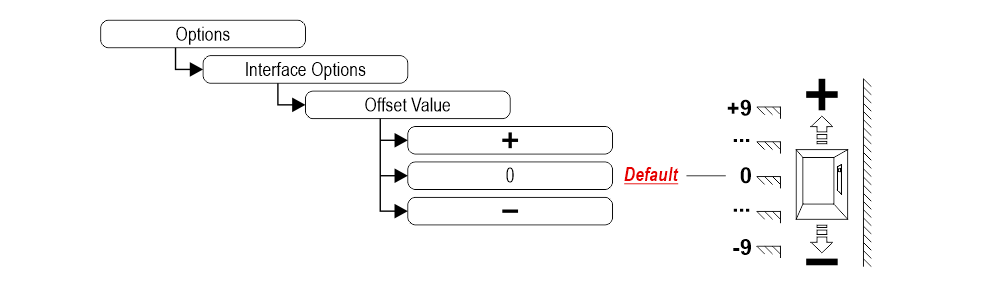
| Offset Value | -9 / ... / 0 / ... / +9 | • | ||||
| First Visualization | Blank / Zero | • | ||||
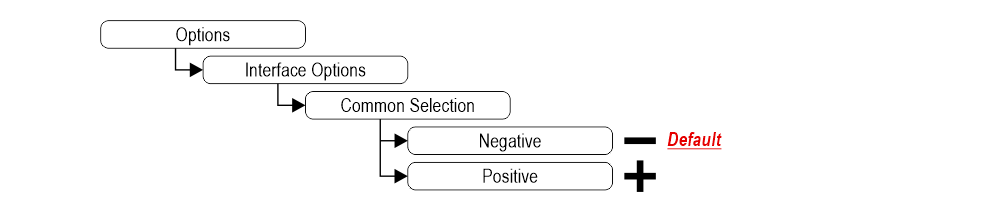
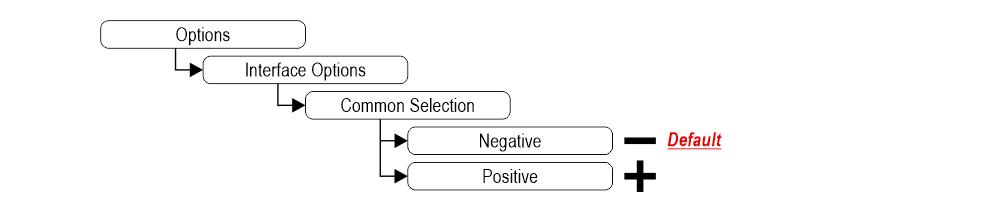
| Common Selection | Negative / Positive | • | ||||
| Arrow Type | Fixed arrows / Scrolling arrows | • | ||||
| Enable AUX Signals | 10 + 0 / 6 + 4 | • | ||||
| Input Filtering | 0 ... 20 | • | ||||
| Gong from Arrows | No / Yes | • | ||||
| Firefighters Operation | 0 (Disabled) / 1 (Egress Floor) / 2 (Non-Egress Floor) | • | • | • | ||
| Screensaver timer | Disabled / 10-20 / 30-60 / 60-120 | • | • | • | ||
| Graphic Options | Floor Symbols | Show / Hide | • | • | • | |
| Arrows | Show / Hide | • | • | • | ||
| Floor Symbols with Signals | Show / Hide | • | • | • | ||
| Arrows with Signals | Show / Hide | • | • | • | ||
| Auto Centering | No / Yes | • | • | • | ||
| Numbers alignment | Center / Left / Right | • | • | • | ||
| Kerning | No / Yes | • | • | • | ||
| Filter Blinking Signals | No / Yes | • | • | • | ||
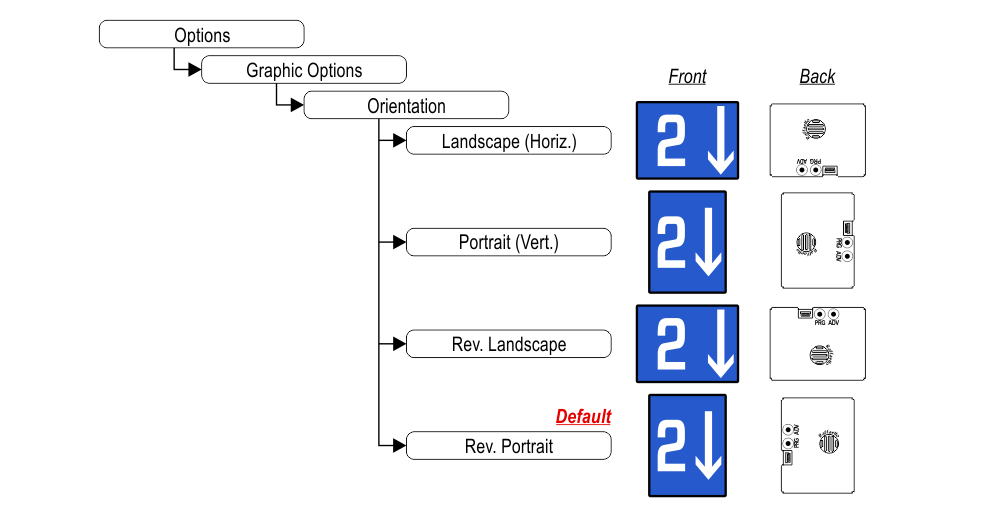
| Orientation | Landscape / Portrait | • | • | • | ||
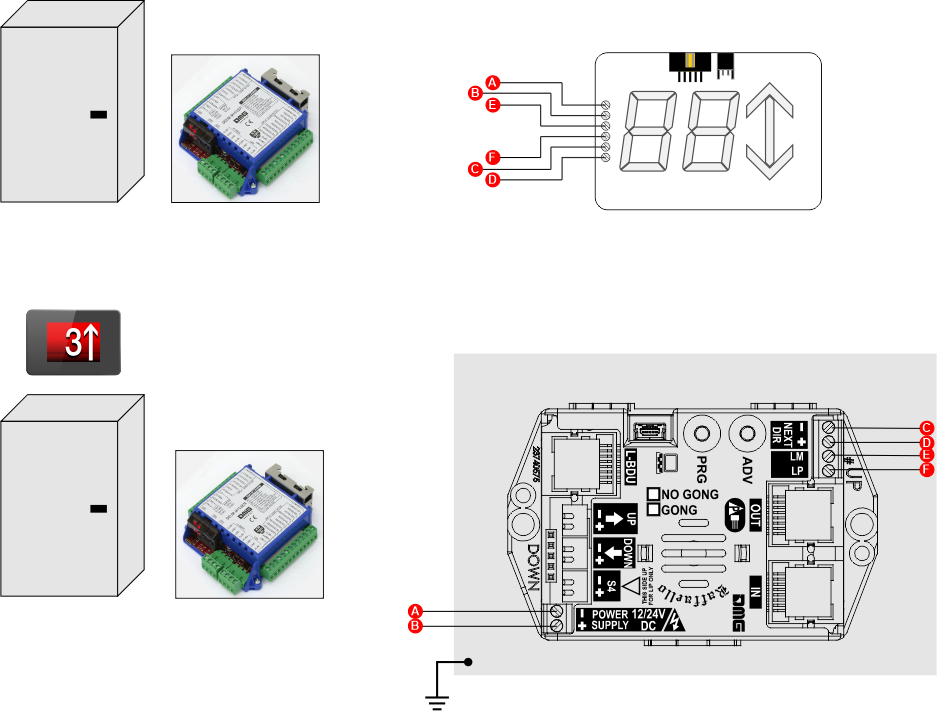
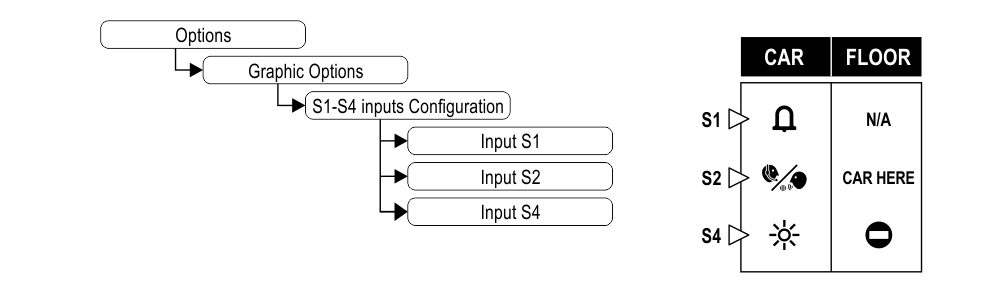
| S1-S5 inputs Configuration | Input S1 / ... / S5 | • | • | • | ||
| AUX Signals Configuration | AUX Signal 1 / 2 / 3 / 4 | • | • | • | ||
| Info Screen | On / Off | • | • | • | ||
| Info Screen Tme | 5s / 10s / 15s / 20s | • | • | • | ||
| Date & Time Settings | No / Yes | • | • | |||
| Reset All Settings | • | • | • | |||
| USB | Display -> USB / USB -> Display | • | • | • | ||
| Aggiornamento firmware / Firmware update | • | • | • | |||
| ? | DEMO mode | No / Yes | • | • | • | |
| Firmware Ver. / Config. Name / Debug Mode / Life Time (internal use) | • | • | • | |||
| Floor Settings | Floor Image | Choose the Images | • | • | • | |
| Floor Audio | No / Audio slot 0 / ... / slot 19 | • | • | • | ||
| Floor Symbols | Choose the Symbols | • | ||||
Common

D45 -> Raffaello D4
Coding

Common input
Set up Display Orientation
Set up service message inputs

D43 -> Raffaello D4
Coding
Common
D13 -> Raffaello D1
Set up Parallel position common input


Download
| Reference | Version | Link |
|---|---|---|
| 1.0 | Download PDF (English) | |
| Retrofit D45 and D13 added | 1.1 (current version) | Download PDF (English) |