Shaft access
For systems with encoder counting it is possible to activate the access procedure in the shaft without the system being stopped due to the interruption of the safety chain (opening of the landing doors). It is also helpful in EN81-1 installation.
With the lift in normal operation:
- Keep the doors open by keeping the door BRA or BRB button pressed
- On the elevator car control panel press the current floor button 3 times.
- The panel will emit a continuous sound to warn of the activation of the procedure which temporarily excludes all calls. (procedure can be deleted by pressing the door open button again)
- Exit from the Cabin;
- The Controller closes the doors and moves lift 2 meters down with slowdown and standard stop. The technician can open the doors and easily access the cab roof. If the cabin does not have enough space to descend, it moves upwards by 2.5 meters (pit access and / or control of the cabin bottom).
- If you do not enter the well, the Cabin remains stationary in this condition for a maximum time of 10 seconds before returning to normal service (new calls are not available in this time).
Access to the shaft for systems compliant with the EN81-20 / EN81-21 standard requires that, after an access and subsequent exit from the llift shaft by an authorized person, there is a reset procedure that excludes the return to automatic operation of the lift. Below are the instructions for entering and exiting the shaft in the case of 81-20 or 81-21 systems.
EN81-20 configuration
Parameter: See Shaft protection.
Access to the Pit
Is detected by operating the pit stop switch or by switching the pit control panel on to ‘inspection’. (both conditions open the safety chain on point SE1).
This condition activates the Fault RSP (code 20) and prevents the movement of the elevator car in normal operation (Movement is now possible only in Inspection mode).
After the end of the Inspection manoeuvre the personnel must:
- Return the selector switch and any STOP buttons to ‘Normal’ and exit the shaft of lift.
- Close the landing doors (check the safety chain) and carry out the reset using one of the following methods:
- From lowest floor with three quick opening / closing of the release key or.
- From the PME (*) panel with three quick presses of button

- From the PlayPad with specific reset (RSP reset).
(*) PME’s KNOB could be used also in Inspection position if any Safety device between SE2 and SE3 is active (eg ELGO’s OC1 contact, limit switches, Safety Gear etc…)
Characteristics of the auxiliary contact on the door (s) at the lowest floor:
- Monostable NC contact (does not open during normal door operation).
The auxiliary contact is electrically connected to the BDU’s Door input or to the terminal (screw) of the controller on the E511 input (NC contacts in series when there are multiple shaft access doors eg. Pit Access Hatch).
Access the Car roof
No control required for access to the cabin roof.
EN81-21 Installation with door’s Bistable contacts
Headroom and reduced pit (Compliance with Article 2.2 of Annex 1 of Directive 95/16 / EC of the European Community)
In systems where the minimum required dimensions in the top and bottom of the shaft cannot be guaranteed, according to the requirements of the regulation EN 81, special alterations must be made to the system and the controller in order to avert the risk of injury to workers carrying out maintenance work in the shaft.
The following is a relevant section from the regulation:
“The lift must be designed and manufactured in order to prevent the risk of crushing when the elevator car is in an extreme position. In order to achieve this, a free space or refuge beyond the extreme positions must be provided. However, in exceptional cases, allowing the Member States the possibility of giving prior approval, particularly in existing buildings, the competent authorities may provide other appropriate means to avoid this risk, if the previous solution is impossible to achieve”.
The controller of the lift is able to automatically manage the floor doors opening control in systems with limited space in the extreme points of the shaft. As indicated schematically in the illustration below, the controller must be equipped with a control circuit at the top/bottom of the shaft so that, when the maintenance worker opens the landing door to access the shaft, a contact connected to the dedicated input which provides monitoring of shaft access to the lift controller.
The specific procedure is according to the type of Installation as described in following sections.
The reset procedure is possible only if bistable contacts are open, otherwise the controller checks an automatic reset of bistable contacts (without any reset procedure): so the controller gives a RSP Fault (Cod 121) and it is necessary to open the Bistable circuit and after make a reset procedure.
Parameter: See Shaft protection
Access to the Pit
Is detected by operating the pit stop switch or by switching the pit control panel on to ‘inspection’.
(both conditions open the safety chain on point SE1).
This condition activates the Fault RSP (code 20) and prevents the movement of the elevator car in normal operation.
After the end of the Inspection manoeuvre the personnel must:
• Remove the protections (in case of manual protections in the PIT), Return the selector switch and any STOP buttons to ‘Normal’ and exit the shaft of lift.
• Close the landing doors (check the safety chain) and carry out the reset using one of the following methods:
– From lowest floor with three quick opening / closing of the release key.
– From the PME (*) panel with three quick presses of button.
 – From the PlayPad with specific reset (RSP reset).
(*) PME’s KNOB could be used also in Inspection position if any Safety device between SE2 and SE3 is active (eg ELGO’s OC1 contact, limit switches, Safety Gear etc…)
Characteristics of the auxiliary contact on the door (s) of the lowest floor:
• Monostable NC contact (does not open during normal door operation).
The auxiliary contact is electrically connected to the DOOR Contact input of BDU of the lowest floor.
Access on the Car roof
Access to the shaft is detected by opening a contact using the release key which activates the RSP fault (code 21), preventing the elevator car from moving in normal operation (a run is only possible in ‘Inspection’ mode). Before entering the shaft of lift, wait for the traffic light to indicate the safe condition (green light).
After the end of the Inspection manoeuvre the personnel must:
• Remove the protections (in case of manual protections), Return the selector switch and any STOP buttons to ‘Normal’ and exit from the lift well.
• Close the landing doors (check the safety chain) and carry out the reset using one of the following methods:
– From floor with three quick opening / closing of the reset key (optional).
– From the PME (*) panel with three quick presses of button.
 – From the PlayPad with specific reset (RSP reset).
(*) PME’s KNOB could be used also in Inspection position if any Safety device between SE2 and SE3 is active (eg ELGO’s OC1 contact, limit switches, Safety Gear etc…)
Reset fault RSP on the Lift Controller and make coil’s reset on the bistable contacts on the Landings
If the controller detects an automatic contact reset (contact close before reset procedure) it gives again a Fault RSP (Cod 121) as a fault on coil’s reset circuit.
Characteristics of the auxiliary contact (BERNSTEIN type) on all doors except those on the lowest floor:
• Bistable NC contact (does not open during normal door operation) connected to a dedicated input.
• 230 Vac reset coil.
Optional reset key switches are electrically connected to the BDU’s DOOR Contact input.
Parameter: See Shaft protection
Access in the Pit
Access to the shaft is detected by opening a contact using the release key which activates the RSP fault (code 21), preventing the elevator car from moving in normal operation (a run is only possible in ‘Inspection’ mode). Before entering the shaft, wait for the traffic light to indicate the safe condition (green light).
After the end of the Inspection maneuver the personnel must:
• Remove the protections (in case of manual protections), Return the selector switch and any STOP buttons to ‘Normal’ and exit from the lift well.
• Close the landing doors (check the safety chain) and carry out the reset using one of the following methods:
– From the floor with three quick opening / closing of the reset key (optional).
– From the PME (*) panel with three quick presses of button
 – From the PlayPad with specific reset (RSP reset).
(*) PME’s KNOB could be used also in Inspection position if any Safety device between SE2 and SE3 is active (eg ELGO’s OC1 contact, limit switches, Safety Gear etc…)
If controller detects an automatic contact reset (contact close before reset procedure) it gives again a Fault RSP (Cod 121) as a fault on coil’s reset circuit.
Characteristics of the auxiliary contact (BERNSTEIN type) only on the lowest floor:
• Bistable NC contact (does not open during normal door operation). connected to a dedicated input.
• 230 Vac reset coil
Optional reset key switches are electrically connected to BDU’s DOOR Contact input.
Access on the Car roof
No control required for access to the cabin roof.
Parameter: See Shaft protection
Access in the Pit or Access on the Car roof
Access to the shaft is detected by opening a contact using the release key which activates the RSP fault (code 21), preventing the elevator car from moving in normal operation (a run is only possible in ‘Inspection’ mode). Before entering the lift shaft, wait for the traffic light to indicate the safe condition (green light).
After the end of the Inspection manoeuvre the personnel must:
· Remove the protections (in case of manual protections), Return the selector switch and any STOP buttons to ‘Normal’ and exit from the lift well.
· Close the landing doors (check the safety chain) and carry out the reset using one of the following methods:
– From floor with three quick opening / closing of the reset key (optional).
– From the PME (*) panel with three quick presses of button.
 – From the PlayPad with specific reset (RSP reset).
(*) PME’s KNOB could be used also in Inspection position if any Safety device between SE2 and SE3 is active (eg ELGO’s OC1 contact, limit switches, Safety Gear etc…)
If controller detects an automatic contact reset (contact close before reset procedure) it gives again a Fault RSP (Cod 121) as a fault on coil’s reset circuit.
Characteristics of the auxiliary contact (BERNSTEIN type) on all doors:
· Bistable NC contact (does not open during normal door operation). connected to dedicated input.
· 230 Vac reset coil
Optional reset key switches are electrically connected to BDU’s DOOR Contact input.
Installation with door’s Monostable contacts
Headroom and reduced pit (Compliance with Article 2.2 of Annex 1 of Directive 95/16 / EC of the European Community)
With the same consideration of previous chapter it is possible to manage installation with monostable contacts on the landing doors to monitor the shaft access.
In a case where monostable door contacts are used, present in the controller is a bistable circuit. The reset procedure is possible only if the bistable circuit is open, otherwise the controller gives a specific Fault RSP (§ 6): it is necessary to open the Bistable circuit and after carry out the reset procedure.
The specific procedure is according type of Installation as described in following sections.

Parameter: See Shaft protection
Access in the Pit
Access to the pit is detected by operating the pit stop switch or by switching the pit control panel on to ‘Inspection’. (both conditions open the safety chain on point SE1). This condition sets the Fault RSP (code 20) by preventing the movement of the elevator car in normal operation.
After the end of the Inspection manoeuvre the personnel must:
• Remove the protections (in case of manual protections in the PIT), Return the selector switch and any STOP buttons to ‘Normal’ and exit the lift shaft.
• Close the landing doors (check the safety chain) and carry out the reset using one of the following methods:
– From lowest floor with three quick opening / closing of the release key.
– From the PME (*) panel with three quick presses of button.
 – From the PlayPad with specific reset (RSP reset).
(*) PME’s KNOB could be used also in Inspection position if any Safety device between SE2 and SE3 is active (eg ELGO’s OC1 contact, limit switches, Safety Gear etc…)
Characteristics of the auxiliary contact on the door (s) of the lowest floor:
• Monostable NC contact (does not open during normal door operation).
The auxiliary contact is electrically connected to the DOOR Contact input of BDU of the lowest floor.
Access on the Car roof
Access to the shaft is detected by opening a contact using the release key which activates the RSP fault (code 21), preventing the elevator car from moving in normal operation (a run is only possible in ‘Inspection’ mode). Before entering the lift shaft, wait for the traffic light to indicate the safe condition (green light).
After the end of the manoeuvre the personnel must:
• Remove the protections (in case of manual protections), Return the selector switch and any STOP buttons to ‘Normal’ and exit from the lift well.
• Close the landing doors (check the safety chain) and carry out the reset using one of the following methods:
– From floor with three quick opening / closing of the the release key.
– From the PME (*) panel with three quick presses of button.
 – From the PlayPad with specific reset (RSP reset).
(*) PME’s KNOB could be used also in Inspection position if any Safety device between SE2 and SE3 is active (eg ELGO’s OC1 contact, limit switches, Safety Gear etc…)
Characteristics of the auxiliary contact on all doors except those on the lowest floor:
• Monostable NC contact (does not open during normal door operation).
Keys are electrically connected in series to the screw terminal of the controller.

Parameter: See Shaft protection
Access in the Pit
Access to the shaft is detected by opening a contact using the release key which activates the RSP fault (code 21), preventing the elevator car from moving in normal operation (a run is only possible in ‘Inspection’ mode) Before entering the shaft, wait for the traffic light to indicate the safe condition (green light).
After the end of the Inspection manoeuvre the personnel must:
• Remove the protections (in case of manual protections), Return the selector switch and any STOP buttons to ‘Normal’ and exit from the lift well.
• Close the landing doors (check the safety chain) and carry out the reset using one of the following methods:
– From floor with three quick opening / closing of the release key.
– From the PME (*) panel with three quick presses of button.
 – From the PlayPad with specific reset (RSP reset).
(*) PME’s KNOB could be used also in Inspection position if any Safety device between SE2 and SE3 is active (eg ELGO’s OC1 contact, limit switches, Safety Gear etc…)
Characteristics of the auxiliary contact on all doors except those on the lowest floor:
• Monostable NC contact (does not open during normal door operation).
Key are electrically connected in series to the screw terminal of the controller.
Access on the Car roof
No control required for access to the cabin roof.

Parameter: See Shaft protection
Access in the Pit or Access on the Car roof
ccess to the shaft is detected by opening a contact using the release key which activates the RSP fault (code 21), preventing the elevator car from moving in normal operation (a run is only possible in ‘Inspection’ mode). Before entering the lift shaft, wait for the traffic light to indicate the safe condition (green light).
After the end of the Inspection manoeuvre the personnel must:
• Remove the protections (in case of manual protections), Return the selector switch and any STOP buttons to ‘Normal’ and exit from the lift well.
• Close the landing doors (check the safety chain) and carry out the reset using one of the following methods:
– From floor with three quick opening / closing of the release key.
– From the PME (*) panel with three quick presses of button.
 – From the PlayPad with specific reset (RSP reset).
(*) PME’s KNOB could be used also in Inspection position if any Safety device between SE2 and SE3 is active (eg ELGO’s OC1 contact, limit switches, Safety Gear etc…)
Characteristics of the auxiliary contact on all doors:
• Monostable NC contact (does not open during normal door operation).
Key are electrically connected in series to the screw terminal of the controller.
Elevator car Positioning System and Stopping Accuracy
ELGO LIMAX 33 CP Absolute Encoder Counting System
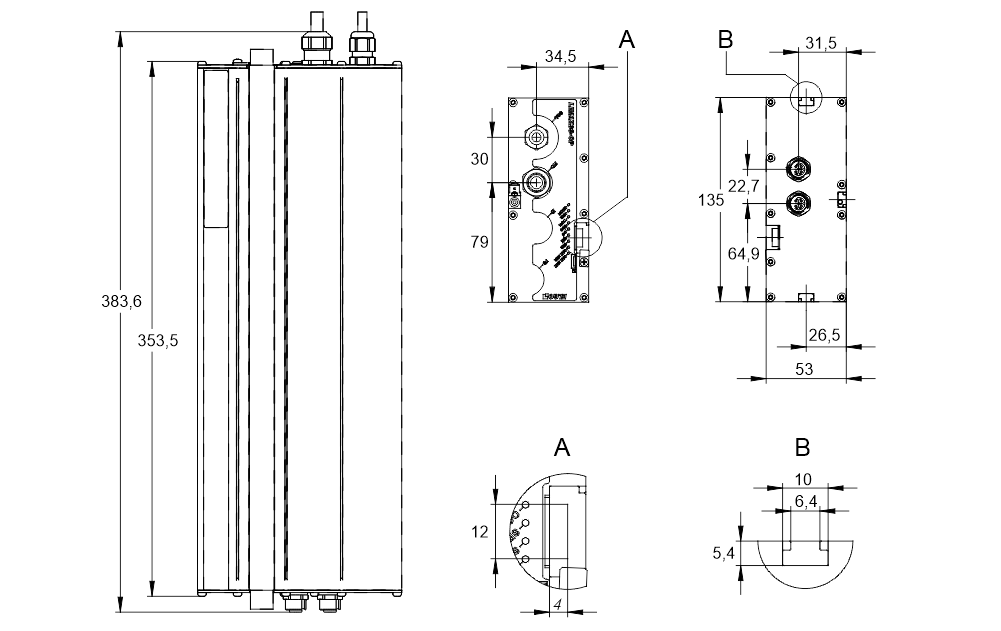
The absolute encoder allows you to replace all the safety contacts inside the lift shaft. The position of the cabin is detected thanks to a magnetic strip.
Features:
• Absolute position detection and safety functions:
– Extra limit switches
– Inspection limit switches
– Overspeed Governor (combined with an electronic safety gear
– Door bypass circuit (movement with doors open)
– UCM (in case of certified double brake)
• EU approved, SIL3 (TÜV)
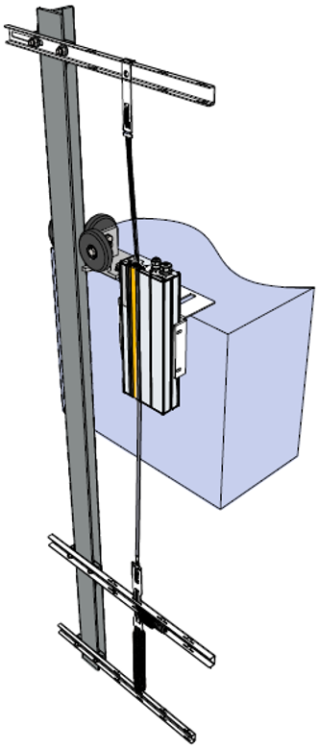
Magnetic Tape
Do not install the magnetic tape near permanent magnet motors.
Do not use magnetized tools near the Magnetic tape.
Do not use welding equipment near the magnetic tape.
Respect the fitting shown on the tape and make sure it is in the correct position shown in the following figure:
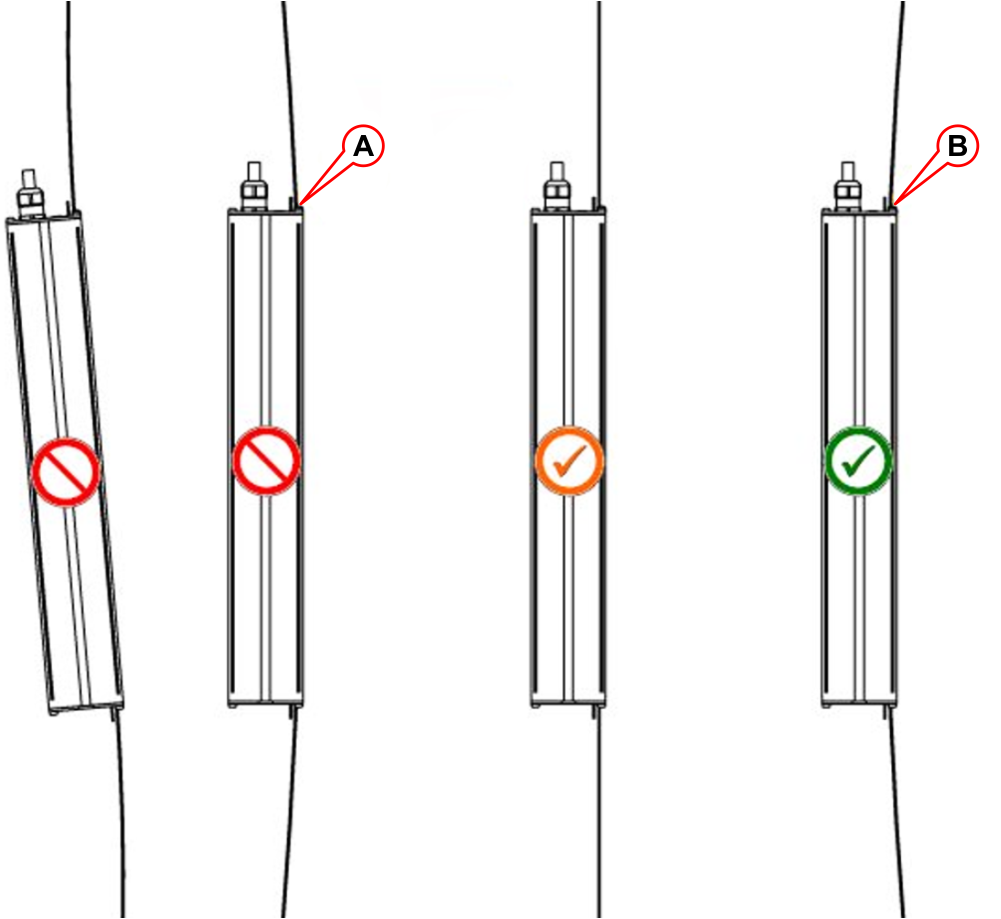
A) – Tape touches the guide with the magnetized side.
B) – Tape touches the guide with the steel side.
LED Signal
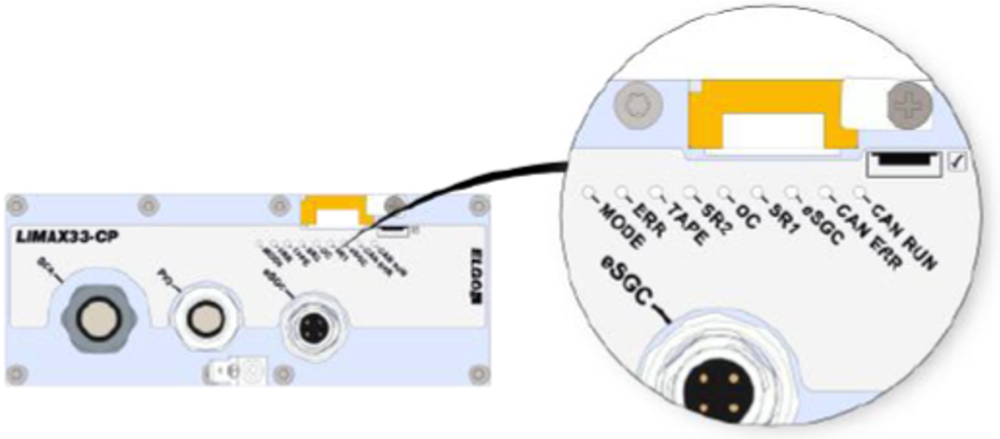
| LED | DESCRIPTION | |
|---|---|---|
| MODE | Normal mode | Slow Flashing (1 s) |
| Pre-Commissioning Mode | Fast Flashing (0,1 s) | |
| Teach Mode | Lights permanently | |
| ERROR | No Error | Led OFF |
| Generic Error | Led ON | |
| Emergency Error | Flashing | |
| TAPE | Magnetic Tape not detected | Led ON |
| eSGC | eSGC Contact close | Led ON |
| eSGC Contact Open | Led OFF | |
| OC | OC Contact close | Led ON |
| OC Contact Open | Led OFF | |
| SR1 | SR1 Contact close | Led ON |
| SR1 Contact Open | Led OFF | |
| SR2 | SR2 Contact close | Led ON |
| SR2 Contact Open | Led OFF | |
| CAN-ERR | Status CAN Open | Led ON |
| CAN-RUN | Status Can Open | Led OFF |
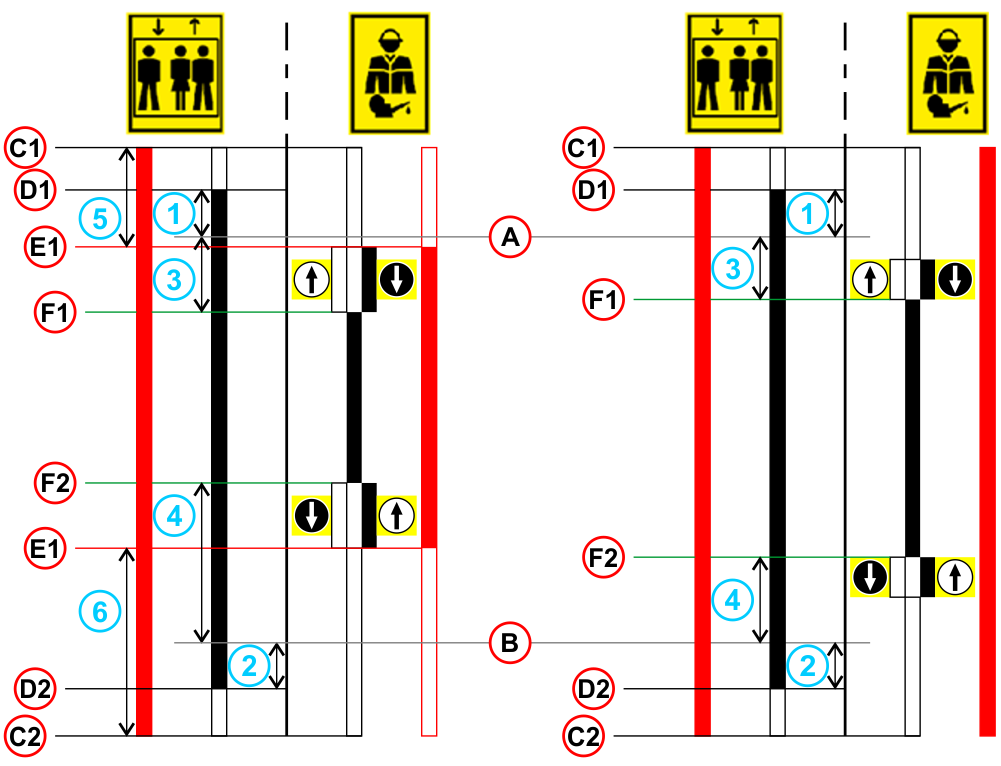
Explanation of safety contacts
| Reduced Head and/or Reduced PIT Installation | Sufficient Head and Pit clearance according EN81-20 §5.2.5.7 / § 5.2.5.8 |
||
|---|---|---|---|
 |
|||
 | Normal Mode | A) - | TOP floor |
 | Inspection Mode | B) - | BOTTOM floor |
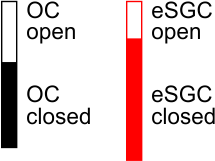 | Safety contacts status | C1) - | Upper reference position |
| Inspection UP button | C2) - | Lower reference position | |
| Inspection DOWN button | D1) - | Upper final limit switch | |
| Final limit switches Offset Up | D2) - | Lower final limit switch | |
| Final limit switches Offset Down | E1) - | Upper pre-triggered stopping system limit | |
| Inspection limit switches Offset Up | E2) - | Lower pre-triggered stopping system limit | |
| Inspection limit switches Offset Down | F1) - | Upper inspection limit switch | |
| Pre-Triggered Stopping System Offset Up | F2) - | Lower inspection limit switch | |
| Pre-Triggered Stopping System Offset Down | |||
For manual adjustment of the positions of the indicated is possible from menu <Positioning> Monitor Encoder (see table below).
| Label | Page | Description | |
|---|---|---|---|
| N_LIM_S | 7 | Upper final limit switch offset (offset over top floor) | |
| N_LIM_D | 7 | Lower final limit switch offset (offset under bottom floor) | |
| I_LIM_S | 6 | Upper inspection limit switch (offset under top floor) | |
| I_LIM_D | 6 | Lower inspection limit switch (offset over bottom floor) | |
| TRIPS | 8 | Upper Pre-Triggered Stopping System limit (from Upper Reference Position) | |
| TRIPD | 8 | Lower Pre-Triggered Stopping System limit (from Lower Reference Position) |
TRIPS and TRIPD values are used only if ELGO is part of Safety System for Reduced Head and/or Pit (ELGO + eSGC).
Video Tutorial – ELGO Limax 33 CP positioning system
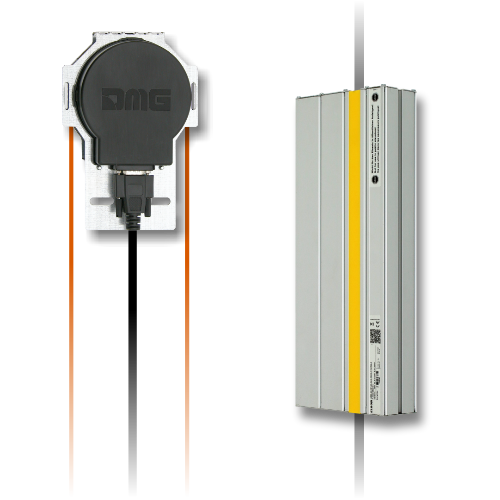
DMG Encoder based Counting System
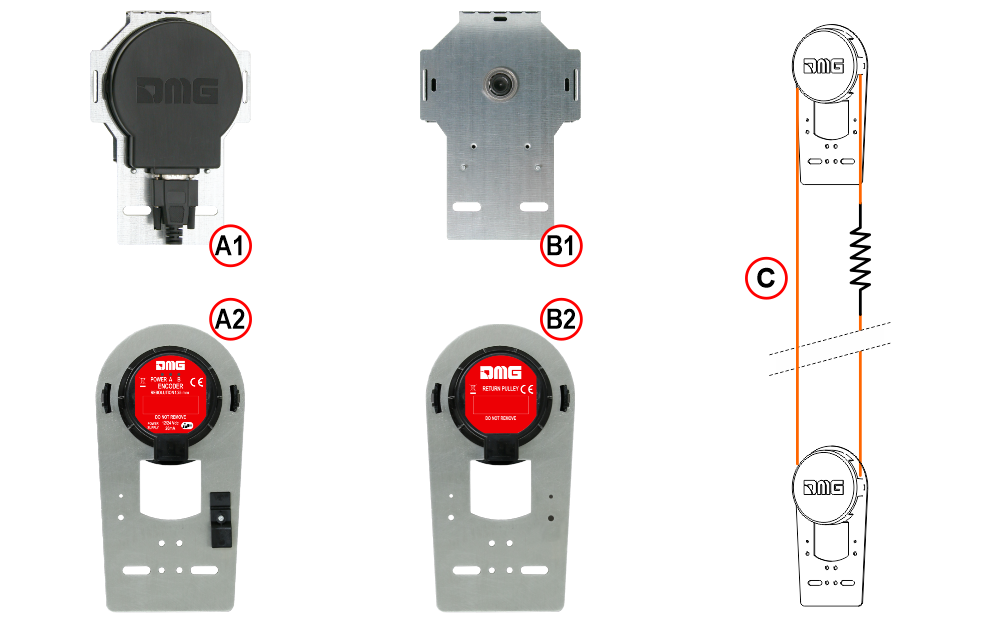
A1) – Encoder – Old model = 64 pulse number
A2) – Encoder – New model = 100 pulse number
B1) – Pulley – Old model
B2) – Pulley – New model
C) – Symbol
DMG’s rope and pulley Encoder provides the Playboard controller with a reliable, accurate and easy to install elevator car position detection system. The encoder calculates elevator car position by detecting the movement of the rope fixed to the cabin and checks this information with reference positions (detected during the initial self learning procedure). If present, discrepancies in the reading are detected and compensated at every passage on AGB/AGH limit switches and door zone (ZP) positions. Actual deceleration distance is set by the position of AGB/AGH limit switches. System accuracy is 1,2mm.
The activation of ZP door zone sensors also enables the door open command.
More over it is possible to set Inspection limit point (no safety contacts).
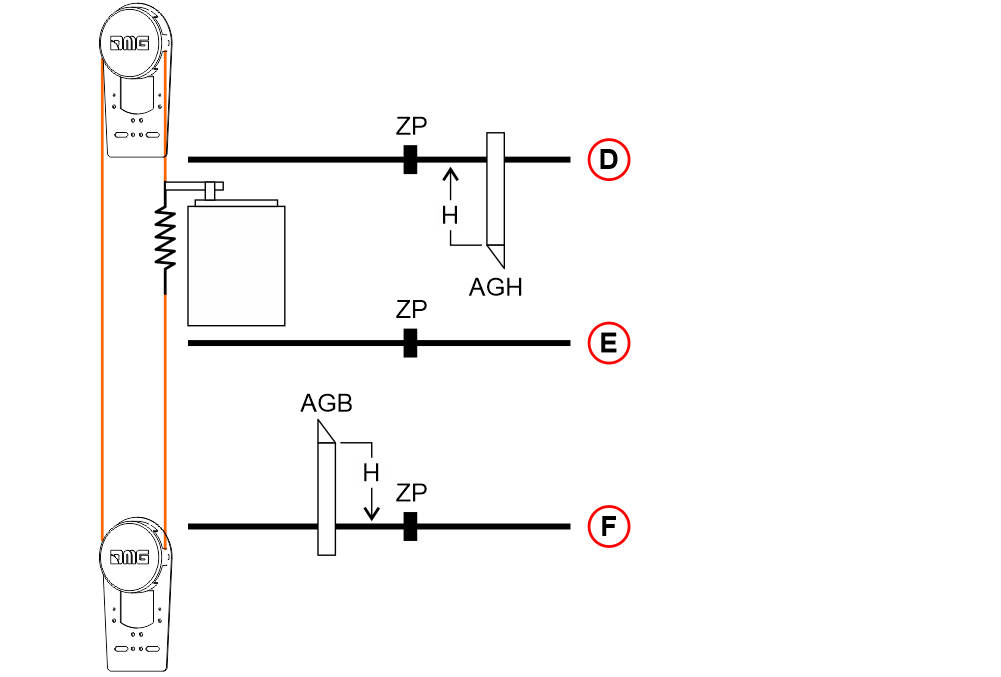
D) – Terminal Top Floor
E) – Floor N
F) – Floor 0
H) – Deceleration distance
ZP) – Door Zone
AGB) – Limit switch for bottom deceleration or reset
AGH) – Limit switch for top deceleration or reset
Inspection limit position
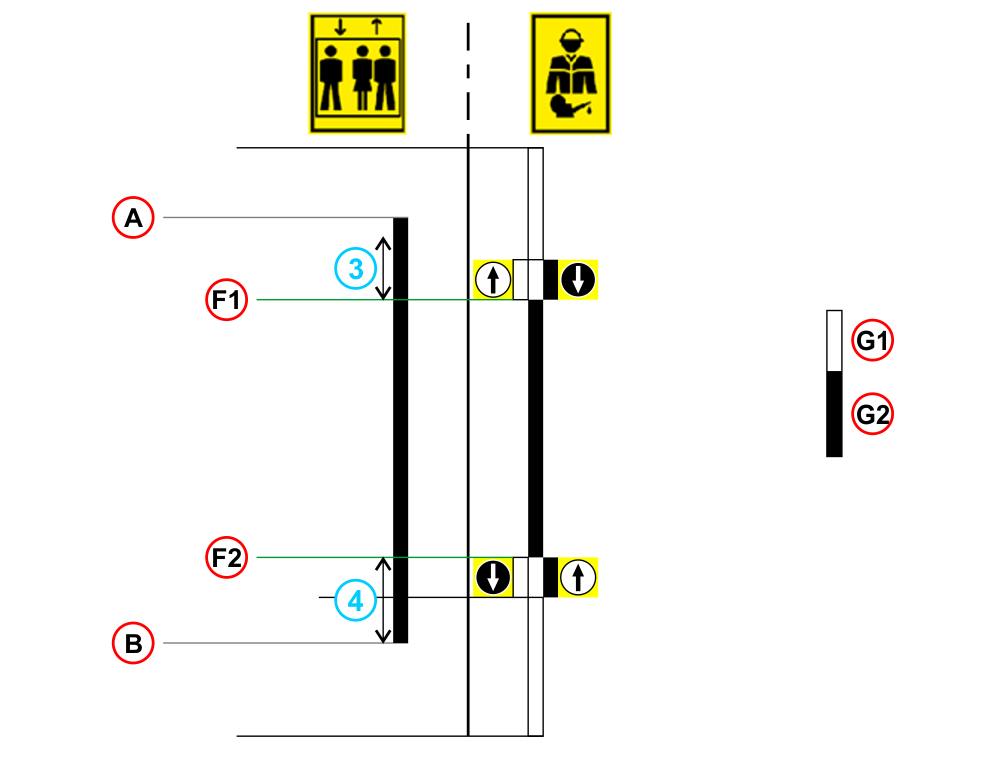
 | Normal Mode | A) - | TOP floor |
 | Inspection Mode | B) - | BOTTOM floor |
| Inspection UP button | F1) - | Upper inspection limit switch | |
| Inspection DOWN button | F2) - | Lower inspection limit switch | |
| Inspection limit position Up | G1) - | Moving enable | |
| Inspection limit position Down | G2) - | Moving not enabled |
For manual adjustment of the positions of the indicated is possible from menu <Positioning> Monitor Encoder (see table below).
| Label | Page | Description | |
|---|---|---|---|
| I_LIM_S | 6 | Upper inspection limit (offset under top floor) | |
| I_LIM_D | 6 | Lower inspection limit (offset over bottom floor) |
Lift speed and Deceleration distance
| Speed [m/s] | Deceleration [mm] | Acceleration time [s] |
|---|---|---|
| 0,6 | 900 | 3,0 |
| 0,7 | 1050 | 3,0 |
| 0,8 | 1200 | 3,0 |
| 0,9 | 1350 | 3,0 |
| 1,0 | 1500 | 3,0 |
| 1,1 | 1750 | 3,2 |
| 1,2 | 2000 | 3,3 |
| 1,3 | 2250 | 3,5 |
| 1,4 | 2500 | 3,6 |
| 1,5 | 2750 | 3,7 |
| 1,6 | 3000 | 3,8 |
| 1,7 | 3250 | 3,8 |
| 1,8 | 3500 | 3,9 |
| 1,9 | 3800 | 4,0 |
| 2,0 | 4100 | 4,1 |
| 2,1 | 4200 | 4,2 |
| 2,2 | 4700 | 4,3 |
| 2,3 | 5000 | 4,3 |
| 2,4 | 5300 | 4,4 |
| 2,5 | 5600 | 4,5 |
| 2,6 | 5950 | 4,6 |
| 2,7 | 6300 | 4,7 |
| 2,8 | 6650 | 4,8 |
| 2,9 | 7000 | 4,8 |
| 3,0 | 7350 | 4,9 |
| 3,1 | 7700 | 5,0 |
| 3,2 | 8050 | 5,1 |
| 3,3 | 8500 | 5,2 |
| 3,4 | 9000 | 5,3 |
| 3,5 | 9500 | 5,4 |
| 3,6 | 10000 | 5,6 |
| 3,7 | 10500 | 5,7 |
| 3,8 | 11000 | 5,8 |
| 3,9 | 11500 | 5,9 |
| 4,0 | 12000 | 6,0 |
Shaft protection
• Checking jumpers on door contacts (SCS error)
• Unauthorized access control in the compartment (UAS error): function required on the Russian market.
| Shaft Protection | SCS Fault | UAS Fault | |
|---|---|---|---|
| Type | Door contacts | Hatch contacts | |
| No | Disabled | Disabled | |
| 1 ... 5 | Do not use | ||
| 6 | Yes | Disabled | |
| 7 | Yes | N.O. | Disabled |
| 8 | Yes | N.C. | Disabled |
| 9 | Disabled | Disabled | N.O. |
| 10 | Disabled | Disabled | N.C. |
| 11 | Disabled | N.O. | N.O. |
| 12 | Disabled | N.C. | N.C. |
| 13 ... 16 | Do not use | ||
| 17 | Yes | Disabled | N.O. |
| 18 | Yes | Disabled | N.C. |
| 19 | Yes | N.O. | N.O. |
| 20 | Yes | N.C. | N.C. |


