(v 1.1)
Getting Started
Registration to MosaicONE
To request access credentials to the MosaicONE portal, send an email to [email protected] indicating your name and company. You will then receive instructions for registration.
What is MosaicONE
MosaicONE is a cloud-based software that allows the user to update and manage any networked device from MAD or DMG via a web browser. The theme designer allows you to create or modify displays whenever and wherever you want! You can do it all by yourself or delegate the responsibility to other users.
• News, Stocks & RSS feeds
• Time & Weather
• Pictures & Video
• HTML Content
• Position Indicator
• Per-Floor Messaging
• Scheduling
• Fully Customizable
Permissions
The creation, configuration, management of themes and devices in this cloud is strictly linked to the type of permissions associated with the user. The table below shows 3 different types of users with different permissions that DMG, in agreement with the client, can issue when shipping out the order.
During the ordering phase, DMG will create access only for BUILDING MANAGERS.
All actions, based on permissions, are always related to the Company of belonging (for example, a DMG Building Manager will be able to create users, buildings, devices, and themes only and exclusively for their company).
Visibility is also limited by company.
| A | B | C | D | Description | |
| Permissions for users | |||||
| Create new user | x | x | ○ | ○ | creating new users (only for the assigned buildings) |
| Modify a user | x | x | ○ | ○ | choosing the permissions to assign to a user |
| View users | x | ○ | ○ | ○ | viewing all the users assigned to a specific building |
| Delete a user | x | x | ○ | ○ | deleting users |
| Assign/unassign a user | x | x | ○ | ○ | assign/unassign users to buildings within the same company/organization |
| Permissions for buildings | |||||
| Create a new building | x | x | x | x | creating new building |
| Delete a building | x | x | x | x | deleting a building |
| Modify building information | x | x | ○ | ○ | modifying information related to single buildings such as Country, City, Address, etc. |
| Modify building settings | x | x | ○ | ○ | enabling traffic, maps news, etc. |
| Permissions for devices | |||||
| View the devices | ○ | ○ | ○ | ○ | view the connected devices |
| Create a device | x | x | ○ | ○ | creating devices |
| Modify a device | x | x | ○ | ○ | modifying the devices |
| Delete a device | x | x | ○ | ○ | deleting devices |
| Command a device | x | ○ | ○ | ○ | sending commands to the devices such as firmware updates, reset command, log, etc. |
| Administer a device | x | x | x | x | modifying the basic template |
| Permissions for themes | |||||
| View themes | ○ | ○ | ○ | ○ | view the existing themes |
| Create themes | ○ | ○ | ○ | ○ | creating new themes |
| Modify themes | ○ | ○ | ○ | ○ | modifying the existing themes |
| Delete themes | x | x | ○ | ○ | deleting existing themes |
A) – End user
B) – Device manager
C) – Building manager
D) – Main admin (customer)

A) END USER
This is the role with the most basic permissions. An END USER will only have access to managing device graphics, e.g. replacing graphics, multimedia content, installation information, and the like.

B) DEVICE MANAGER
This type of user has fewer privileges than a Building Manager. The DEVICE MANAGER is the person who will physically operate on the device, only if previously authorized by the Building Manager. They will not be able to create or delete devices. Building Managers can create graphics, but not delete them. They will be able to make changes or launch the software update of the devices and create rules for the operation of the devices. They will not be able to create or delete users.

C) BUILDING MANAGER
The role of BUILDING MANAGER is assigned exclusively by the ADMINISTRATOR. He will be the one to manage the buildings and/or devices. In addition to having complete management of buildings (except for creating and deleting them), groups, devices, and graphics, a BUILDING MANAGER can create or delete users and assign them the appropriate permissions for their purposes. Only users from the company owning the devices will have access to these contents in the cloud.

D) ADMINISTRATOR
THE ADMINISTRATOR is the user with the highest level of permissions. It is created during the order phase and associated with the person responsible for one or more orders. THE ADMINISTRATOR will create the buildings, to which the devices will then be connected, and which will be assigned to one or more BUILDING MANAGERS.
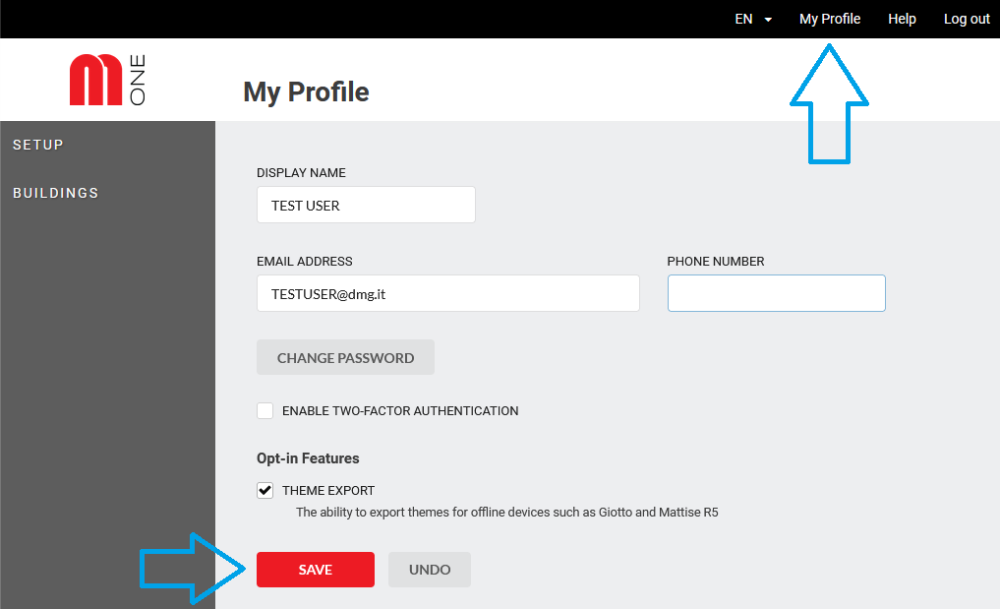
Organization users

By clicking on “ORGANIZATION” in the main menu on the left, and then clicking on the submenu “USERS”, it is possible to view the name, email address, and phone number of the people who have been assigned access to the system.
By clicking on the GEAR ICON on the right side of the screen next to each person, you can edit the details and create a password for each person you have granted access to the system. Clicking on the browser’s Back button will return you to the main menu from here. Below is an example:
Login
Go to www.mosaicone.net and log in with your credentials to access the devices in each of your buildings.
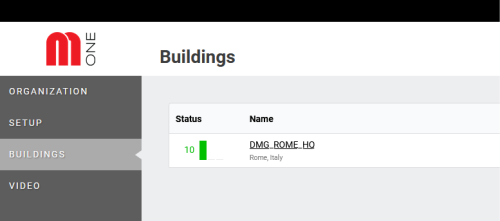
Once you log in you will see the following screen:
Click on the building name to access each screen and update/modify content remotely.
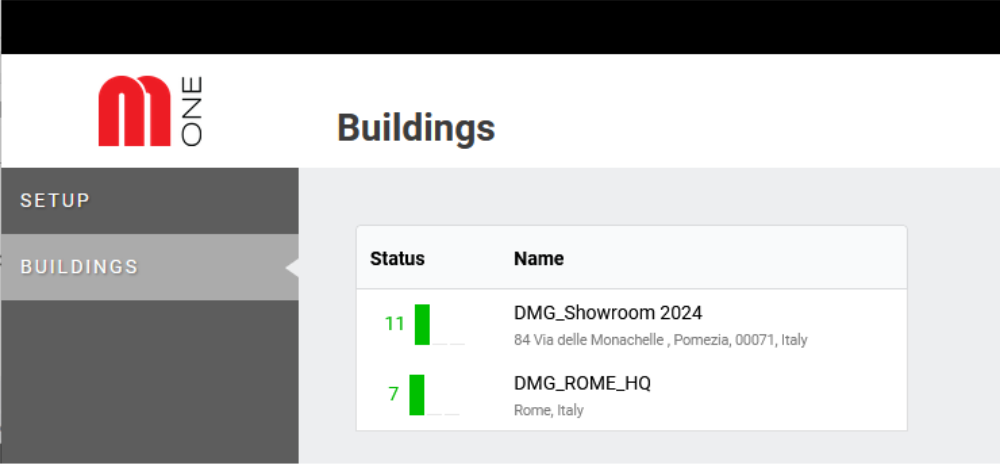
Clicking on a building will show the list of devices in that building, as shown in the picture.
It’s a quick view on the status of all devices of a specific building.
Browsing the interface
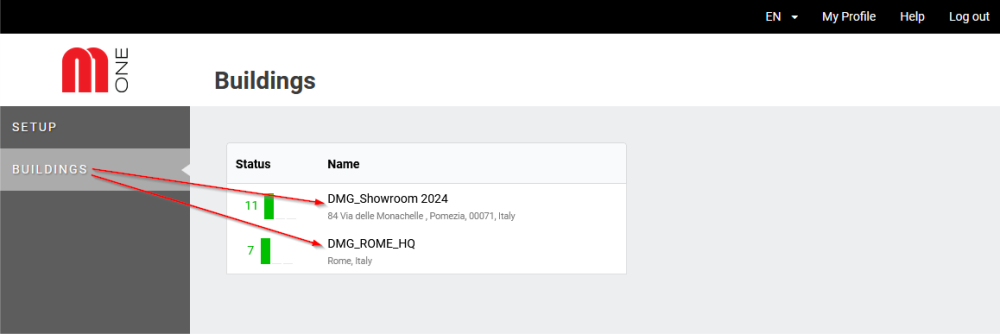
Buildings

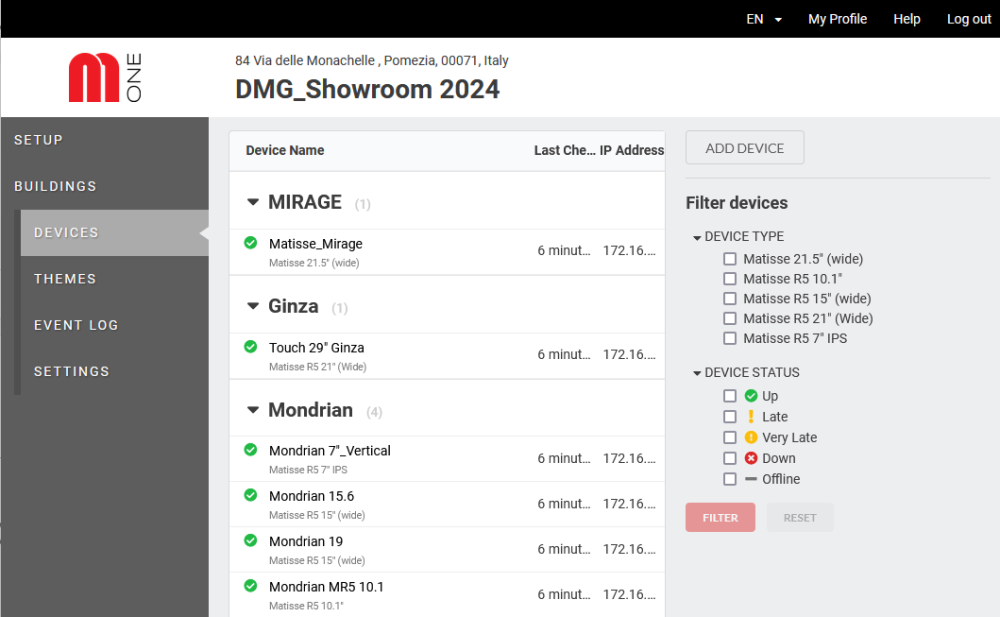
Once you click on the BUILDINGS menu on the left, the list of buildings under management will appear.
BUILDINGS >> DEVICES
Select the building you are interested in and you will see the list of devices assigned to that particular building.
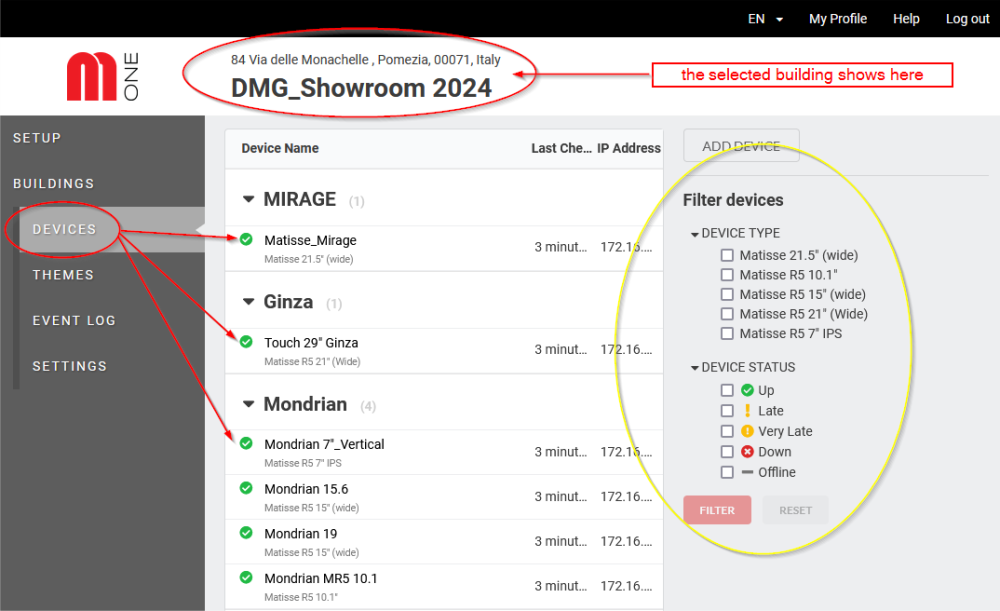
Using the options on the right side of the screen, it is possible to filter the devices by model, to make the search for your device fast and efficient.
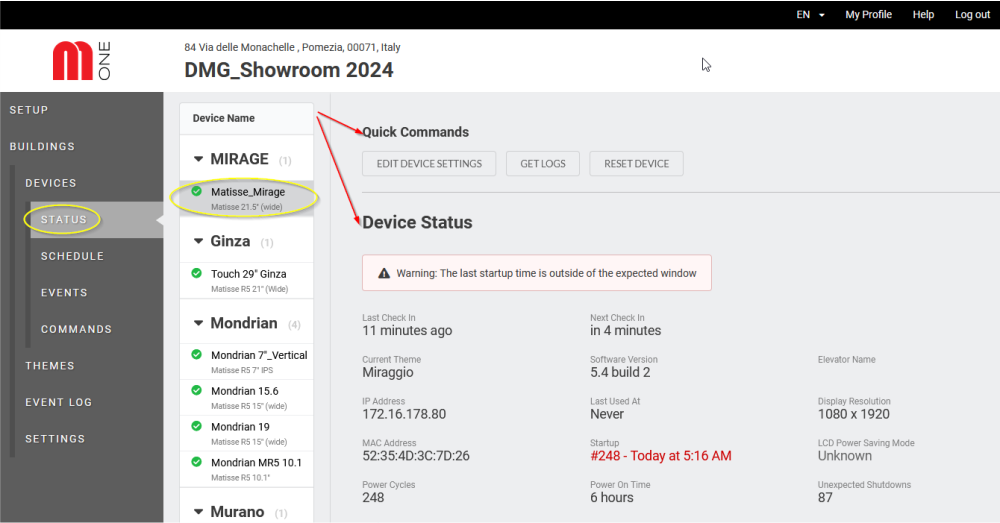
When selecting a device, the DEVICE menu expands, giving you access to 4 sub-menus. By default, the program shows the first one, with an overview on the STATUS of that device and 3 buttons for quick commands, as shown in the following picture:
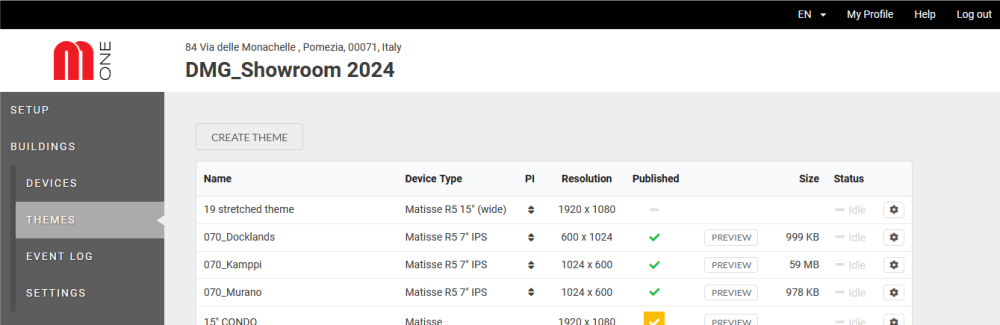
BUILDINGS >> THEMES
By clicking on ‘THEMES’ in the left menu, you will see a list of all the themes already created and associated with various devices. From this page, you can easily preview each theme, to which device it is associated, the screen resolution in pixels, whether it has been published on the corresponding device, view its status.
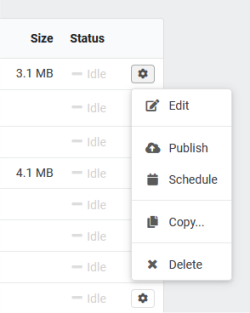
The GEAR symbol at the right end of each row allows you to edit, publish to the Cloud, schedule, copy, or delete a theme.
BUILDINGS >> EVENT LOG
The EVENT LOG (available from BUILDINGS > EVENT LOG) shows device, status, date, and time of each event in the system. By clicking ‘Show more’ at the bottom of the screen, you can view all events related to the building and its devices.
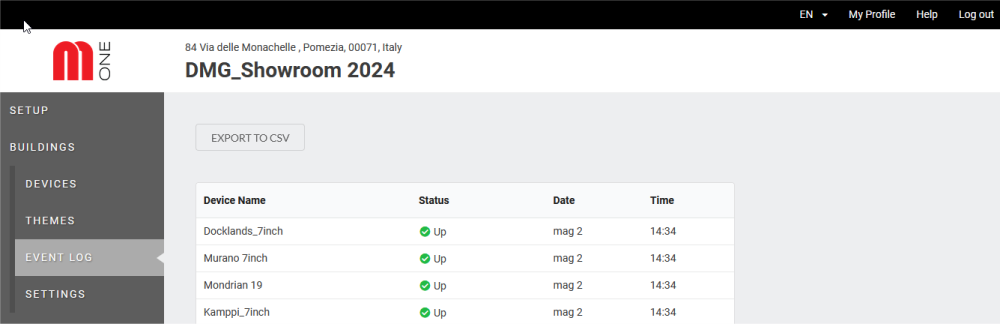
By clicking ‘Export to CSV’, you can download the event log to your computer.
BUILDINGS >> SETTINGS
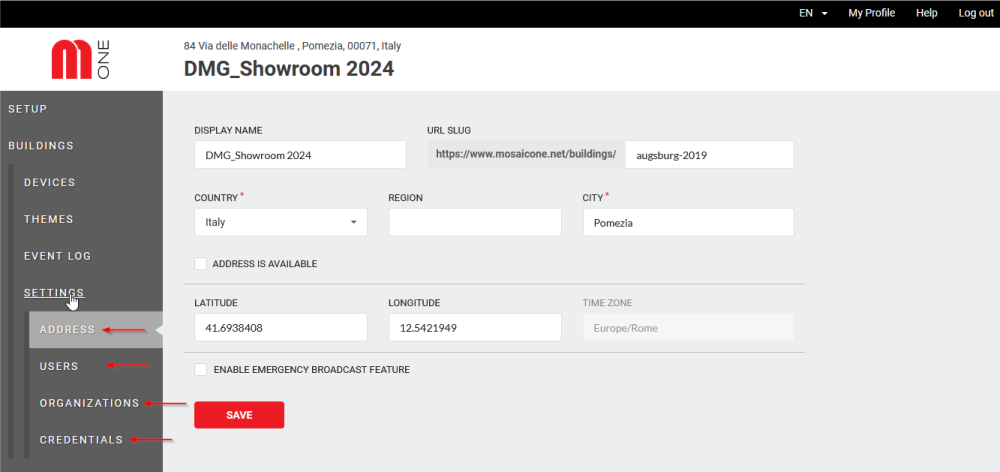
Selecting the SETTINGS sub-menu opens a further sub-menu that contains the options:
- ADDRESS
- USERS: allows access to the complete list of users assigned to the selected building
- ORGANIZATION: normally the organization is the name of the company that purchased the device(s)
- CREDENTIALS: this is the list of added PROVIDERS (related to stock market titles) and includes the provider’s name, the APP ID, the username, and the password.
From the CREDENTIALS submenu, by clicking on the ADD button, it will be possible to add providers. For example, ‘Thomas Reuters’ can be entered so that this provider can supply information for the ‘Stock Market’ widget.
Devices
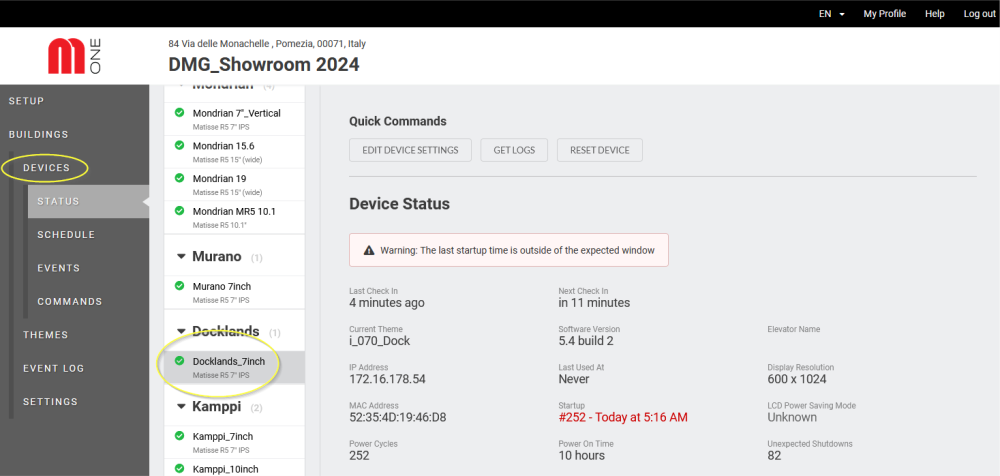
DEVICES >> STATUS
By clicking on each device, you will access detailed information about its status. Below is an example:
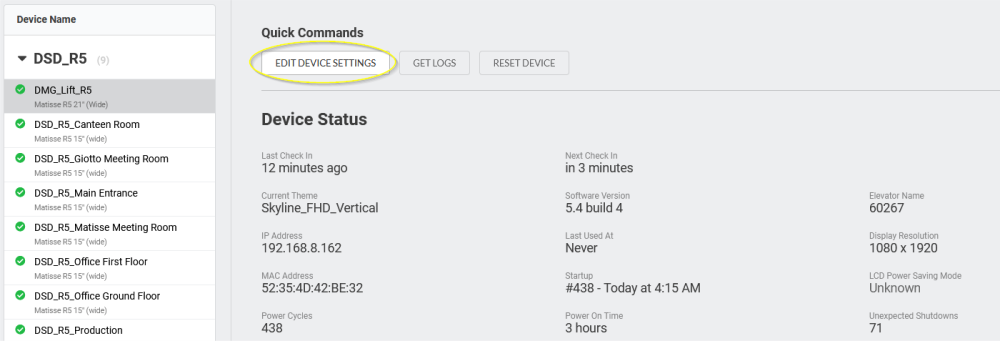
By clicking on ‘EDIT DEVICE SETTINGS’ you can modify the device name and set a PIN code to apply.
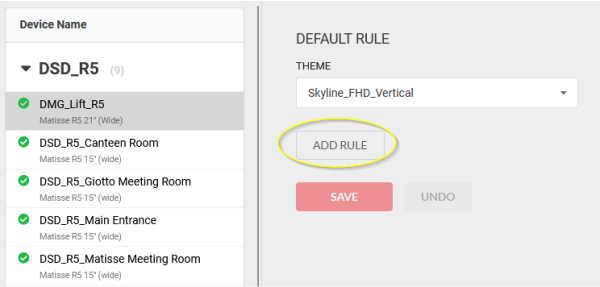
DEVICES >> SCHEDULE

By clicking on ‘SCHEDULE’ in the left menu, you can view the ‘THEME’ of each device. For example, scheduling information for the ‘DMG_Lift’ device is shown below.
By clicking ‘Add rule,’ you can schedule a second theme to run on the device in addition to the first one.
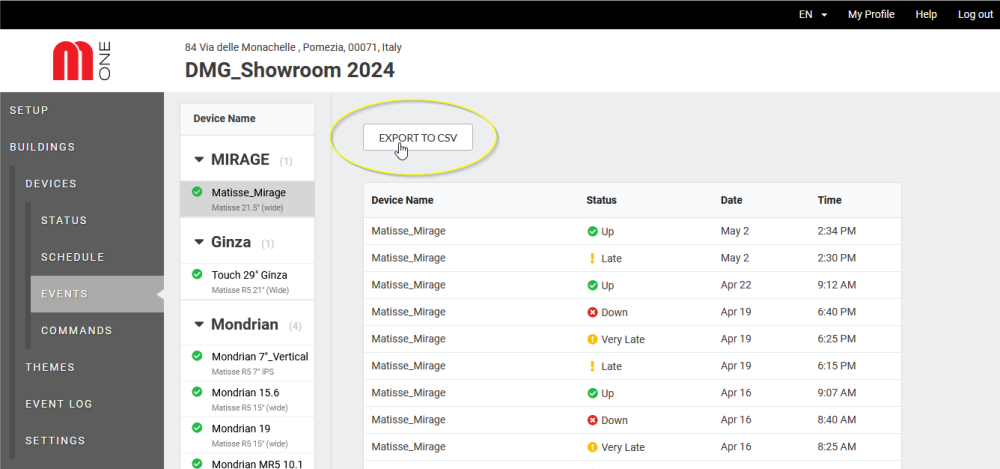
DEVICES >> EVENTS
By clicking on EVENTS in the DEVICES menu, after selecting a specific device, you will be shown a dashboard with the most recent events of the selected device. For example, the ‘Events’ information for ‘DSD_R5_Canteen Room’ is shown below.
By clicking on EXPORT TO CSV, you can export the displayed data.
Themes
Creating a new theme: general overview
From the main menu on the left, clicking on ‘BUILDINGS’, selecting the building you are interested in, and then clicking on ‘THEMES’ again from the left menu, you can create and manage themes for each device.
The displayed page shows the existing themes and the device type associated to each theme.
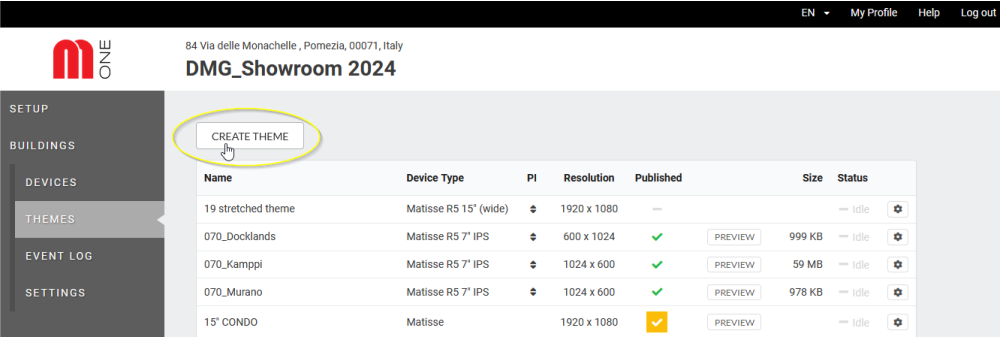
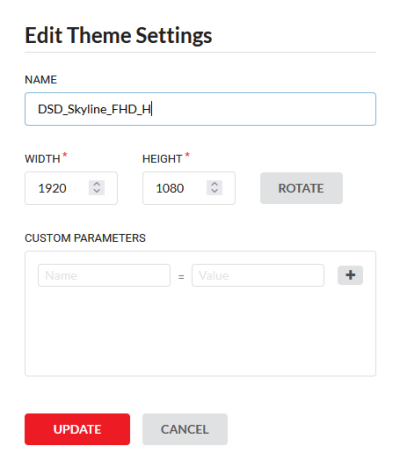
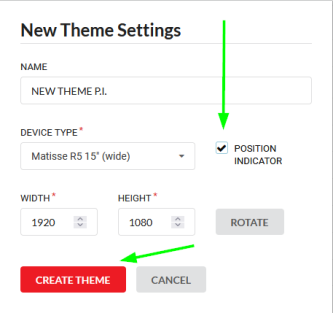
Clicking on CREATE THEME will open a pop-up window (see img below).
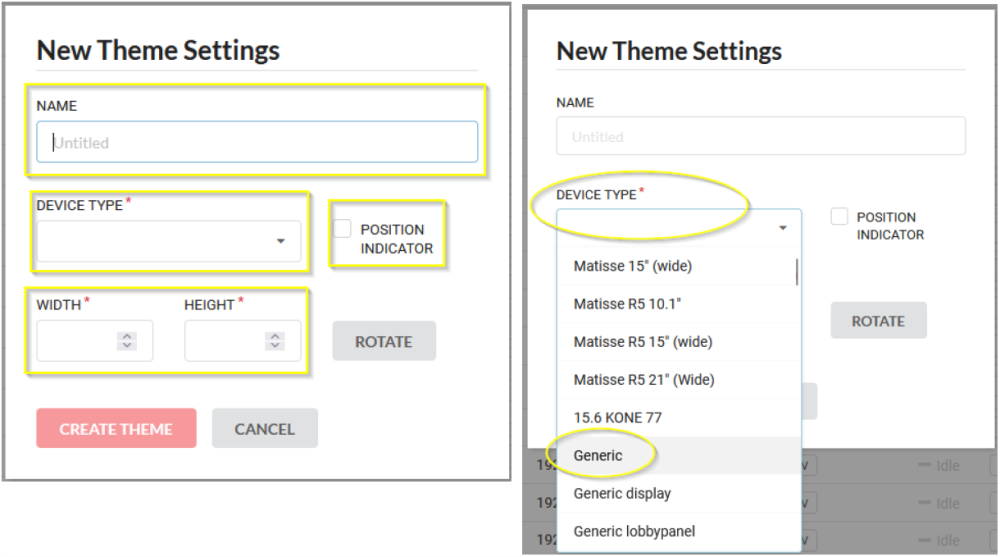
In the drop down menu of “DEVICE TYPE”, choose the device you need to set up or choose “Generic” if you don’t want the theme to be associated to a specific size/res.
Do not select the ‘POSITION INDICATOR’ box if you do not want the floor position to be displayed on the device.
The values of WIDTH and HEIGHT are automatically compiled based on the selected ‘DEVICE TYPE.’ If you have set the device type as ‘GENERIC,’ you will need to manually enter both the height and the width.
IMPORTANT NOTE: Do not modify the width and height settings from the ‘New Theme Settings’ page, but only from the ‘Device Type’ tab.
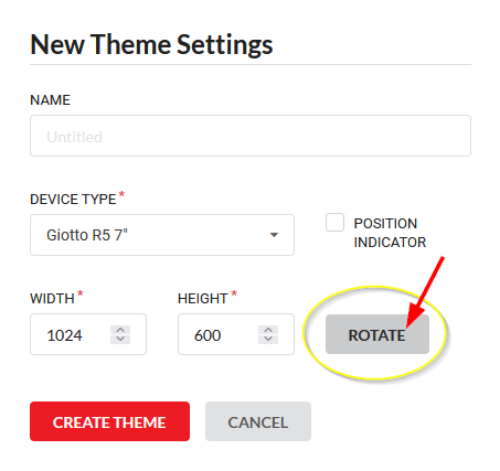
The ‘ROTATE’ button allows you to switch from horizontal mode to vertical mode.

Afterward, click on ‘CREATE THEME. A new screen will open, displaying the interface where you can create and edit the new theme.
Changing the area colors (fill in and borders)
To change the border/fill color of an Area, or the color of a font, click on the Color button in either the Area Properties or Content Properties menu. Select a color from the provided color palette to apply the color change. Drag the slider bar or enter a numeric value to change adjust the opacity.
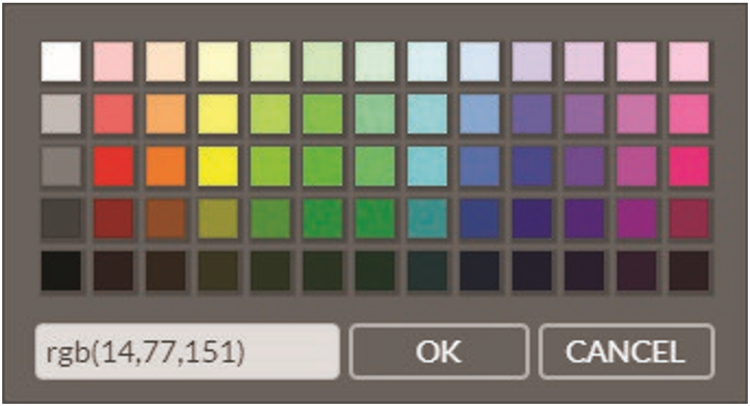
If you want a custom color, you will need to manually find the RGB value and type it in this exact format with no spaces: rgb(#,#,#).
For example, the blue used in this theme has the format of rgb(14,77,151).
Click OK when ready.
Transitions & Duration
If you have multiple Contents in your Areas, the default transition between them is “Fade” and the default duration is 10 seconds per.
The duration can be updated in the Content Properties menu, and can be seen quickly at the bottom right of each Content in an Area.
Transition is applied to the entire Area.
The following transitions are available to choose from:
- Fade
- Slide Down
- Slide Left
- Slide Right
- Slide Up
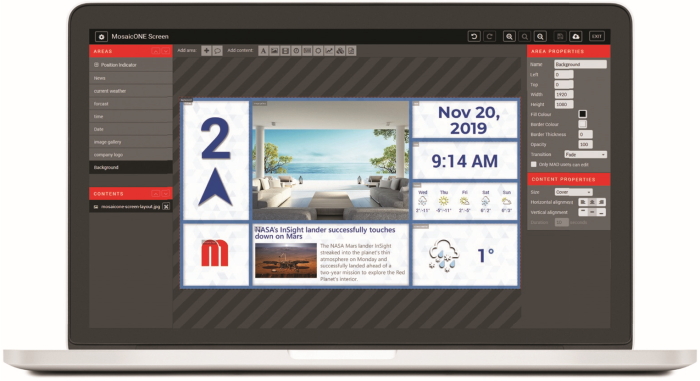
Creating a new theme: areas & options
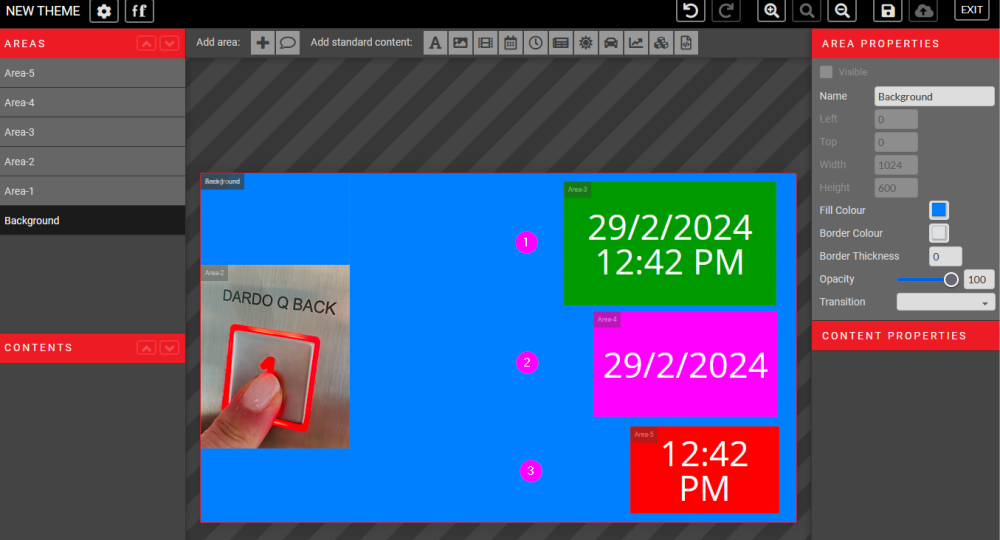
Once the name of the theme with its basic settings has been created, the actual composition window opens to show what will appear on the device’s screen.
In the following image, you see the screen of an existing theme that was created starting from DEVICE TYPE set to GENERIC, and not selecting POSITION INDICATOR.
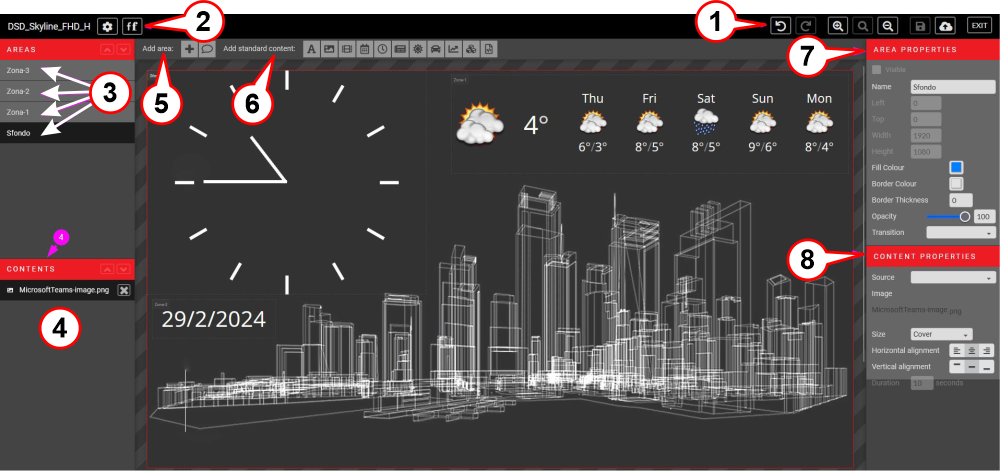
1) – Basic commands (ex. undo, re-do, zoom in, zoom out, save, publish).
2) – Settings & fonts
The settings symbol opens the pop-up window that you see on the left and allows you to make changes to the basic parameters of the display, such as name, horizontal/vertical orientation, screen dimensions.
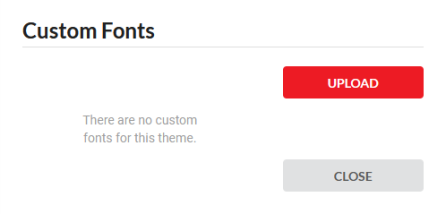
The fonts symbol opens a pop-up window that allows you to upload a custom font or view the list of previously uploaded custom fonts.
3) – Areas (background and any other area with a specific content type).
4) – Content (the name of the file assigned to an area).
5) – Add area (the + symbol adds a new AREA to the device, the comment symbol adds a FLOOR MESSAGE to which an image can be associated, to be displayed at a specific floor).
6) – Add content (from left to right: text, image, video, date/time, clock, news, weather, traffic, stock quotes, graphics, HTML.).
7) – Area properties ((For each selected area, it allows you to modify these parameters).
8) – Content properties (For each individual selected area, it allows you to modify these parameters).
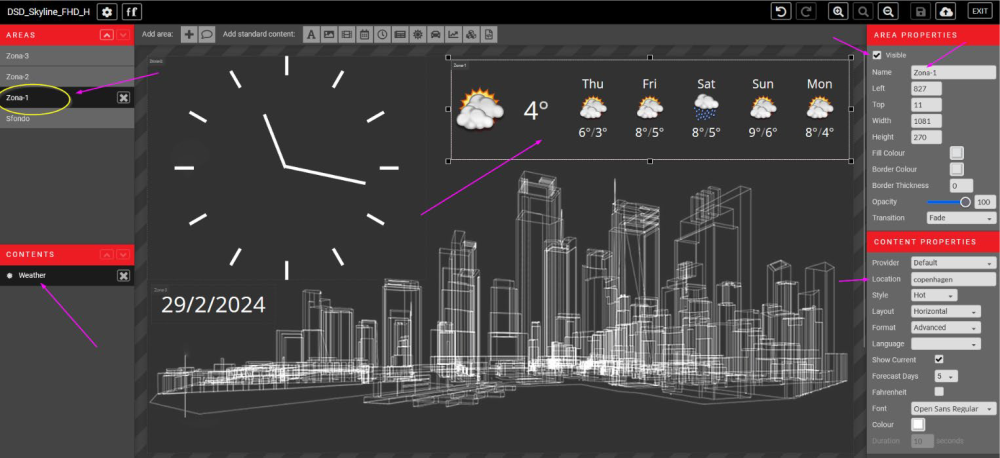
As shown in the image above, you need to SELECT AN AREA from the left menu to see it selected also within the visible area and therefore access the changes in the various menus on the left and right of the screen. From the AREA PROPERTIES section (top right), you can also decide whether an area will be visible on the device or not. The properties that can be modified vary depending on the type of content assigned to an area.
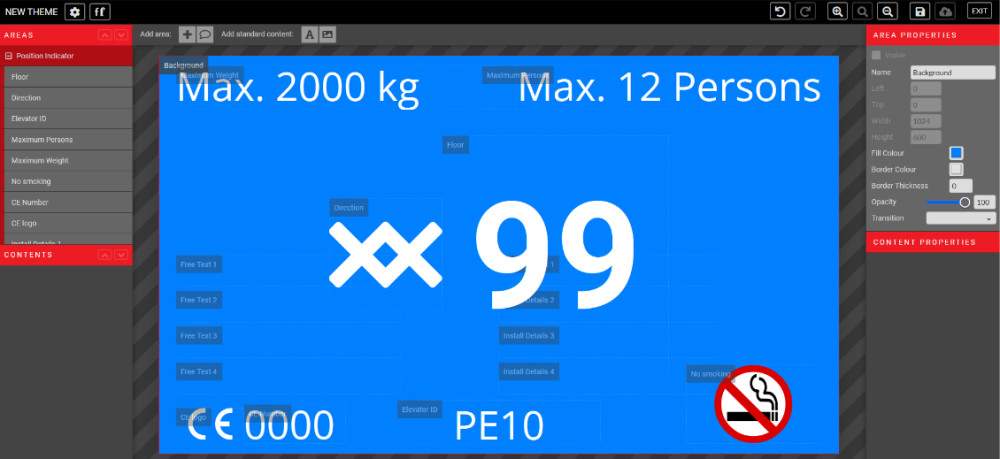
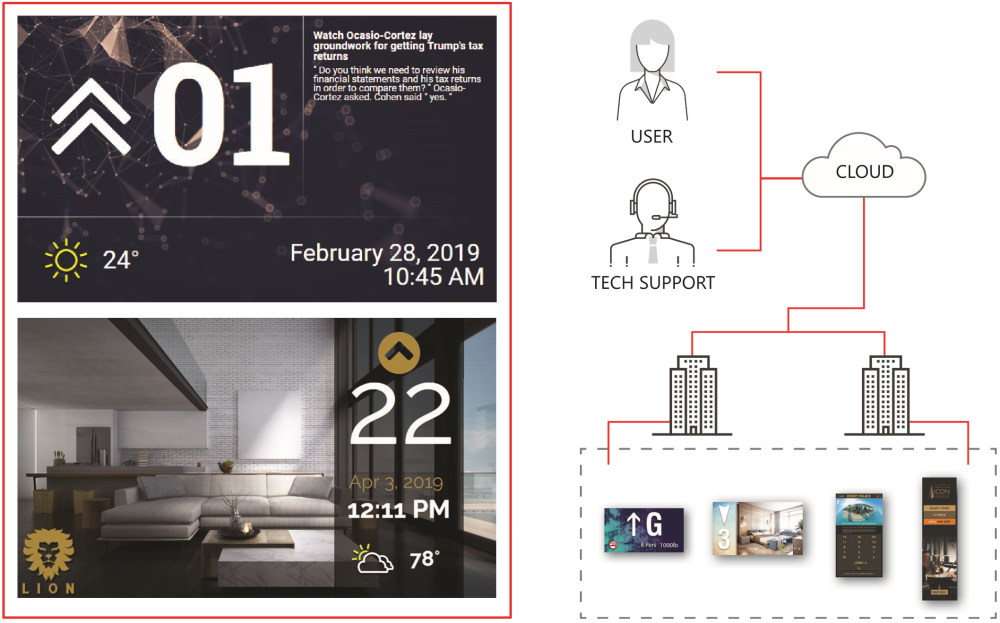
This image, on the other hand, shows the starting screen by selecting the POSITION INDICATOR box from the CREATE THEME screen.
It’s just a starting example; all predefined areas can be modified.
Creating a new theme: Let’s get started
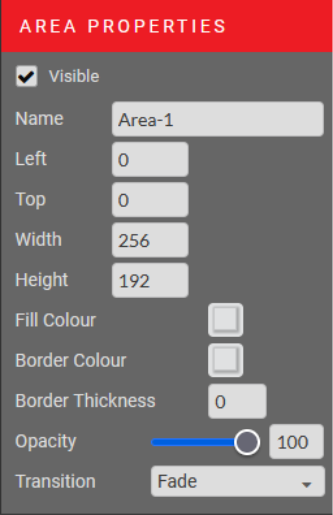
When a new theme is created for the first time, the visible space of the device will be empty except for the ‘BACKGROUND’ area, which appears blue by default.
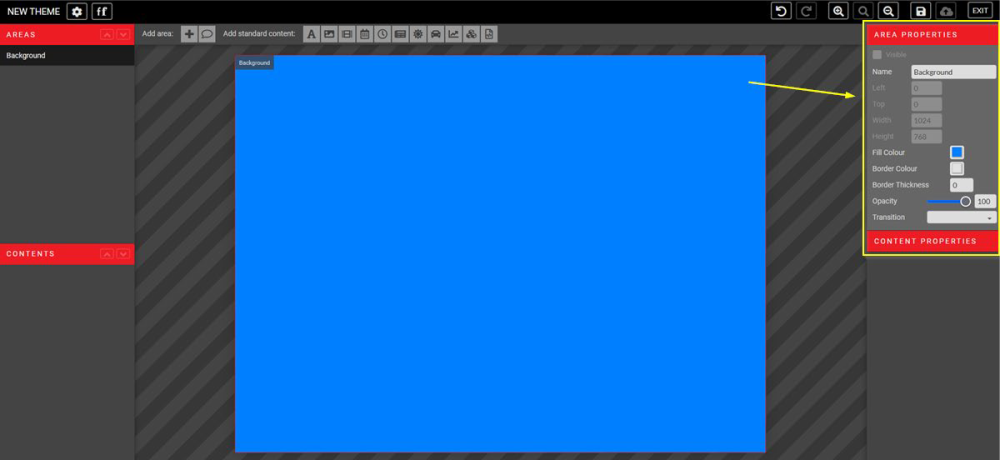
You can modify the NAME, the background COLOR and other attributes from the menu AREA PROPERTIES on the right side of your screen.
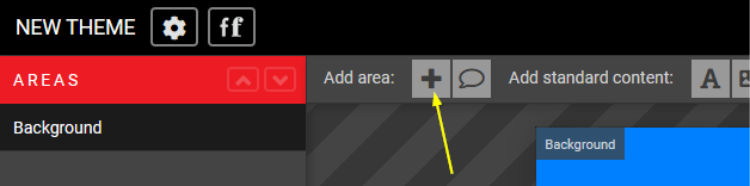
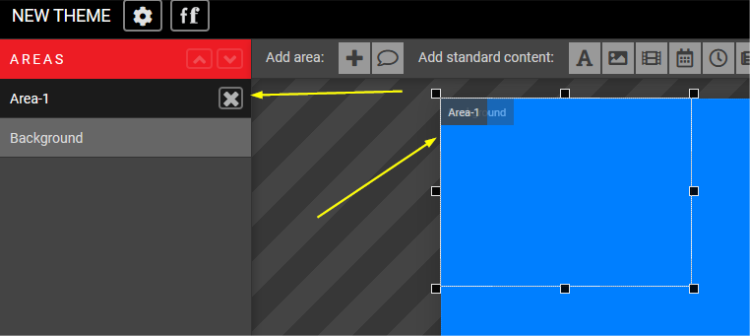
ADDING A NEW AREA is the first thing to do.
By clicking on the +, a box named ‘AREA-1’ is created. Each subsequent area will be assigned a progressive number by default. The names of the areas can be modified from the right menu, AREA PROPERTIES, by selecting each individual area.
Now that the area has been created, we can proceed to insert the desired CONTENT TYPE from the top menu
From left to right: text, image, video, date/time, clock, news, weather, traffic, stock exchange, theme, HTML.

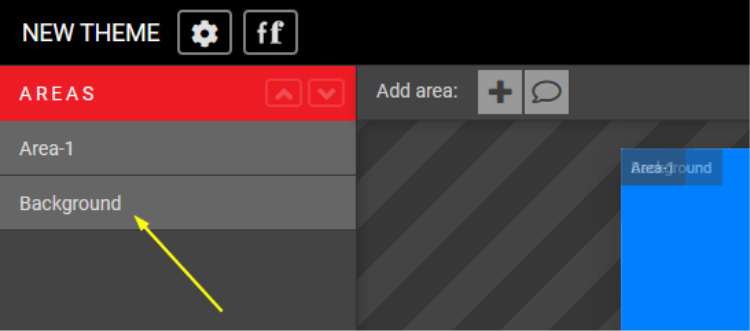
To upload a background image, select BACKGROUND from the AREAS menu at the top left.
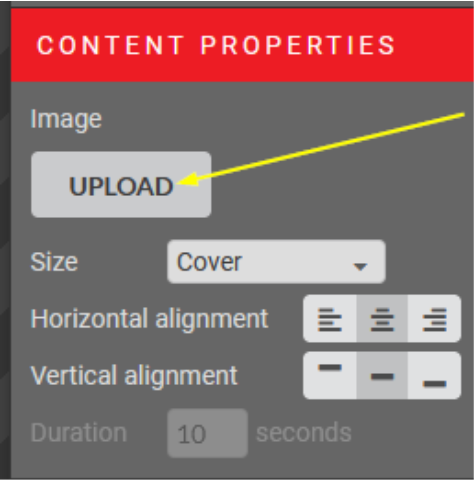
Click on the IMAGE symbol in the top menu

and click on the UPLOAD button in the CONTENT PROPERTIES menu on the right to upload an image from your computer.
Areas & Content
To add content to each area, simply select the desired area and then click on the type of content you want to add.
Content type: TEXT

To add text, first create an area and click on the A symbol from the ADD STANDARD CONTENT menu on top.
You can rename the area, resize it, reposition it and apply a different color to the selected area. You can HIDE it unflagging the first box on top of this section.
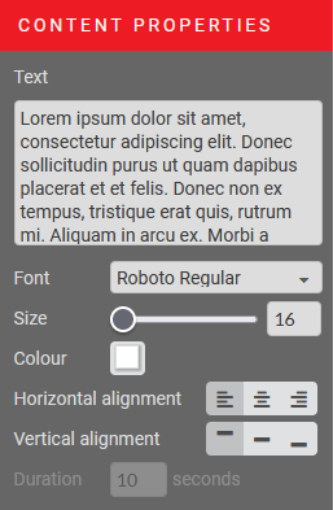
The text to be displayed should be entered in the TEXT field of the CONTENT PROPERTIES section.
From that section, you can also modify the font type, its size, color, horizontal and vertical alignment.
If you want to create larger titles and smaller body text, you will need to create two separate areas and configure each with its own characteristics.
Content type: IMAGE

Multiple images can be assigned to the same area (in the example below, 3 images not yet uploaded), which are configured by default to be displayed for 10 seconds each.
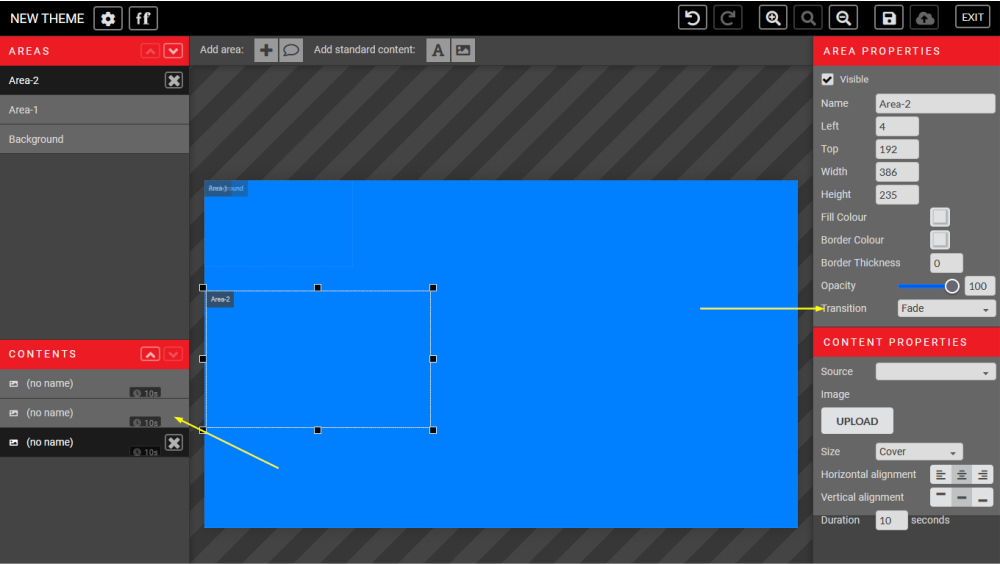
By default, the transition between one image and the following one is configured with the FADE type. Through the dropdown menu, you can change the type of transition, and at the bottom of the CONTENT PROPERTIES section (bottom left), you can modify the display time of each image.
This option allows you to create an IMAGE GALLERY.
Accepted formats for images are JPEG, PNG, TIFF, GIF, and EPS.
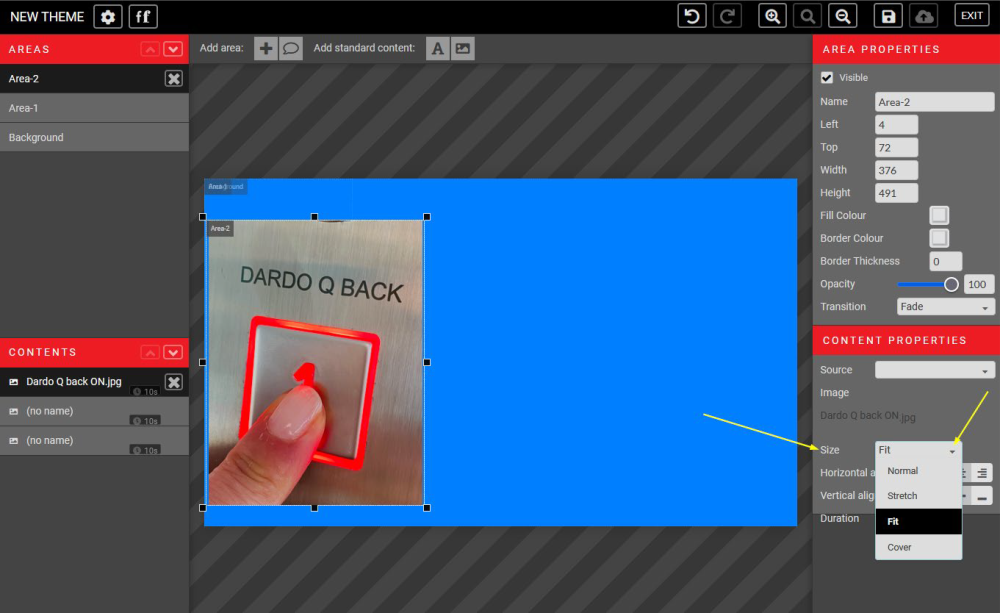
Once the image is uploaded, you can assign resizing characteristics to each image from the dropdown menu in the CONTENT ATTRIBUTES section. The possible choices are:
- NORMAL : to show the image with its original size
- STRETCH : to adapt the image to the area size; it could distort your image
- FIT: to show the entire image inside the area, it fits the image to the area height by default
- ZOOM: it fits the image to the width of the area, vertically centered by default
Content type: VIDEO

To add a video to an area, click on the Film icon in the ADD STANDARD CONTENT menu. The supported formats for videos are MP4, MOV, AVI, and MPEG.
This option adds a video from the computer. To load a video from YouTube, start from the HTML content instead.
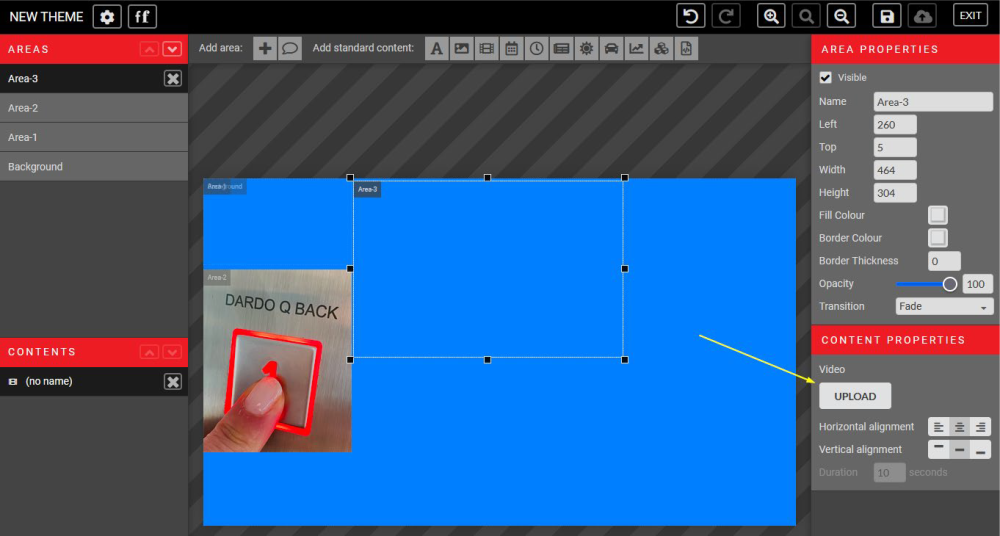
Use the ‘UPLOAD’ button in the CONTENT PROPERTIES section on the right to upload your content.
Content type: DATE & TIME

To add DATE & TIME to an area, click on the CALENDAR icon in the ADD STANDARD CONTENT menu.
Date and time can be added together in a single area (option 1 below) or separately (option 2 and 3 below) depending on the format selected in the dropdown menu in the CONTENT ATTRIBUTES section.
Content type: CLOCK

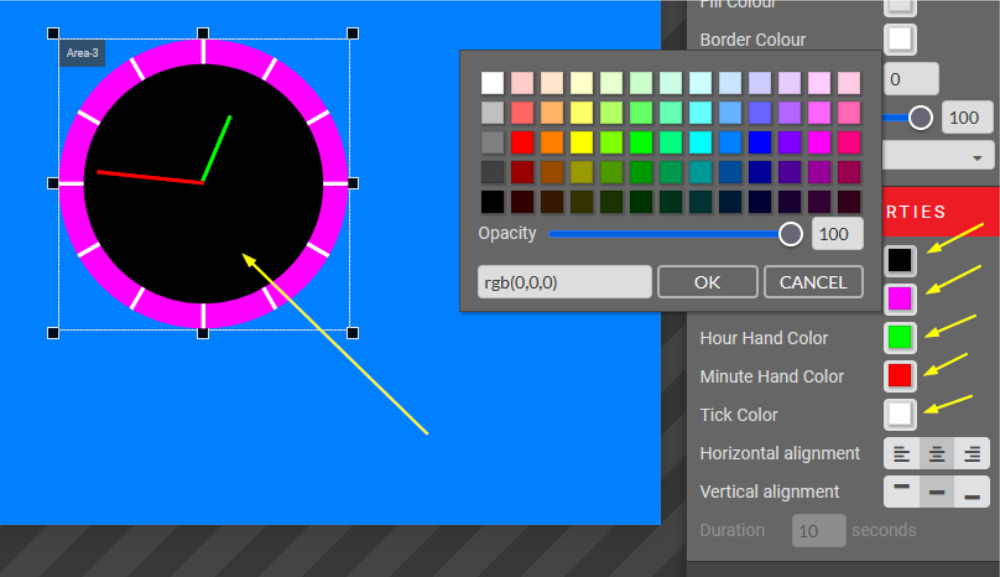
By clicking on the CLOCK icon, you have the ability to display a real clock on your device screen.
The available clock shape is ROUND; the color customization of each element is free, including the transparency property of a clock area.
Content type: NEWS

To add NEWS to an area, while the area is selected, click on the NEWS icon in the ADD STANDARD CONTENT menu in the top bar.
The news provider can be selected from the dropdown menu in CONTENT PROPERTIES.
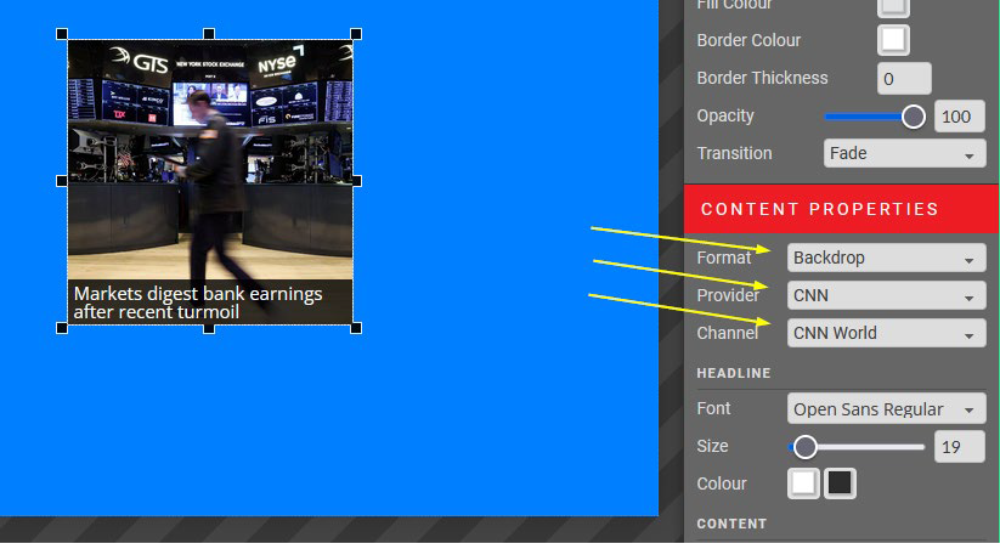
You can customize the DURATION of the news feed and the NUMBER OF NEWS ITEMS you want to be displayed simultaneously.
A separate area is provided for the title font and the content font.
Available providers: RAI / CNBC / CNN / Global / Thomson Reuters / Yahoo / Custom…
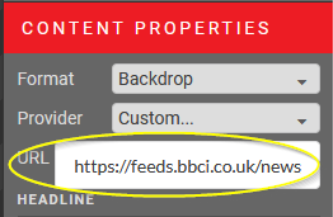
If the news feed you want is not one of the options, select ‘Custom…’ and enter the RSS feed URL for the news channel you want to link..
Ex. BBC World News is https://feeds.bbci.co.uk/news/world/rss.xml.
Content type: WEATHER FORECAST

Click on the SUN icon from the top menu to add the weather forecast to an area.
The forecast will automatically refer to your position. If you want to display the weather of a different location, just type in the place in the format “city, country”.
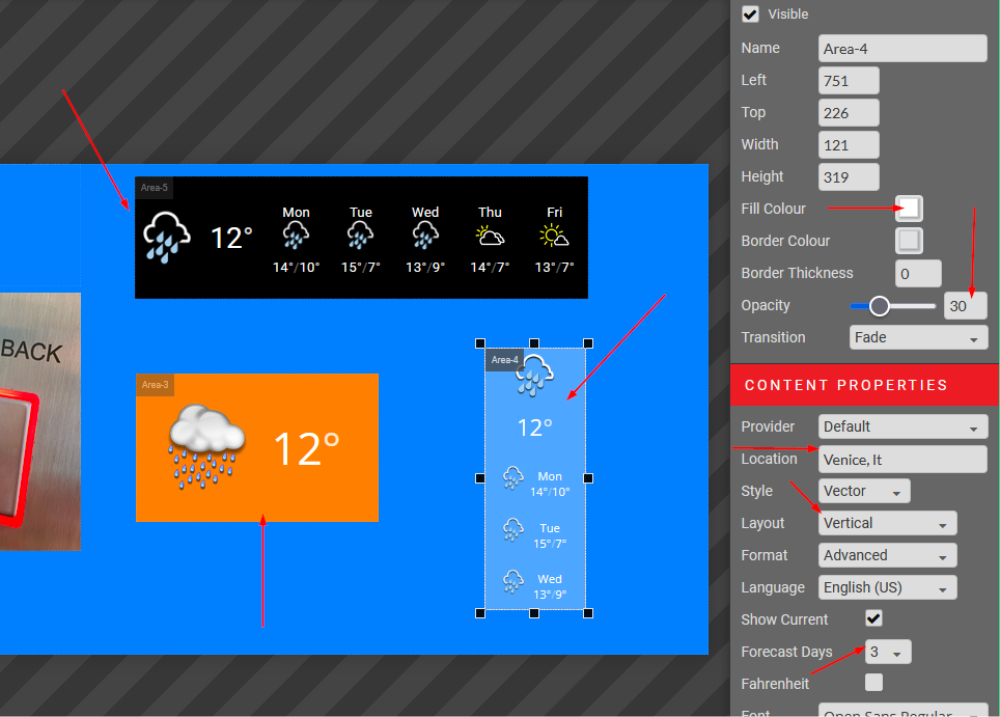
You can see three different weather areas in the image on the left, to show the different layouts that can be obtained changing the set up of the area from the right-side menu.
Forecast days can be configured 1 to 5, the layout can be VERTICAL or HORIZONTAL.
The background color of the area can be customised, as well as its transparency.
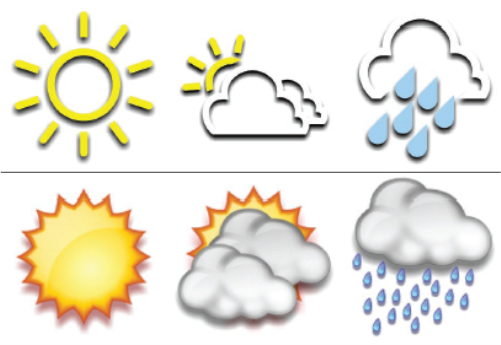
Two sets of icons with different styles are available to choose from: VECTOR or HOT, basically the first is a set of outline icons (minimal style) and the second is a set of illustrations. The example shows the VECTOR at the top and the HOT at the bottom:
As a default, temperature shows in Celsius; you can select Fahrenheit from the control box.
Content type: TRAFFIC

The button with the CAR icon enters a widget to show traffic in real time from a selected city/place. Geolocation is automatic, no need to enter Latitude and Longitude, as shown below.
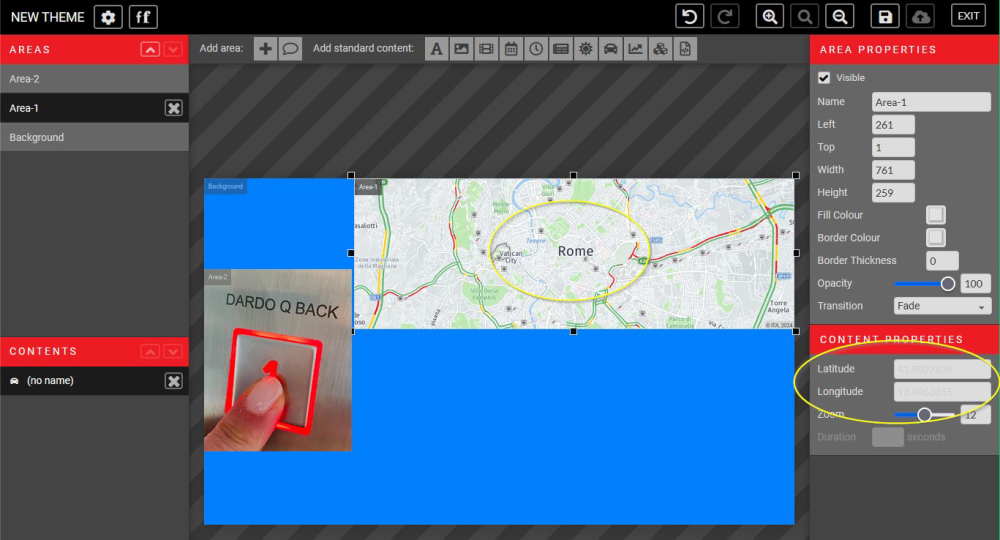
Enter a specific LATITUDE and LONGITUDE to show traffic of a different location.
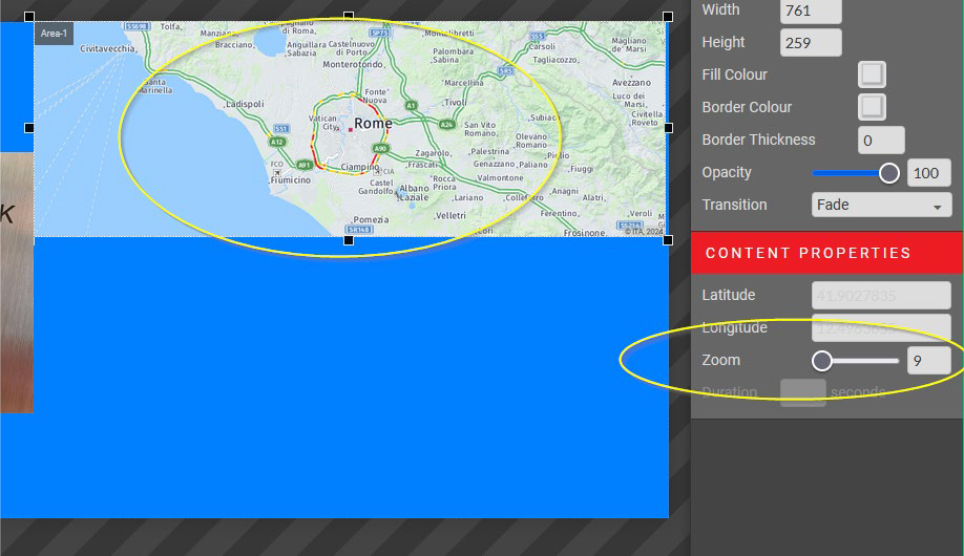
Changing the ZOOM factor will immediately show the new output on your screen for a better control of what you’re creating.
Content type: STOCKS

Click on the GRAPHIC icon to enter the STOCKS widget.
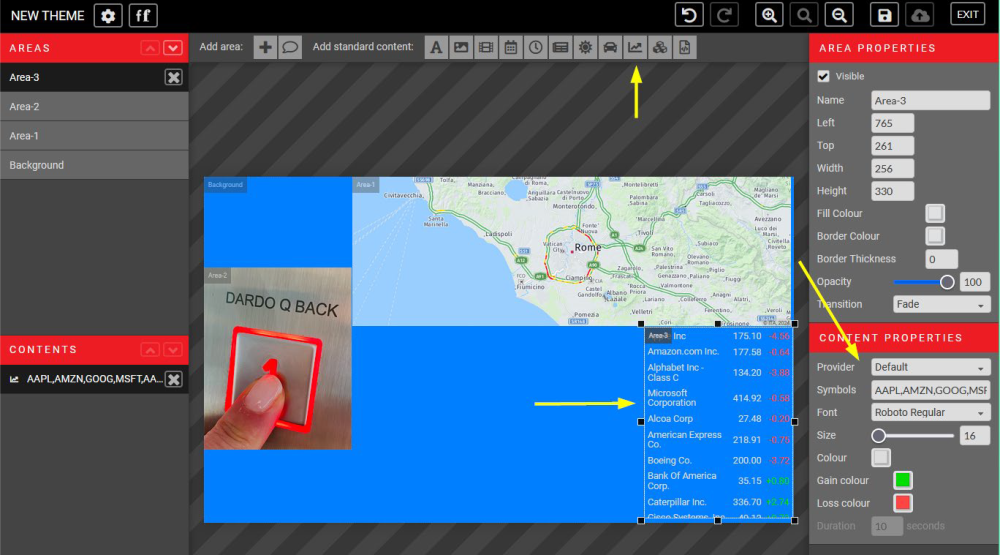
You can specify which stocks you want to display, simply by entering them in the SYMBOLS box on the right of your screen.
Create separate Content Containers and select transition “Slide Down” for a traditional stock
transition. Duration between sets of stock symbols can also be customized.
You can also customize the font, size, gain colour and loss colour to suit your theme design.
A list of compatible stock symbols can be found at:
https://iextrading.com/trading/eligible-symbols
Content type: THEMES

To add Existing Themes to an Area, while the Area is selected, click the BUILDING BLOCKS icon in the Content Options menu.
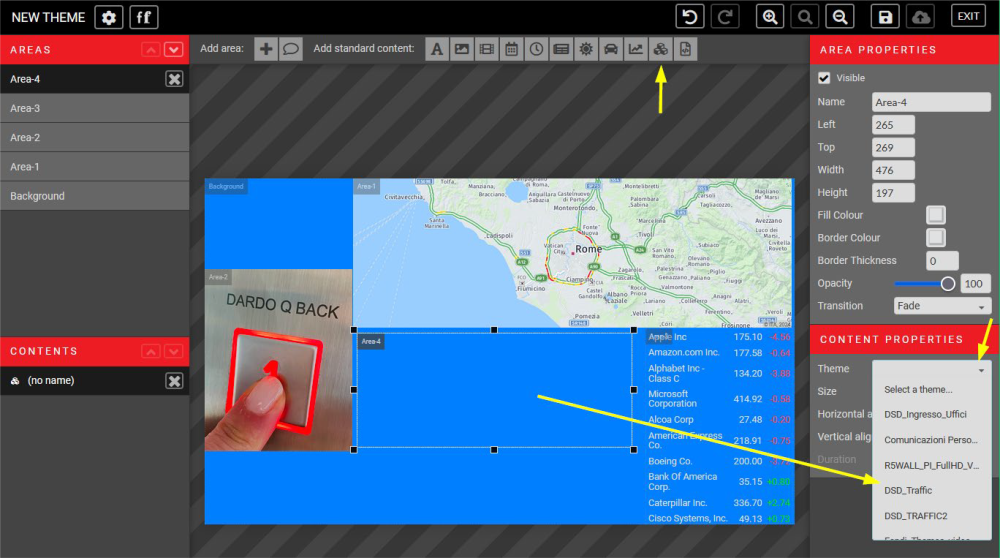
This advanced tool allows for existing themes to display within another theme.
This can come in handy to schedule different content at different times within an Area to keep the display consistent.
The themes must be saved and published in the same building to be able to display in a Content Area.
Content type: HTML CODE

To add a custom HTML code to an area, click on the SCRIPT icon button in the top menu.
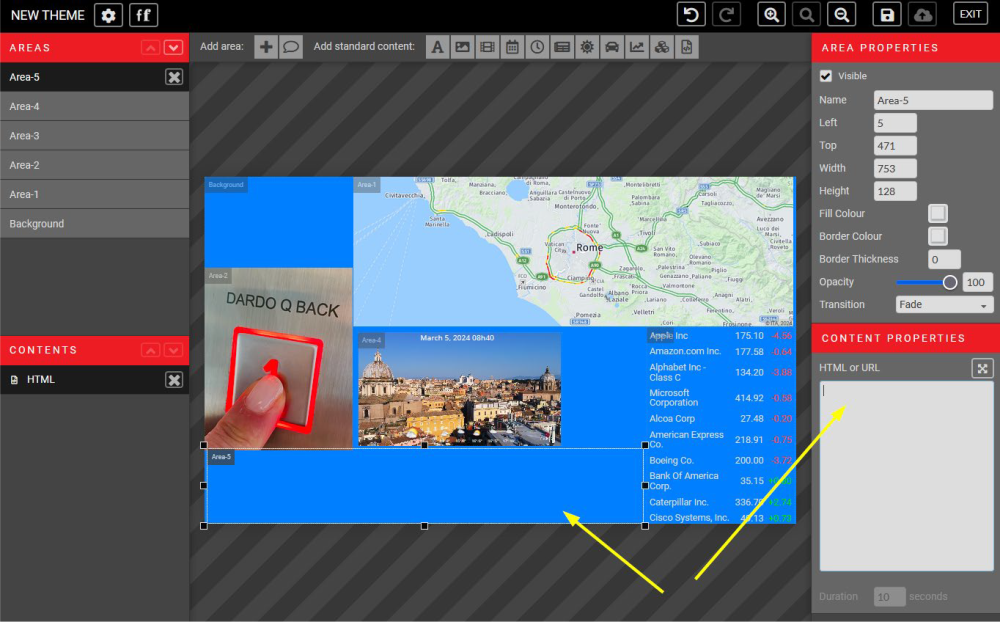
This advanced tool allows you to customise content areas with your html code. This includes incorporating YouTube videos.
Just enter your HTML code in the box. The area will be your iframe.
Like many other content areas, HTML iframes can have a set duration.
URL
To display a Website, enter the corresponding complete URL in the content properties box.
Ex: https://www.xxxxxxxxxx.xxx/
New theme for position indicator
When creating a new theme, be sure to have the Position Indicator checkbox selected.
It will then automatically be added as the top-most layer to the theme Areas. It can be minimized at any time.
A preset template will show as shown below.
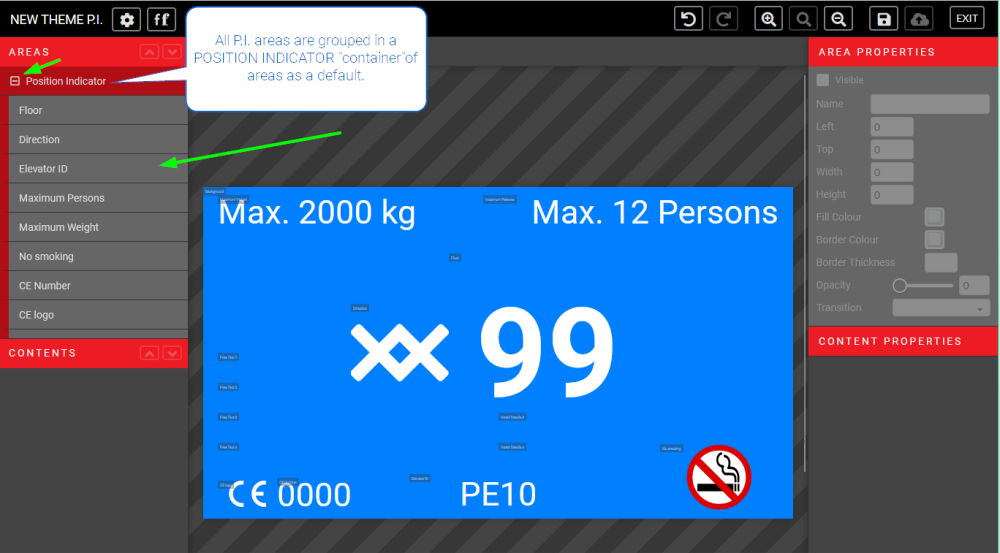
Clicking on a single area will show the relevant CONTENT PROPERTIES on the right, where you’ll be able to edit it.
As a default, the following sub-areas are included in the POSITION INDICATOR layout.
| Floor (to edit the floor number/symbol) | Direction (to edit the arrows) |
| Elevator ID (to edit the installation/elevator number or ID) | Max Persons (max nr of persons allowed in the elevator) |
| Maximum Weight (max weight allowed in the elevator) | NO SMOKING |
| CE Number | CE Logo |
| Install Details 1 | Install Details 2 |
| Install Details 3 | Install Details 4 |
| Free Text 1 | Free Text 2 |
| Free Text 3 | Free Text 4 |
Below the POSITION INDICATOR group of areas, you can find the background area, which can be edited and customized as described before.
The position indicator is required by code to be a MINIMUM OF 2” IN HEIGHT. The minimum pixel size is given in the Content Properties menu.
Save, publish, preview
In order to Preview your theme, you first need to SAVE (floppy disk icon) and PUBLISH
(upload icon) your theme in the top-right menu. Then Exit to return to the Themes menu.
From here you will see a green checkmark under the Published column. Click on the PREVIEW button to launch a new tab in your browser to preview your theme.
If you have Saved but not Published your theme, a yellow checkmark will appear instead of a green one.
Your theme Preview will be from the last time you Published your theme.

It takes approximately 15 minutes for the system to update the devices after Publishing.
Duplicate & share a theme
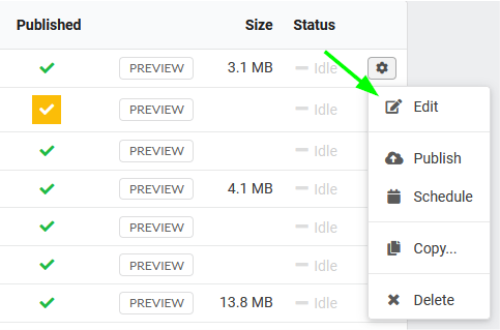
From the BUILDINGS > THEMES menu (where you have the full list of themes that you have created) you can edit any existing theme by clicking the gear icon on the right and selecting EDIT from the drop down menu.
From the same drop down menu you can PUBLISH, SCHEDULE, COPY or DELETE a theme.
To duplicate a theme, use the COPY option.
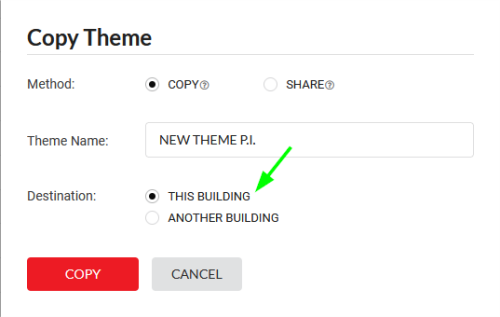
Rename this theme to avoid confusion.
This option comes in handy when creating Seasonal themes.
To use the same theme in multiple buildings, use the SHARE option. You will then only need to keep one theme up to date, which will display in multiple buildings.
If the theme you’re copying has been created with the P.I. function, it will be duplicated as a P.I. The same is valid for a theme created without the P.I. function.
Scheduling a theme
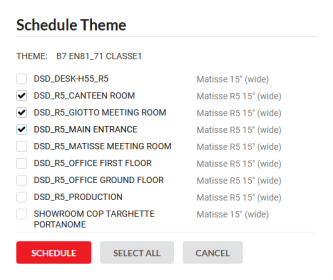
To schedule an existing theme, go to BUILDINGS>THEMES, click on SCHEDULE in the drop down menu of the gear icon button. Select the device/devices where you want to schedule the selected theme.
For advanced settings of a theme schedule, go to DEVICES > SCHEDULE.
Only themes compatible with the device will be displayed in the dropdown menu.

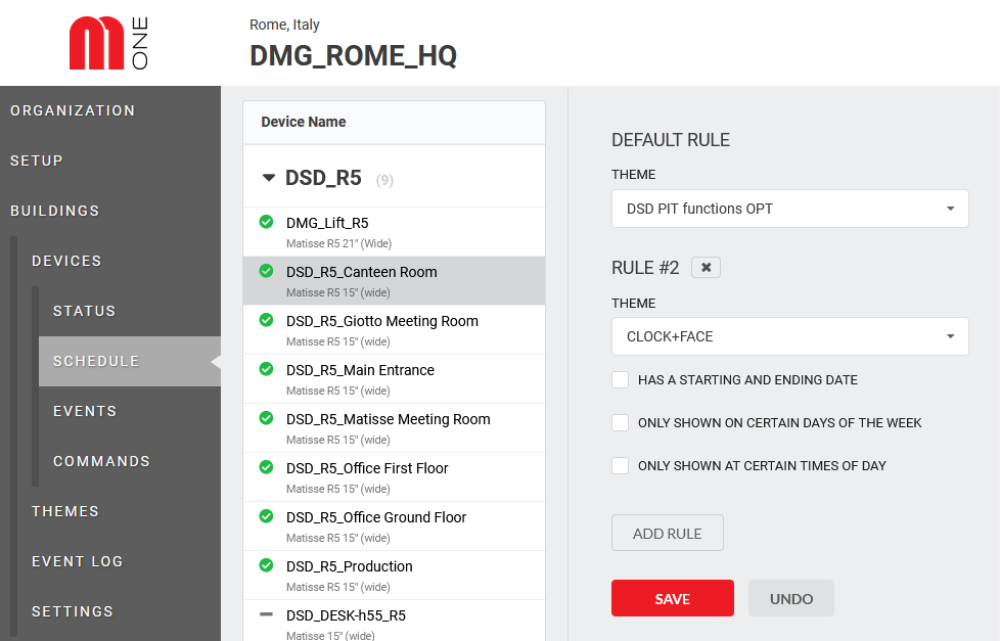
Click on “ADD RULE” to schedule a theme in a specific day or hour. You can adda s many rules as needed.
Adding a new device
- Log-in in Mosaic ONE, go to BUILDINGS and
- Select the building where you want to add the new device.
3. Click on the ADD DEVICE button.
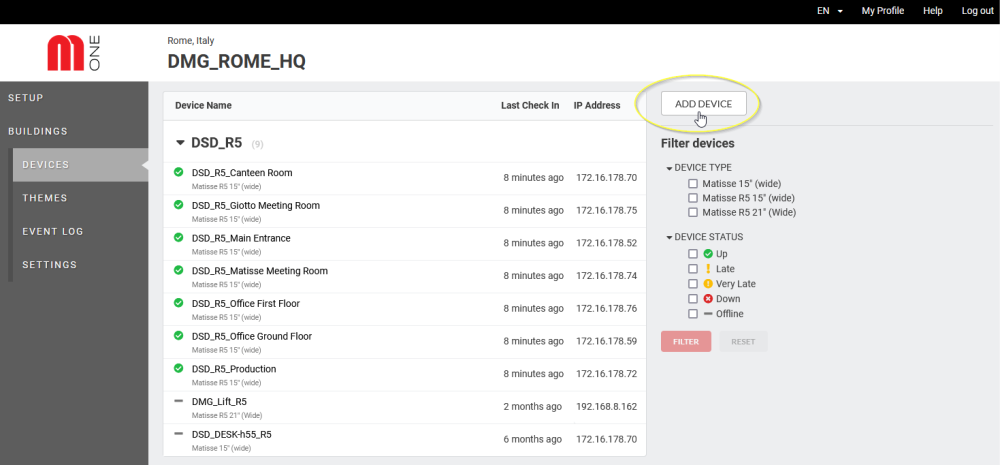
4. From the next window you can start editing the settings of the new device.
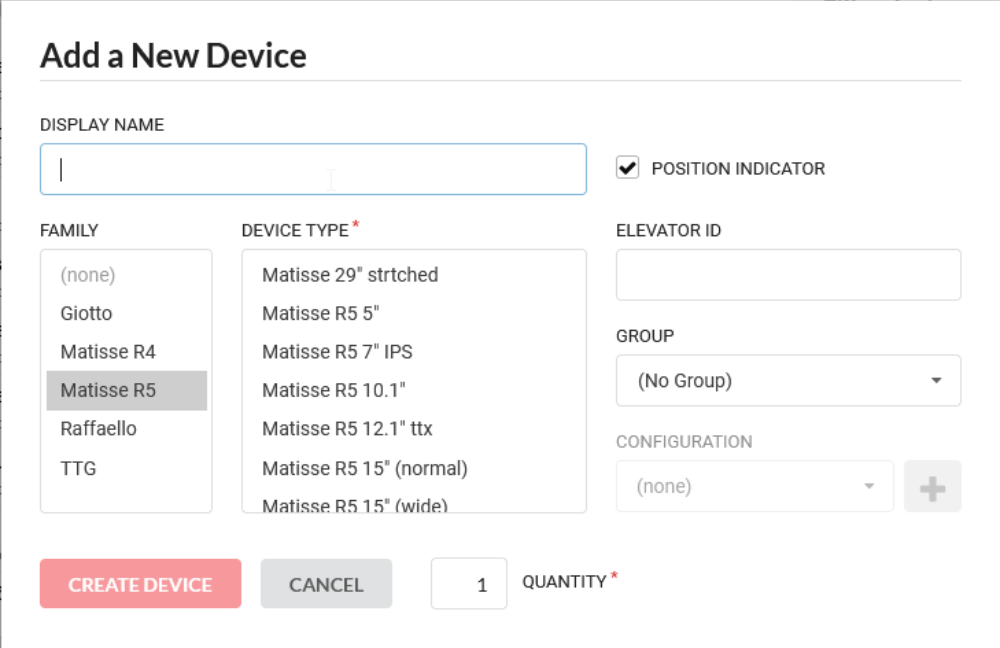
| NAME TO DISPLAY | The device name that will be displayed in the list of devices under that building. |
| FAMILY | Select the device family/series : Matisse M1, Giotto M1, Raffaello M1 and the V4 Matisse. |
| DEVICE TYPE | This is the device model. Only for the Matisse series, you’ll be able to select the old V4 version. |
| POSITION INDICATOR | Select this checkbox if you want your device to have elevator functions. Leave it unchecked if you don’t want the typical elevator fields to show. |
| ELEVATOR ID | Enter the ID number of your elevator |
| GROUP | If you have associated more devices to one building, you can create a group. You have several benefits from creating a group of devices. |
| SETTINGS | From this field you can assign a preset to the new device. Click the “+” button to access advanced options to create new settings. This buttoni s disabled if the P.I. checkbox is not selected. |
| QUANTITY | If there are several identical devices in the same building, you can duplicate a device. In this case, all features of the starting device will be inherited by the new devices. |
Insights for admin users only
Create a new configuration
The concept of “CONFIGURATION” must be considered strictly linked to all the parameterization necessary for an elevator display. This section is divided into 3 parts to set the parameters of a display:
- BASE CONFIGURATION – covers all operational parameters of Position Indicators based on encoding
- SERVICE MESSAGES – set of alarm/alert images for language-nation-customer
- VOICE – set of floor voice messages
The graphic aspect regarding multimedia contents, widgets, graphic options is covered in the THEMES chapter.
BASE CONFIGURATION
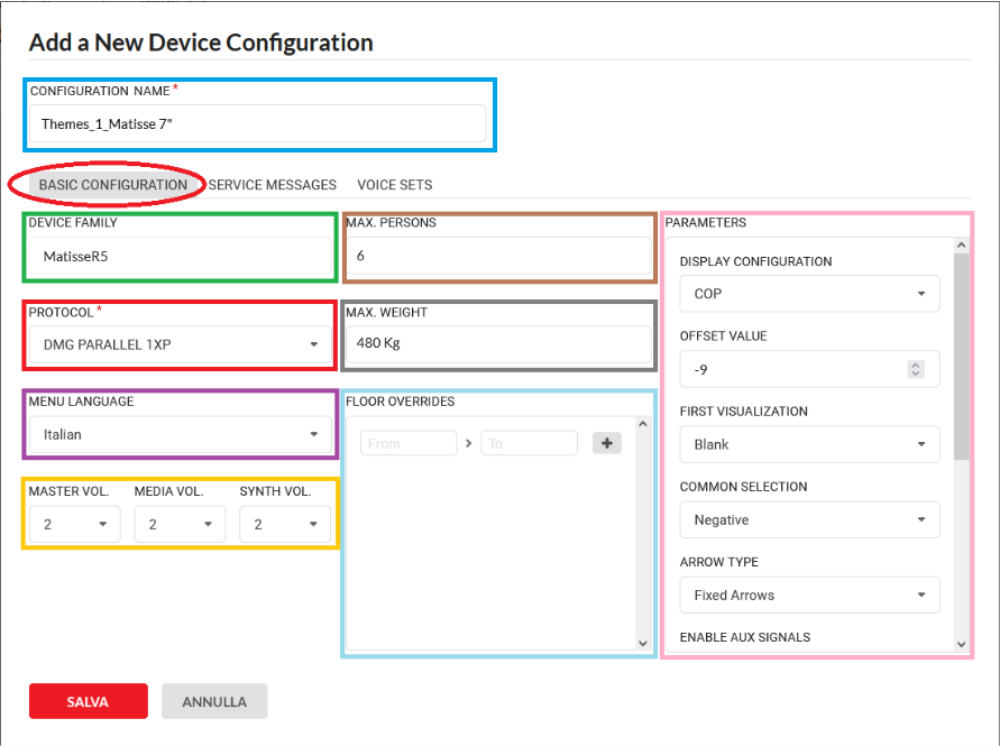
CONFIGURATION NAME
Enter a name and associate it to the previous menu.
DEVICE FAMILY
This field can not be edited and this property is inherited from the field “DEVICE FAMILY” entered during the previous step.
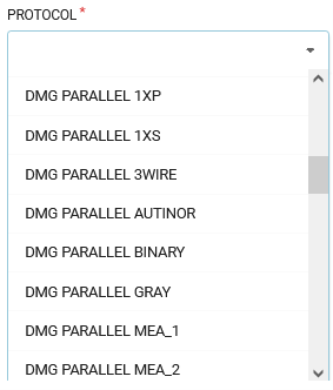
PROTOCOL
Depending on the indicator type (interface) and on your licence (company etc), this field will enable you to configure how the device will communicate. With a parallel interface for example, you can select 1x floor, 1xsegment etc.

MENU LANGUAGE
This is the language that will show in the device menu.
MASTER volume
It has an impact on all audio devices
MEDIA volume
It has an impact on all media contents
SYNTH volume
It has an impact on floor messaging, alarms and gong.
MAX PERSONS
Max number of persons allowed in the car
MAX WEIGHT
Max weight allowed in the car
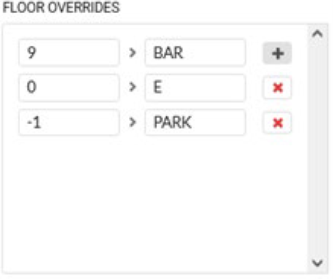
FLOOR OVERRIDES
This function allows to change from floor number to letters, symbols or words (*).
Clicking on (+) will add lines and clicking on (x) will delete them.
(*) Max 4 letters

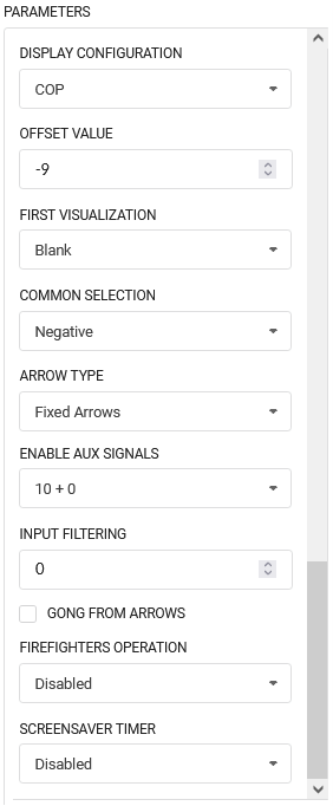
PARAMETERS
From this menu you can configure the indicator paramters. These choices are strictly associated with the device interface.
SERVICE MESSAGES
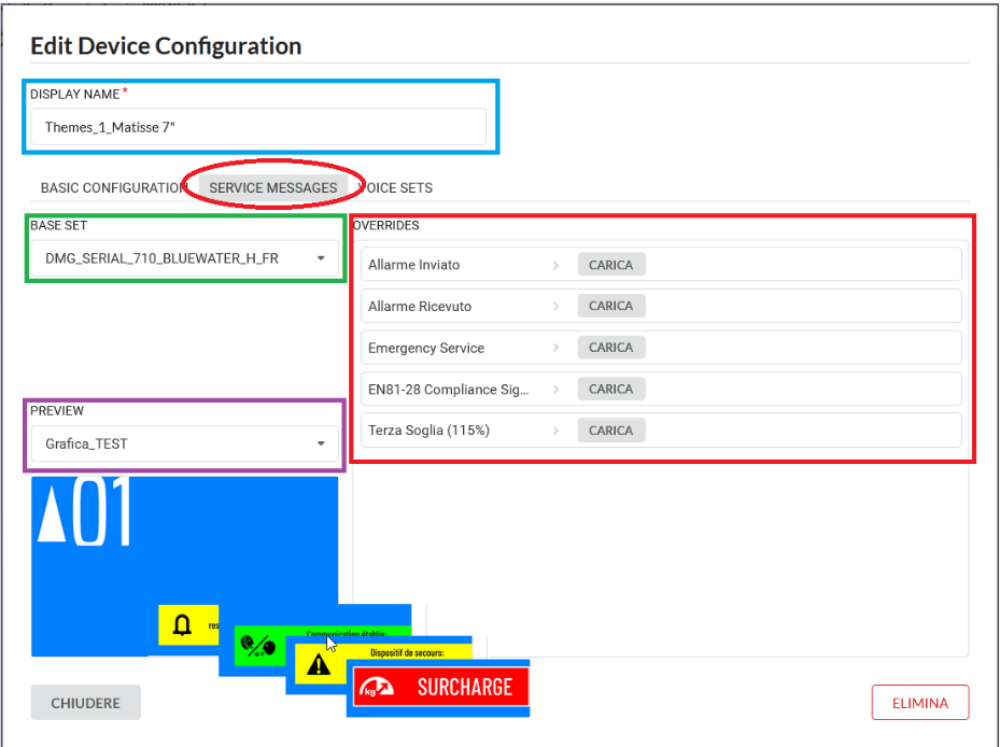
DISPLAY NAME
This is the name assigned previously.
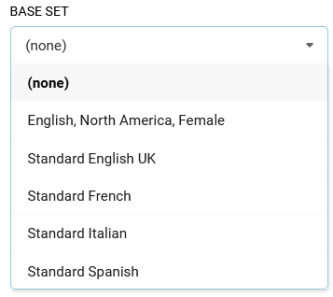
BASE SET
You can add factory preset configration from here. The base set generally shows client-size-layout. Every user will be able to see only the preset configurations that were created for his company.
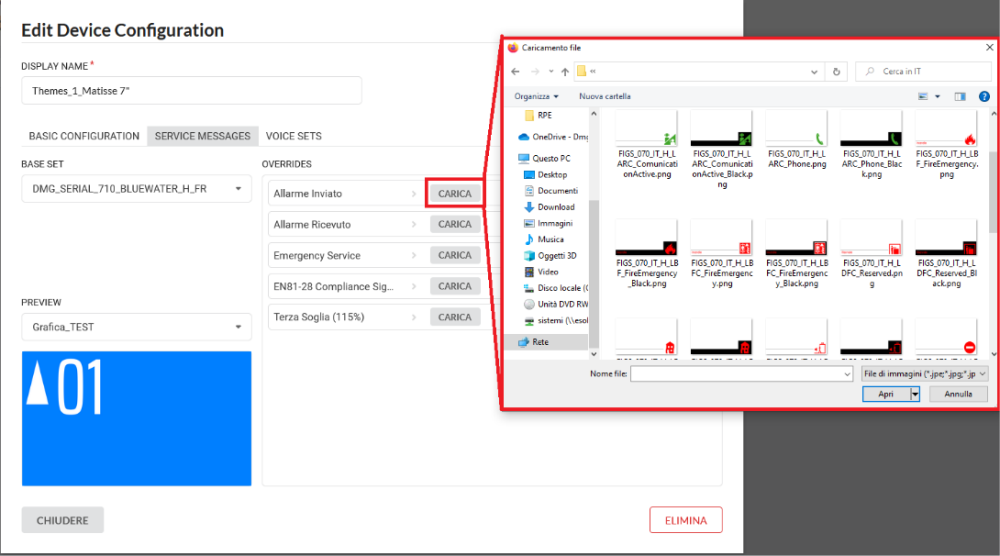
OVERRIDES
The base set can be modified according to different needs. Use the UPLOAD button to replace standard symbols with an image of your choice.
PREVIEW
The preview allows to check the association of the selected sets with the device theme. It is possible to change the theme using the dropdown menu.
Click on any icon/image to preview it.
VOICE SET
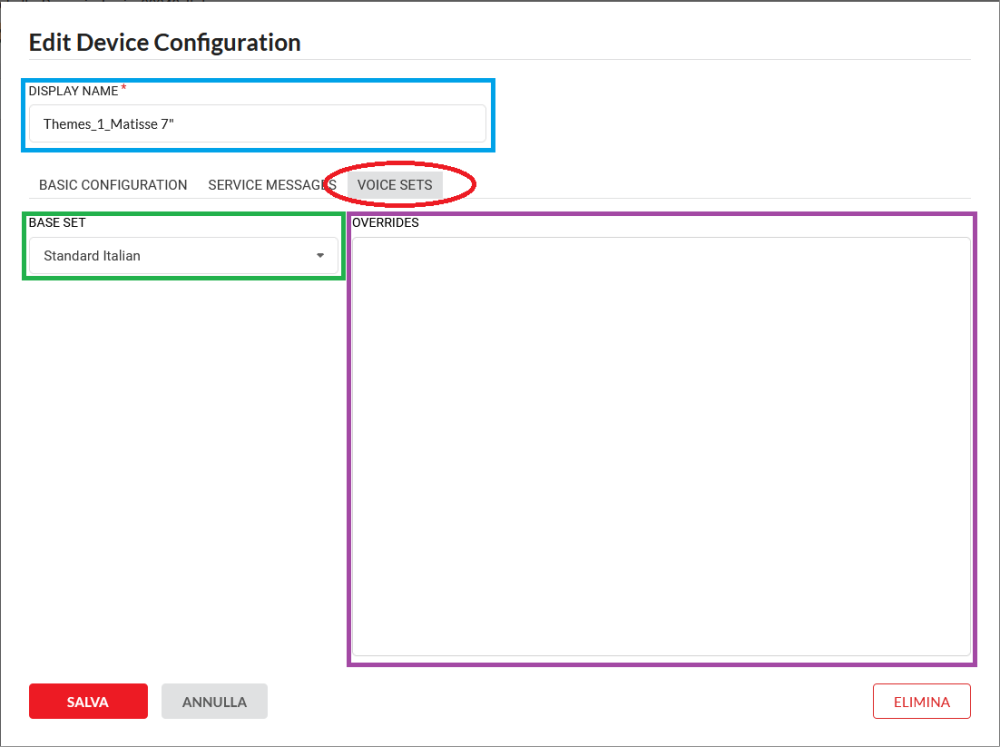
DISPLAY NAME
This is the name assigned previously.
BASE SET
To select one of the available base sets from the library.
All base sets are named following these criteria: language-country-client.
The message library can not be edited by the client; should you need any modification, please contact our support team. The modified message custom library will be visible in the BASE SET drop down menu.
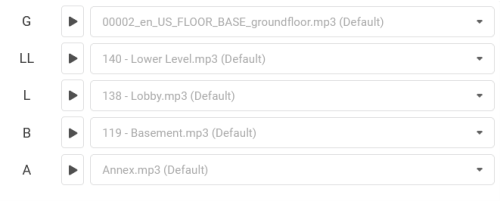
OVERRIDES – The preset voice libraries include several messages that can be associated to the same floor.
For example: Floor -1 = Basement, Parking, store rooms etc
Use the button to listen to the voice message (preview mode).
Click on SAVE to finish your configuration.
SAVING THE NEW DEVICE
After clicking on the SAVE button, the main page of the new device will be displayed. Click on the button ADD DEVICE from there and all your configuration work will be completely saved and ready to use.
Your new device is now available in the building general list.
IMPORTANT NOTE: Once you have set and saved all your parameters, you need to send the new settings to the device; if you don’t run this procedure, the new settings will not be displayed on the device.
1) – Select the device you want to update.
2) – Click on COMMANDS.
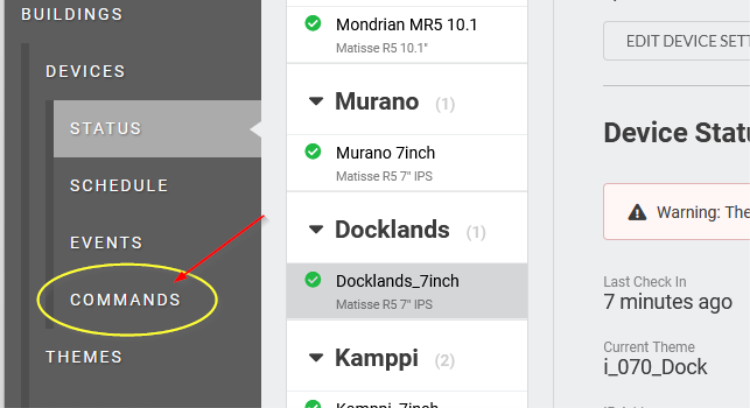
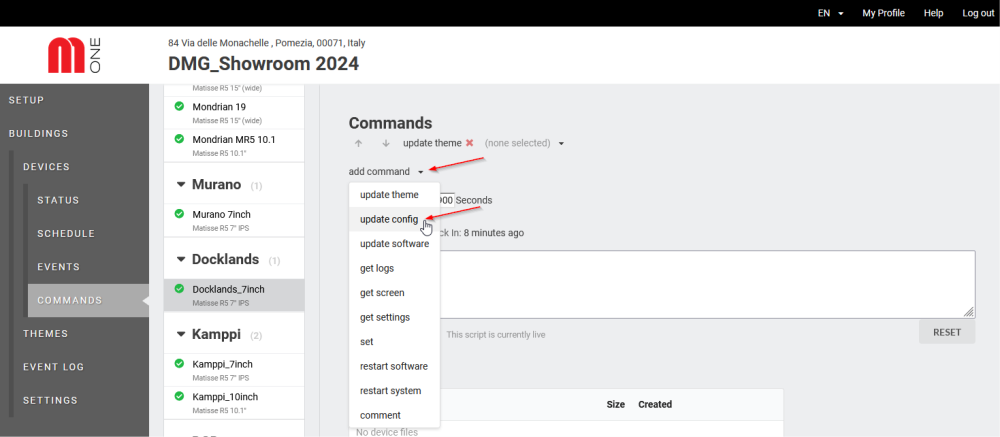
From the ADD COMMAND dropdown menu, select UPDATE CONFIG.
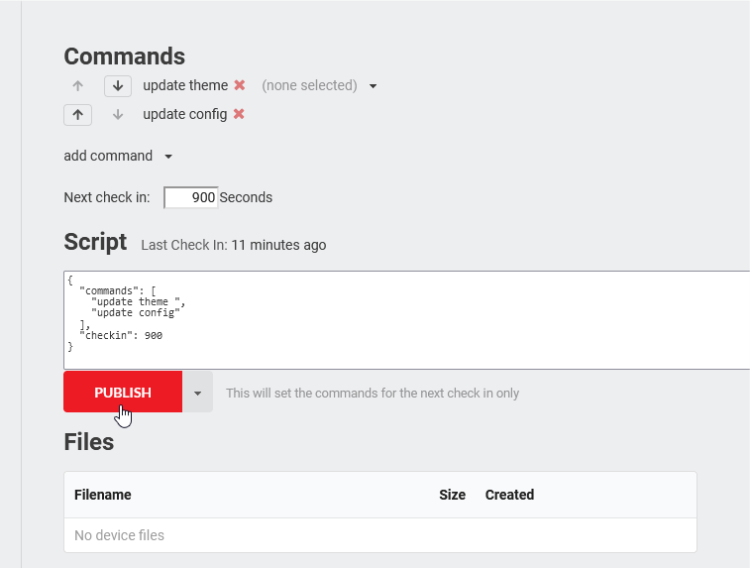
3) – Click PUBLISH to send the settings to the device.
After the first scheduled check-in, the device will automatically upload the new settings.
You can speed up the procedure directly from the device. There’s a FORCE MOSAICONE CHECK-IN button in the Mosaic ONE menu.
Technical information
Floor symbols
The Position Indicator number is controlled by DMG locally (not MosaicONE) as the system is set up as a hybrid solution. Size, font, colour, and style of the Position Indicator can be managed by the user.
System updates
The system requires updates to the firmware on a regular basis. Once the system is handed over and you are in control of MosaicONE and its content, it is your responsibility to ensure that the system is updated. You will be notified when updates are required to the system.
What happens if my device goes offline?
The device will automatically update every 15 minutes. If for some reason the device cannot connect to the building’s Internet connection, it will continue to display the last updated information until the connection is back. You will be able to see the status change in your MosaicONE dashboard.
All scheduled widget content will stop working by the next check-in showing the background and will automatically resume functioning upon network restoration.
Support & customer service for MosaicONE
All support requests to be emailed to [email protected].
Link
To access MosaicONE
Download
| Reference | Version | Link |
|---|---|---|
| 1.0 | Download PDF (English) | |
| Improved readability of the content of this page | 1.1 (current version) | Download PDF (English) |