(v 1.6)
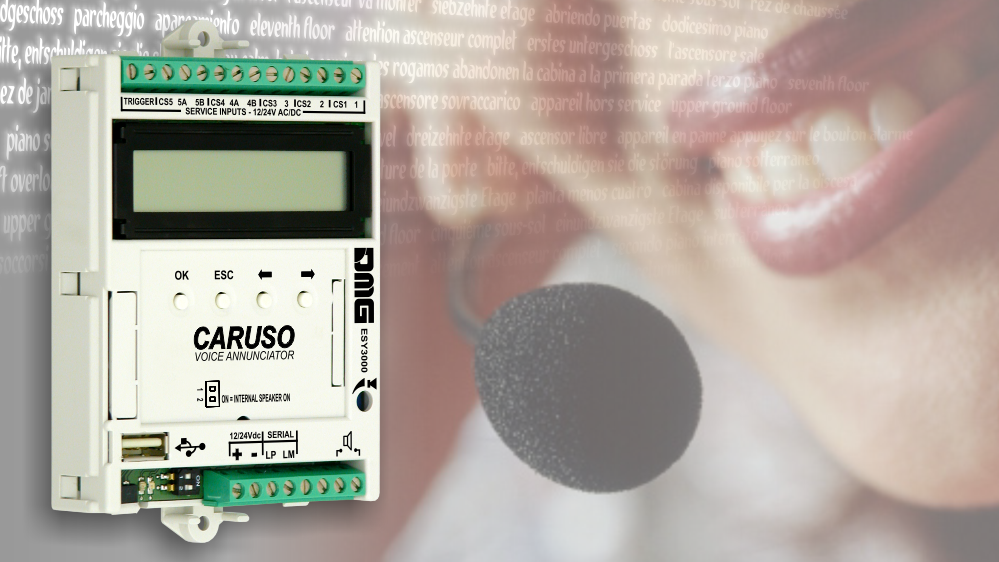
CARUSO is a voice synthesizer for lifts that allows you to play floor and service messages from a message library (8 languages + 1 custom). CARUSO can be driven exclusively in serial mode (with DMG Deum encoder or with Playboard controller).
Safety and usage cautions
Before installing our products, we recommend you to consult the section about safety and usage cautions at the link below

Overview & main features
- Factory pre-loaded messages
- Automatic Dual Language mode (i.e.: “First floor” & “Premier étage”)
- Manual Dual Message mode (i.e.: “First floor” + “Restaurant”)
- Output for optional external speaker (8 Ohm 1W max)
- USB port for additional messages and firmware updates
- Night shift mode (Programmable volume reduction)
- Trimmer for volume adjustment
- 8 opto-isolated inputs with independent common (12/24V AC/DC):
- 7 configurable inputs for service messages
- TRIGGER input for floor message reproduction
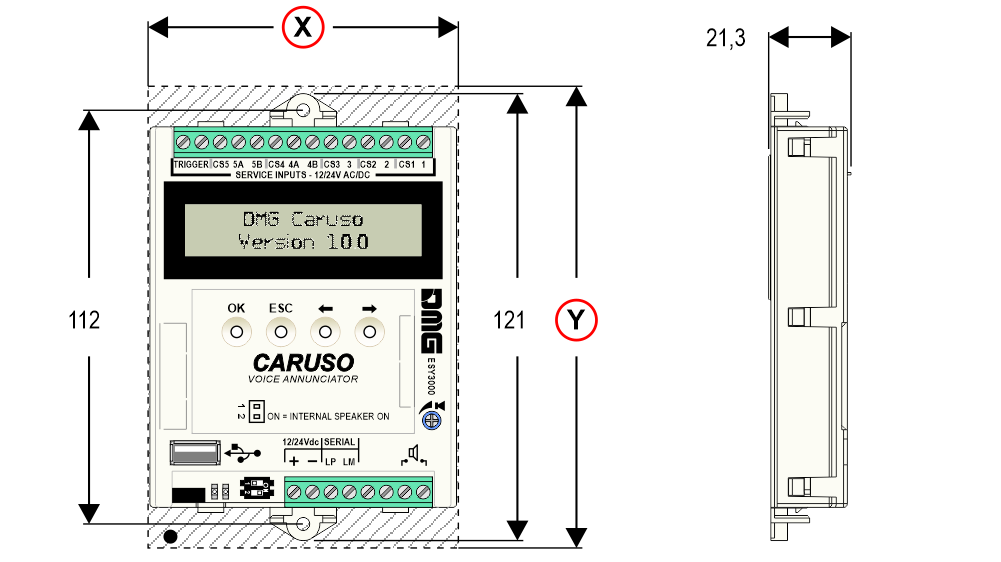
Overall dimensions including connection cable:
X) – 84 mm
Y) – 125 mm / 143 mm (with supporting plate)
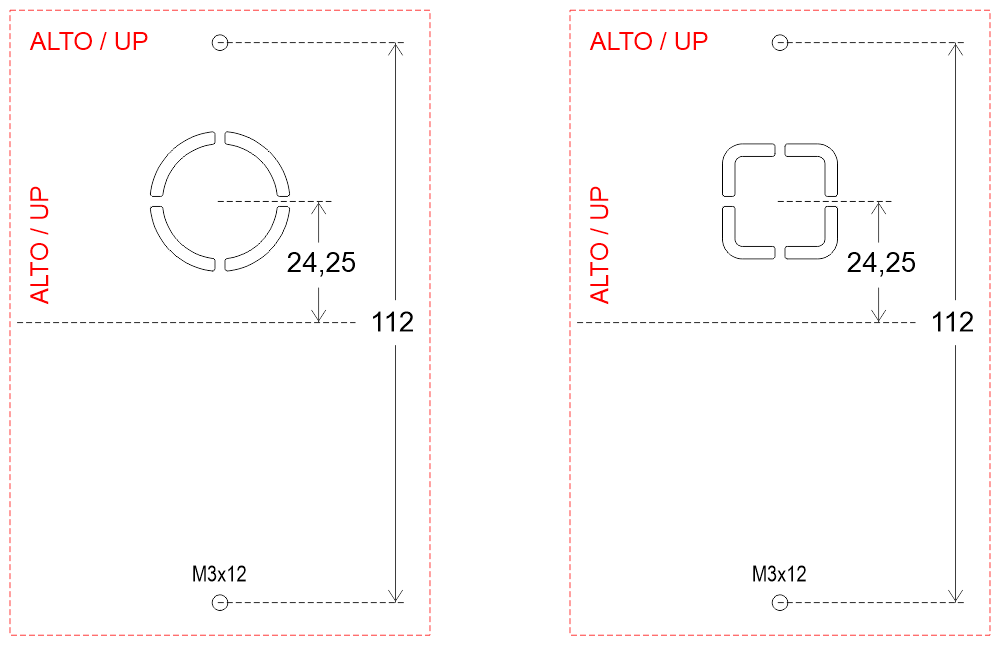
Speaker grid cut out
The cut out of the panel can be of two different shapes, depending on the button design.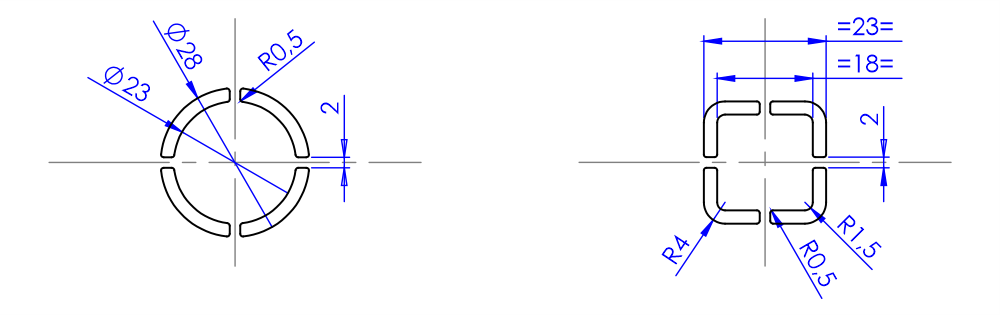 The red dashed line indicates the overall dimensions of the device (84×125).
The M3×12 pins are not fitted when a backplate with double-sided tape is used.
Wiring Instructions
Connection to the controller
Pitagora 4.0

Trigger command embedded in the Serial Bus
Pitagora V3
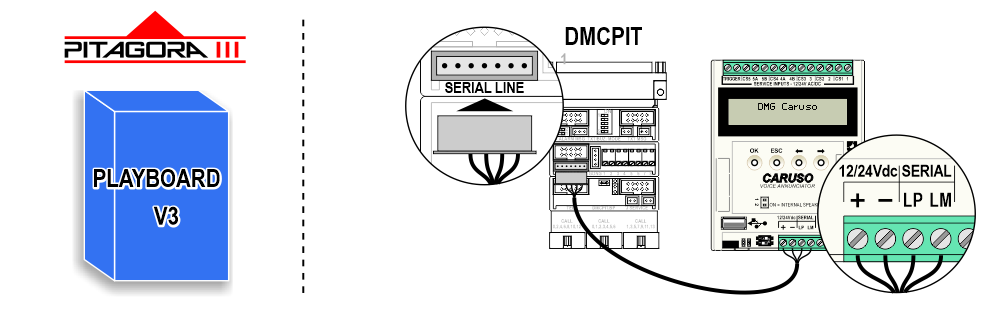
Trigger command embedded in the Serial Bus
+ DMG Encoder
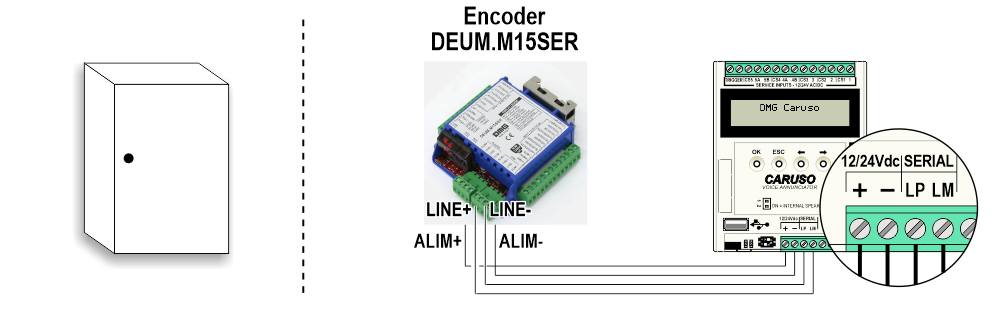
Trigger inputs on DMG encoder (DEUM.M15SER)
Connection of service inputs
7 inputs with independent commons are available for service messages.
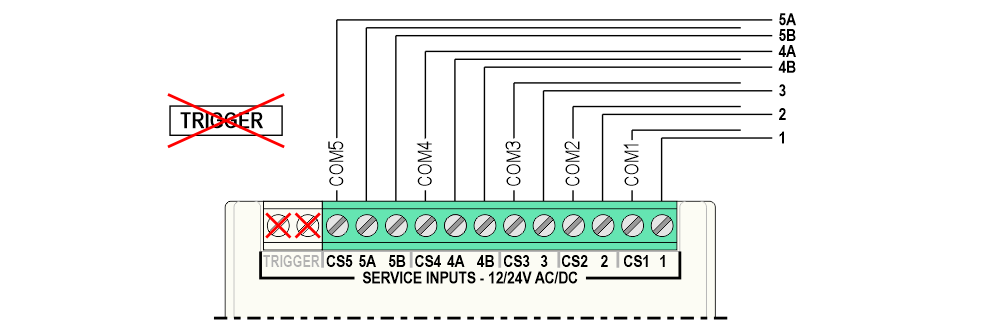
7 programmable service inputs: 12/24V ac/dc (optoisolated)
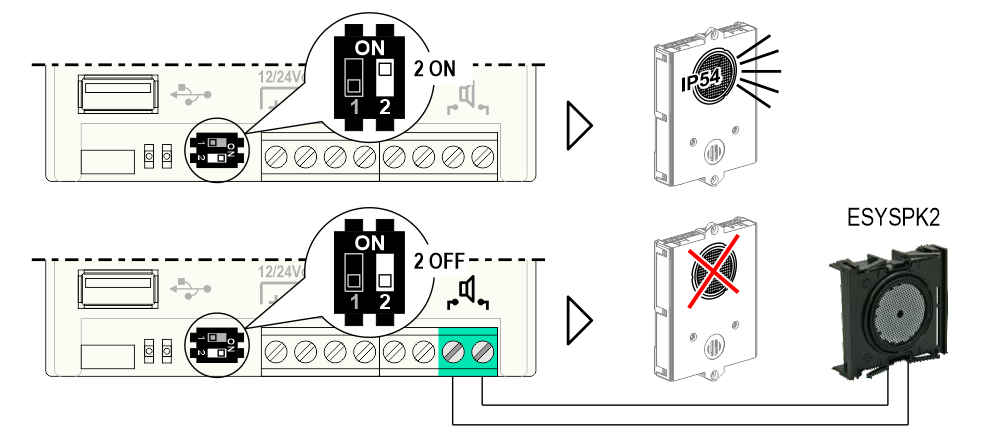
Selection of internal / external speaker
Programming
Basic programming

A) – Navigation keys of the options of each level
B) – Exit the current level and return to the higher level
C) – Access to menu and confirm selection
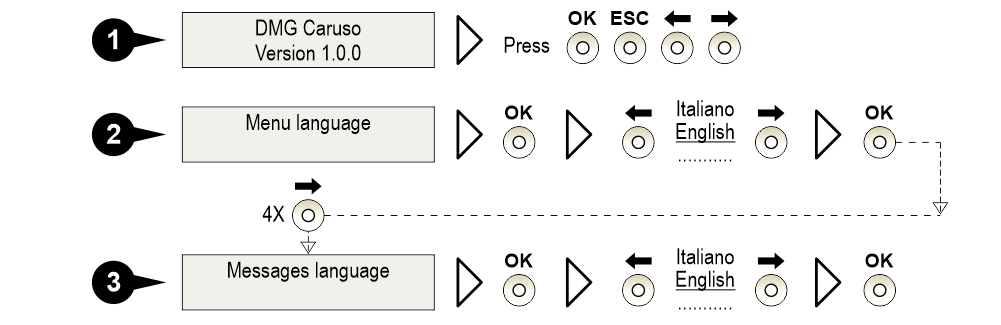
1) – Press a button to access the menu
2) – Select the menu language
3) – Select the messages language
Advanced programming
| Menu | Options | Note | ||||
|---|---|---|---|---|---|---|
| Menu Language | Italiano / English / Française / Deutsch / Russkiy / Español | |||||
| Gong at floor | Enabled / Disabled | |||||
| Direction messages | Tones & messages / Disabled / Play messages / Play tones | |||||
| Direction messages timing | - On start & end. - On start (direction arrows) - On end (next direction arrows) | |||||
| Automatic message mode | Messages language | Italiano / English / Française / Deutsch / Español Portugués / Russkiy / American English / User library | ||||
| Automatic double language | Italiano / English / Française / Deutsch / Español Portugués / Russkiy / American English / User library / Disabled | (*1) | ||||
| Manual message mode | First message floor current | 1) - Language selection: Floors - Basic (Italian) Floors - Advanced (Italian) Floors - Basic (English) Floors - Advanced (English) ...................... No message | 2) - Choice of message: Messages library | (*2) | ||
| Second message floor current | (*3) | |||||
| First message service inputs | 1) - Choice of input: Service 1 Service 2 Service 3 Service 4/B Service 4/A Service 5/B Service 5/A | 2) - Language selection: Floors - Basic (English) Floors - Advanced (English) Service - Basic (English) Service - Advanced (English) ...................... (French) ...................... No message | 3) - Choice of message : Messages library | 4) - Mode selection: - Single - Continuous | ||
| Second message service inputs |
||||||
| Night speaker volume attenuation | 1) - Choice of input: Service 1 Service 2 Service 3 Service 4/B Service 4/A Service 5/B Service 5/A Deactivated | 2) - Volume selection: Low level: -20 dB Medium level: -10 dB Disable speaker | ||||
| Loudspeaker volume level | Low: 30 - 50 dB Medium: 50 - 70 dB High: 70 - 90 dB | (*4) | ||||
| Erase user memory! | Deletes all custom data (*.mp3, *.wav, *.cs2) entered by the user | |||||
(*1) – If enabled, the second language message is played after the first.
(*2) – Allows you to change the First message automatically associated in “Messages language”.
(*3) – Allows you to add the Second message (2 max.) or modify it if already present (i.e.: “Automatic double language”).
(*4) – Use Trimmer for volume adjustment.

Advanced functions
Updating via USB key
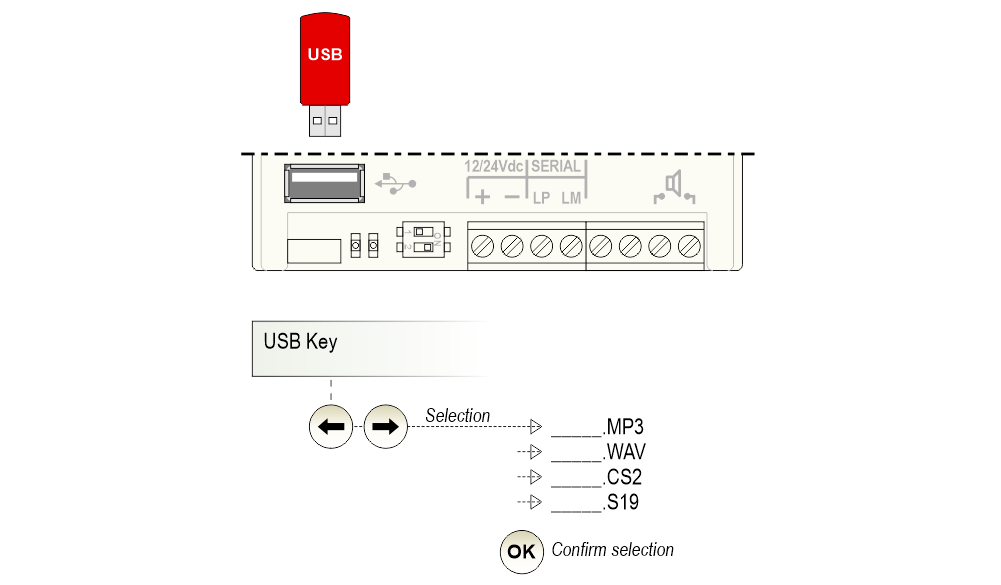
| User memory | Max 2 Mbyte |
| file .Mp3 | Audio file (recommended) |
| file. WAV | Audio File (16 bit 22.000 Hz mono) |
| file .CS2 | Configuration file / restore: • Messages • Settings • Message > floor assignment • Message > service input assignment |
| file .S19 | Firmware update file |
Procedure for loading audio files into memory for service messages and
of customized floors
- Format the USB memory in FAT32 format;
- Load the audio files in MP3 format to the root directory of the USB memory;
- Power on Caruso synthesizer and let the system boot;
- Insert the USB memory with the previously loaded files and wait. The synthesizer will show the number of audio files present in the USB memory;
- Select the file to import using the arrows and select OK. Confirm again select and wait for the file to load. NOTE: Files must be uploaded one at a time;
- Once the desired files are finished loading, press the ESC button and wait for the USB drive removal message. Remove memory and Caruso synthesizer will restart automatically;
- The file upload procedure has been completed.
Procedure for setting personalized floor messages
- Enter the configuration menu;
- Enter the menu “Message language” and select “User library” and wait for saving (skip if previously done);
- Bring the elevator car to the floor where you want to set the personalized message;
- Enter the “FIRST message – current floor” and select “User library”. ATTENTION, even if it comes “User Library” appears as soon as you enter the selection, scroll through the entire menu until reappearance of the “User Library” choice. If this is not done, the save confirmation message will appear but no message will be set;
- Choose the name of the message you want to play and confirm with OK and wait rescue;
- Repeat the procedure for all floors;
- Audio message – floor association procedure completed.
Procedure for setting personalized service messages
- Enter the configuration menu;
- Enter the menu “Message language” and select “User library” and wait for saving (skip if previously done);
- Enter the “FIRST message – service inputs” and select the input you want to access wants to assign the message;
- Select “User Library”. ATTENTION, even if it comes “User Library” appears as soon as you enter the selection, scroll through the entire menu until reappearance of the “User Library” choice. If this is not done, the save confirmation message will appear but no message will be set;
- Choose the name of the message you want to play and confirm with OK;
- Choose “Playback mode”, confirm with OK and wait for saving;
- Repeat the procedure for all service entrances;
- Audio message – service input association procedure completed.
Datasheet
| Power supply | Voltage: 12Vdc – 20% ÷ 24Vdc + 20% 12Vac ÷ 24Vac + 20% (Rectified) Stand-by absorption: 60mA (24Vdc), 100mA (12Vdc) Max absorption: 100mA (24Vdc), 180mA (12Vdc) Nominal voltage for service inputs: 12/24 Volt AC/DC |
| Operating temperature | -10°c ÷ +50°c |
| Audio | External speaker output: 8 ohm 500mW Internl speaker max power: 85 dBA @ 1m Supported audio formats: mp3, wav |
Download
Version list
| Reference | Version | Link |
|---|---|---|
| 1.5 | Download PDF (English) | |
| Added procedures forloading and setting audio files | 1.6 (current version) | Download PDF (English) |
Configuration file
The attached configuration file is a .ZIP file;
inside it contains the.CS2 file to be loaded into the Caruso device as previously indicated.