(v 1.0)

Safety and usage cautions
Before installing our products, we recommend you to consult the section about safety and usage cautions at the link below

In order to guarantee your safety and a correct functioning, be sure to follow these safety warnings. The whole set (with cables included) must be installed in a place lacking of or distant from:
• Dust, humidity, high temperatures and direct exposure to sunlight.
• Heat irradiating objects, which may damage your device or cause any other problem.
Objects producing a high electromagnetic field (Hi-Fi speakers, etc.).
Corrosive liquids or chemical substances.
ENVIRONMENTAL CONDITIONS
Environment temperature: from -10°C to +50°C Relative humidity: from 20 to 80% n.c.
Any sudden change in temperature and humidity must be avoided.
CLEANING INFORMATION
Use a soft dry cloth and avoid any solvents or abrasive materials.
SHOCKS OR VIBRATIONS
Caution against shocks or vibrations.
SIMPLIFIED UE DECLARATION OF CONFORMITY
The manufacturer, B810 S.p.A., declares that this radio equipment Amigo GSM 2G/4G is compliant with Directive
2014/53/UE.
The complete text of UE Declaration of Conformity is available at following internet address: www.b810group.it
ASSISTANCE AND CONTACTS
After reading the instructions carefully if you are unable to solve the problem, contact DMG technical support.
E-mail : [email protected]
SECURITY RULES
The Amigo GSM 2G/4G communicator satisfies the applicable paragraphs of European Regulations concerning the security Rules for lifts as stated in the European directive 95/16/CE:
EN 81-28:2003
EN 81-20:2014
For further details, please refer to the PDF attached at the bottom of the page.
SAFETY WARNINGS
Read these instructions and norms carefully before powering the device. Violation of such norms may be illegal and cause hazard situations.
For any of the described situations please refer to the specific instructions and norms.
The device is a low power radio transmitter and receiver. When it is ON, it sends and receives radio frequency (RF) signals.
The device produces magnetic fields. Do not place it next to magnetic supports such as floppy disks, tapes, etc.
Operating your device close to other electrical and electronic equipment – such as a television, phone, radio or a personal computer – may cause interferences.
Interferences: The device, like all other wireless devices, is subject to interferences that may reduce its performances.
Road safety: Do not use your device while driving. In case of use on cars, you must check that the electronic equipment is shielded against RF signals. Do not place the device in the air bag deployment area.
Aircraft safety: Switch off your device when on board aircrafts by disconnecting the power supply and deactivating the internal
backup battery. Using LTE/GSM devices on aircrafts is illegal.
Hospital safety: Do not use the device near health equipment, especially pacemakers and hearing aids, in order to avoid potential
interferences. Take care when utilizing the device inside hospitals and medical centres, which make use of equipment that could be sensitive to external RF signals. Switch it off when use is expressly forbidden.
Explosive materials: Do not use the device in refuelling points, near fuel or chemicals. Do not use the device where blasting is in
progress. Observe restrictions and follow any specific regulation or instruction.
Instructions for use: Do not use this device in direct contact with the human body and keep a minimum distance of 20 cm from it and from the antenna.
Use approved accessories only. Consult the user’s manual of eventual other equipment connected to this device.
Do not connect incompatible products.
INFORMATION TO USERS
Legislative Decree 14/04/2014 n.49 “Implementation of Directive 2012/19/EU on waste electrical and
electronic equipment (RAEE)”.
The symbol of a crossed waste container marked on the apparatus or on its package indicates that at the end of its useful life the product must be collected separately from other waste materials.
The symbol of a crossed waste container marked on the battery indicates that batteries are considered municipal hazardous waste and must be disposed of according to current regulations.
It is forbidden to dispose of waste electrical and electronic equipment as municipal waste. Such waste is subject to separate collection organised by the municipalities or may be returned to the retailer in the event of the purchase of new equipment of an equivalent type on a one-for-one basis.
Illegal disposal or misuse of such equipment or parts thereof can damage the environment and health due to the presence of dangerous substances. Appropriate separate collection for subsequent recycling, treatment and environmentally sound disposal of the discarded equipment helps to avoid possible negative effects on the environment and human health due to the possible presence of dangerous substances, and promotes the reuse and/or recycling of the materials from which the equipment is made.
Illegal disposal of the product entails the application of the administrative sanctions provided for by the regulations in force.
Introduction
Thank you for your confidence in purchasing a DMG branded product.
Amigo GSM 2G/4G (cod.: ETSGSM.4G) simulates an analog line where the traditional fixed line it is no longer sustainable.
Thanks to Amigo GSM 2G/4G an analog telephone line is always ready and available, and you can continue to
use your existing communicators, saving the costs of the analog PSTN line.
Amigo GSM 2G/4G is the ideal solution for emergency systems installed insidelifts that must be compliant with
EN 81-28 regulation.
Package content
n.1 – Amigo GSM 2G/4G
n.1 – Switching power adaptor (IN: 100-240 Vac / 50-60Hz / 0.5A – OUT 12 Vdc / 1A)
n.1 – LTE/GSM Antenna with a 3 meters cable
n.1 – Phone cable to connect your communicator (1.5 meters)
n.1 – Bracket for wall mounting
n.2 – Caps for bracket fixing
n.1 – User’s Guide
Technical features
- Mobile network type 2G/4G
GSM 900 with operating frequency 880-915, 925-960 MHz, max Power 33 dBm
GSM 1800 with operating frequency 1710-1785, 1805-1880 MHz, max Power 30 dBm
4G/LTE-FDD bands B1/ B3/B7/B8/B20/B28A max Power 23 dBm - FXS Voice Interface
- Off-hook AC impedance: 600 ohm
- On-hook line voltage: 48VDC
- Off-hook line power: 32mA
- Dialing type: Tone (DTMF)
- Ringing voltage: 38 VAC rms – REN: 3
- Voice call
- Led indicators
- Backup battery
- CE Mark and Rohs compliant
- EN 81-28 , EN 81-20
Mechanical features
- 2 RJ11 Connectors
- Plug-in SIM card (1,8V – 3V compatible)
- External LTE/GSM antenna on SMA/f connector
- Bracket for wall mounting
- Dimensions: 115 x 80 x 45 mm
- IP 30 protection
Diagnostic LED

The leds of Amigo GSM 2G/4G shows the different status and situations:
| LED | STATUS | DESCRIPTION |
|---|---|---|
| STATUS | OFF | Device turned OFF |
| ON | Device ON and Backup Battery Charging | |
| Slow blinking | Device is powered by Backup Battery | |
| Fast blinking | Backup Battery NOT Present (or not connected) | |
| NETWORK | OFF (1) | Mobile Network Searching, Low Signal Level, SIM card not present, PIN not inserted |
| Slow blinking | Good Signal Level | |
| ON | Excellent Signal Level | |
| Fast blinking | Roaming services | |
| ACTIVITY | OFF | FXS port not used |
| ON | FXS port used | |
| Slow blinking | Outgoing call (Dialing) | |
| Fast blinking | Incoming call (Ringing) | |
| 4G | OFF | Connected in 2G mode |
| ON | Connected in 4G mode |
Connectors panel
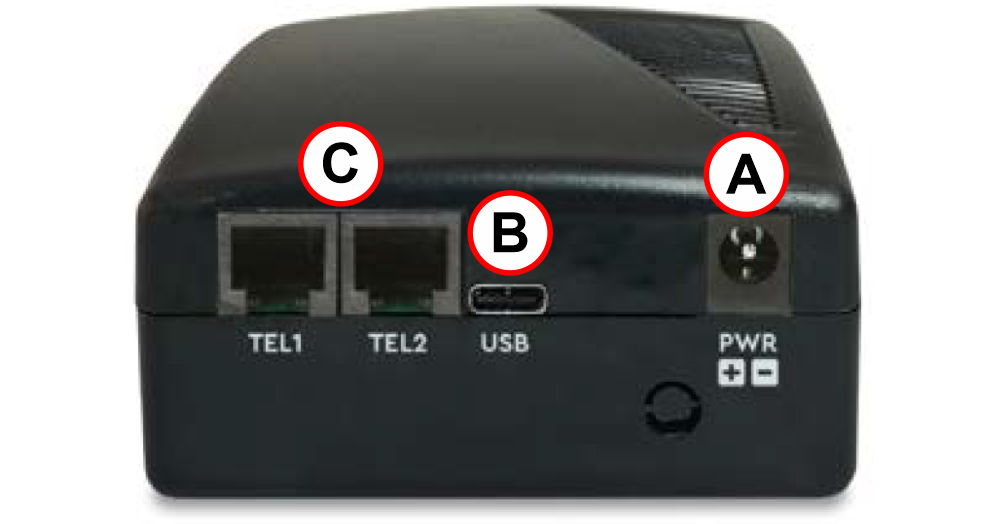
| Ref. | Connector | Description |
|---|---|---|
| A | PWR | Power supply connector |
| B | USB | USB connector for upgrades |
| C | TEL1 / TEL2 | RJ11 FXS connectors for communicators |
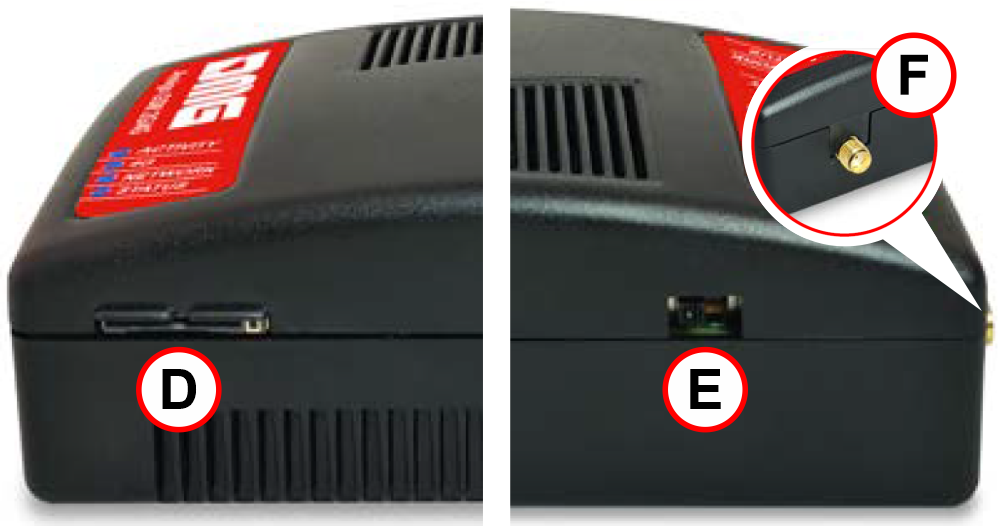
| Ref. | Connector | Description |
|---|---|---|
| D | SIM | SIM connector |
| E | Switch | Switch for the device power off-on |
| F | Antenna | SMA/f connector for external antenna |
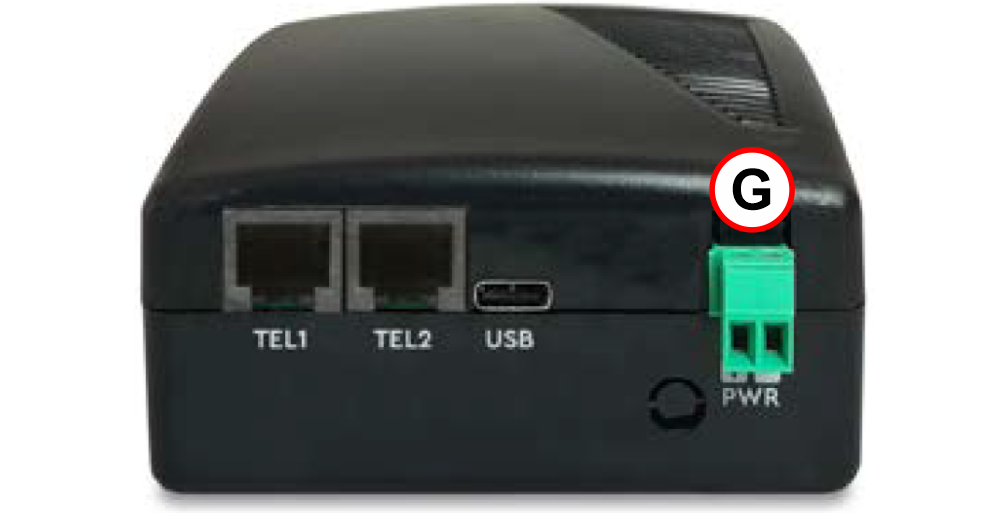
| Ref. | Connector | Description |
|---|---|---|
| G | + PWR (clamp) | Power connector (+) |
| – PWR (clamp) | Power connector (-) |
Installation
For a correct installation, turn the device OFF and read the following instructions.
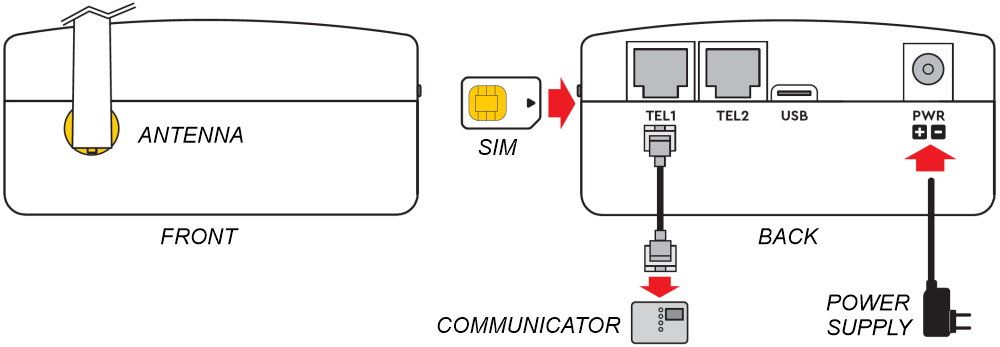
1) Connect the antenna found in the package to the SMA connector. Apply the magnetic base of the antenna only on metal area, without connection to ground. Please use the metal frame, available inside the package, and fixit to the wall if necessary.
2) Insert the SIM Card into the SIM holder. Ensurethe SIM is inserted in the correct way, so that the golden contacts are facing downwards.
3) Connect the Communicator to one of the TEL1 / TEL2 connector available on the back side. The 2 connectors are connected together so there is no difference between the two ports.
4) Connect the power supply and turn Amigo GSM 2G/4G ON using the switch.
First power on
After few seconds from power ON, at the end of the self test, you can see one of the following situations:
| LED | Correct situation | Wrong situation | Roaming/Virtual operator |
|---|---|---|---|
| STATUS | ON | ON | ON |
| NETWORK | Blinking / ON | OFF | Fast blinking |
| ACTIVITY | OFF | ON | – |
| 4G | ON / OFF | – | – |
Correct situation: Good NETWORK signal level in order to call and receive voice calls. (Network
signal level: Blinking=Good ; ON=Excellent).
Wrong situation: Check the following situation: SIM card not present or PIN not inserted or
Network Searching or Low Signal Level.
Roaming/Virtual operator: Enable the Roaming calls, as described in the paragraph ROAMING CALLS.
Outgoing call
Hook off the phone, wait for the dial tone, then dial the phone number.
After the last digit by default Amigo GSM 2G/4G waits for 5 seconds before starting to dialithe phone number; for immediate dialing add the “#” hash digit at the end of the number.
If the SIM card PIN code protection is enabled and the PIN has not been set in the gateway, the Status led is ON
and the PIN code request is transmitted to the phone line (double beep repeated with a short pause).
Insert the PIN code using the phone keypad connected to the TEL1 or TEL2 ports:
1) Hook off the phone, you will hear the PIN code request tone.
2) Enter the PIN Code using the phone keypad and confirm by pressing the “#” (hash) button.
PIN code#
(i.e. 0123#)
3) To cancel a wrong PIN code, hang up before sending the “#” (hash) button.
4) If the PIN code is correct you will hear the configuration tone (continuous tone, repeated twice).
5) Hook on the phone and wait for detection of the NETWORK network.
6) If the PIN code is wrong you will hear the ‘wrong configuration’ tone (single long tone).
The PIN code is automatically stored into Amigo GSM 2G/4G and it will be used when necessary. If the SIM card is removed or stolen then you must newly insert the PIN code manually.
To delete the PIN code from device memory, enter #*99# code using the phone keypad connected to TEL1 or TEL2 connector.
Check the good level of Network signal and if necessary try to improve it by placing the antenna in a different position.
Insert the PUK code
The request for PUK code is signalled with a different special tone with respect to the PIN tone request (double beep repeated with no pause).
Insert the PUK code using the phone keypad connected to the TEL1 or TEL2 port:
1) Hook off the phone, you will hear the PUK code request tone (double beep with no pause).
2) Enter the PUK code using the phone keypad (and confirm by pressing the “#” (hash), followed by a new PIN
code with 4 digits, then press “#” again.
PUK code#PIN code#
(i.e. 12345678#1234#)
3) To cancel a wrong PUK code, hang up before sending the first “#” (hash).
4) If the PUK code is correct you will hear the configuration tone (continuous tone repeated twice).
5) Hook on the phone and wait for detection of the Mobile network.
6) If the PUK code is wrong you will hear the ‘wrong configuration’ tone (single long tone).
Roaming calls
By factory configuration the Amigo GSM 2G/4G detects automatically the Network operator. If the device is installed close to national borders, it could detect the foreign Network operator, and the billing could be higher during the voice calls.
To advise the user of this particular situation, if in roaming phase, on the device all the three leds will blink simultaneously, and the outgoing calls are forbidden: the user will hear in the phone a single continuous tone for few seconds.
The same situation could be present also far from national borders by using a Virtual Network Operator SIM card:
in this case the billing remains the same.
To enable the device for outgoing calls in these situations it is necessary to insert a code using the phone keypad
connected to the TEL1 or TEL2 ports.
Code: ##1111#1#1# – to confirm the automatic mode of Network detection, so, in this case, the roaming mode.
(Use this code with Virtual Network Operator SIM card whenthe device is installed close to the national borders and the manual selection of the Network operator fails.)
Code: ##1111#1#2#operator code# – to select the manual mode of Network detection, to a specific Network operator.
(Use this code in installations close to national borders, to manually select a specific Network operator)
In this last case the operator code is made of 5 digits, which is the operator code number worldwide assigned to each operator: for example in Italy:
22201 for TIM
22210 for Vodafone
22288 for WIND
Amigo GSM 2G/4G can also accept codes different from Italian ones.
If the device can detect the specific manually selected Mobile operator, the device will work in correct mode.
If the device cannot detect the specific Network operator, Amigo GSM 2G/4G will switch backto automatic mode and the roaming condition will be repeated.
If, after inserting previous code, the Amigo GSM 2G/4G works in roaming mode, the Status led is OFF.
The configuration will be automatically saved so after a device ON/OFF it is not necessary to repeat the above sequences.
The two codes above described could be accepted anytime.
To restore the factory configuration, it is enough dial the following DTMF code: #*99#
Redirection of calls
It is possible to configure the Gateway to detect up to 3 phone numbers dialed from the emergency phone, and redirect them to other phone numbers.
| idx | phonebook index (values 1,2,3) |
| detect_number | phone number to detect (e.g. 0331702611) |
| new_number | phone number to call (e.g. 0331263733) |
In the next configuration examples , whenever the Gateway detects the phone number 0331702611, it will call the phone number 0331263733.
Setup via DTMF with local phone
If the configuration is correct you will hear 2 long tones, if wrong only 1 long tone.
| Set the phone numbers: | *912*idx*detect_number*new_number# (e.g. *912*1*0331702611*0331263733#) |
| Delete all phone numbers: | *912*0# |
| Delete the phone number at idx: | *912*1**# |
Setup via SMS
| Set the phone numbers: | #+DGTELMOD=idx,detect_number,new_number# (e.g. #+DGTELMOD=1,0331702611,0331263733#) |
| Read the phone numbers: | #+DGTELMOD?# |
| Answer: | +DGTELMOD: 0331702611,0331263733,,,, |
| Delete all phone numbers: | #+DGTELMOD=0# |
| Delete the phone number of idx: | #+DGTELMOD=1,,# |
Backup of battery
The backup battery is located inside the product.
Backup Battery features: rechargeable Li-ion Polymer 3,7V – 2000mAh.
At the first power on, leave the device connected to the power supply for at least 10 hours for a correct and complete battery charging.
In environment temperature, with new batteries, the autonomy of device:
Standby time: about 6 hours (*)
Talk time: about 1 hour and 30 minutes (*)
(*) The battery life depends on several factors, i.e. the operating temperature of the device and the quality of NETWORK signal.
Italian laws consider batteries as dangerous urban waste that must be disposed according to the law provisions in force (Italian DPR 915/82 and local provisions).
Remove the backup battery

The replacement of battery must be carried out by qualified staff in our maintenance centre.
In special cases, to remove the battery disconnect the device from the main power and exclude the battery moving the switch.
Open the device by removing the upper and lower cover: there are no screws, you need special tools.
Disconnect the connector as shown in picture.
Remove the board first, then you will be able to remove the battery.
Wall mounting
Amigo GSM 2G/4G can be installed on a table/desk or wall mounted through the proper bracket for wall mounting.
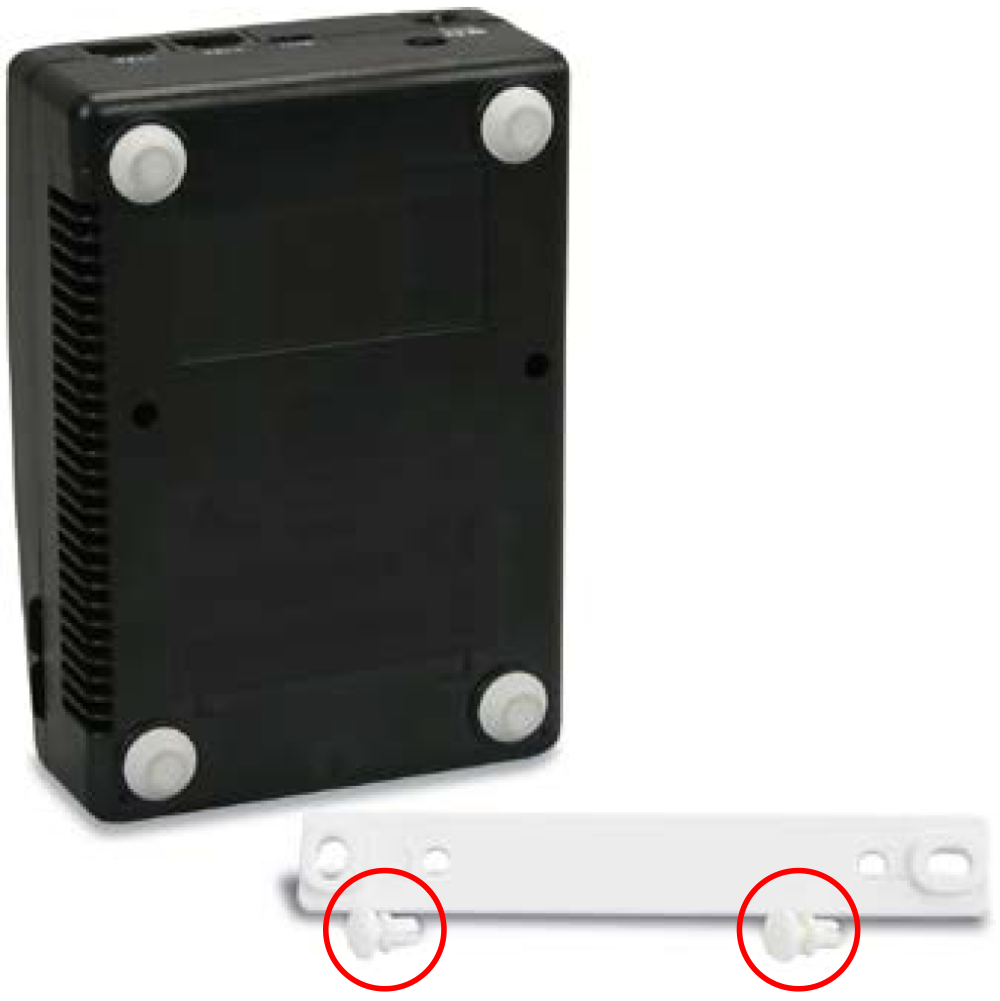
1) Place temporarily the bracket on the wall where you want to install the device and mark the mounting points.
2) Before fixing the bracket to the wall you need to plug it to the device using the two fixing caps supplied in the package.
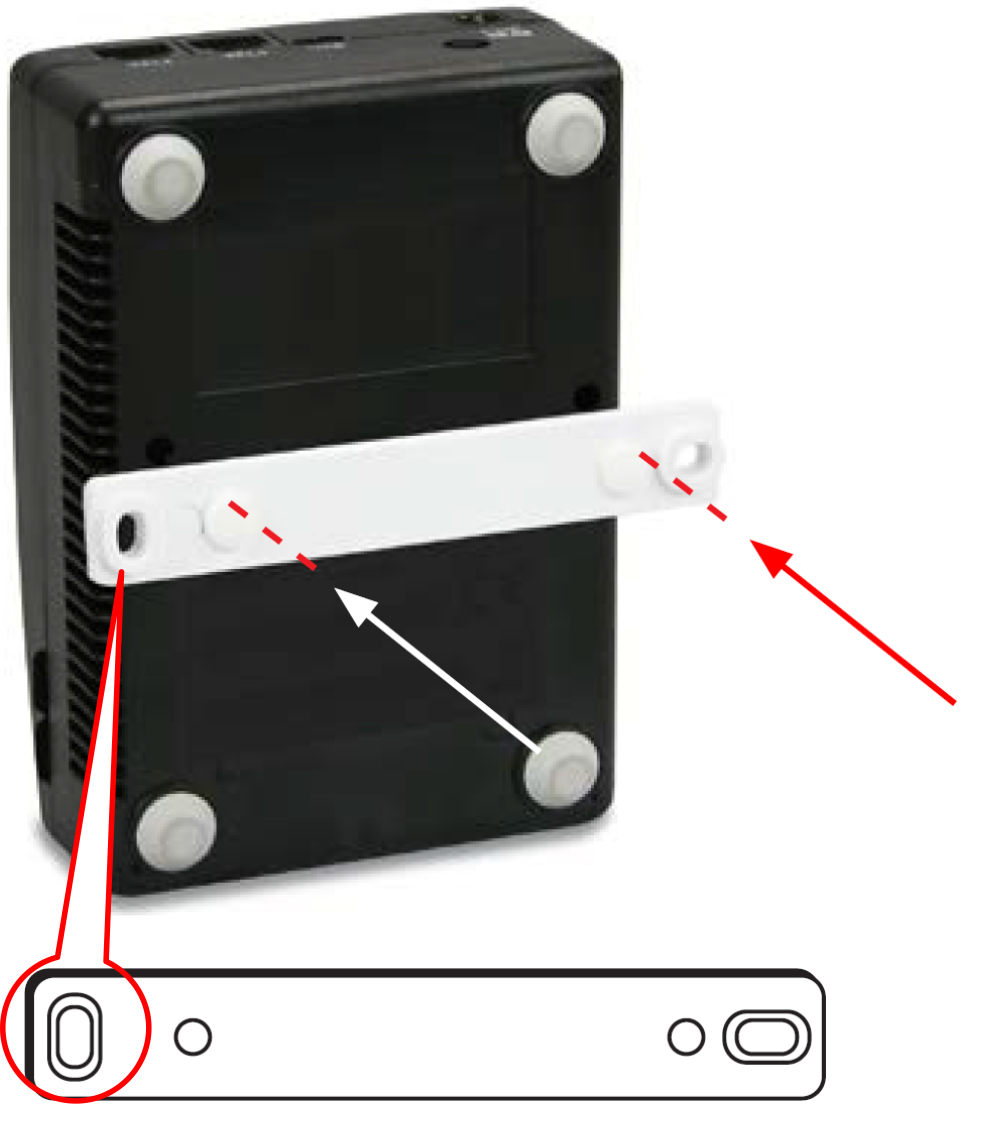
3) Align the bracket on the back of the device in correspondence of the holes as shown in the picture.
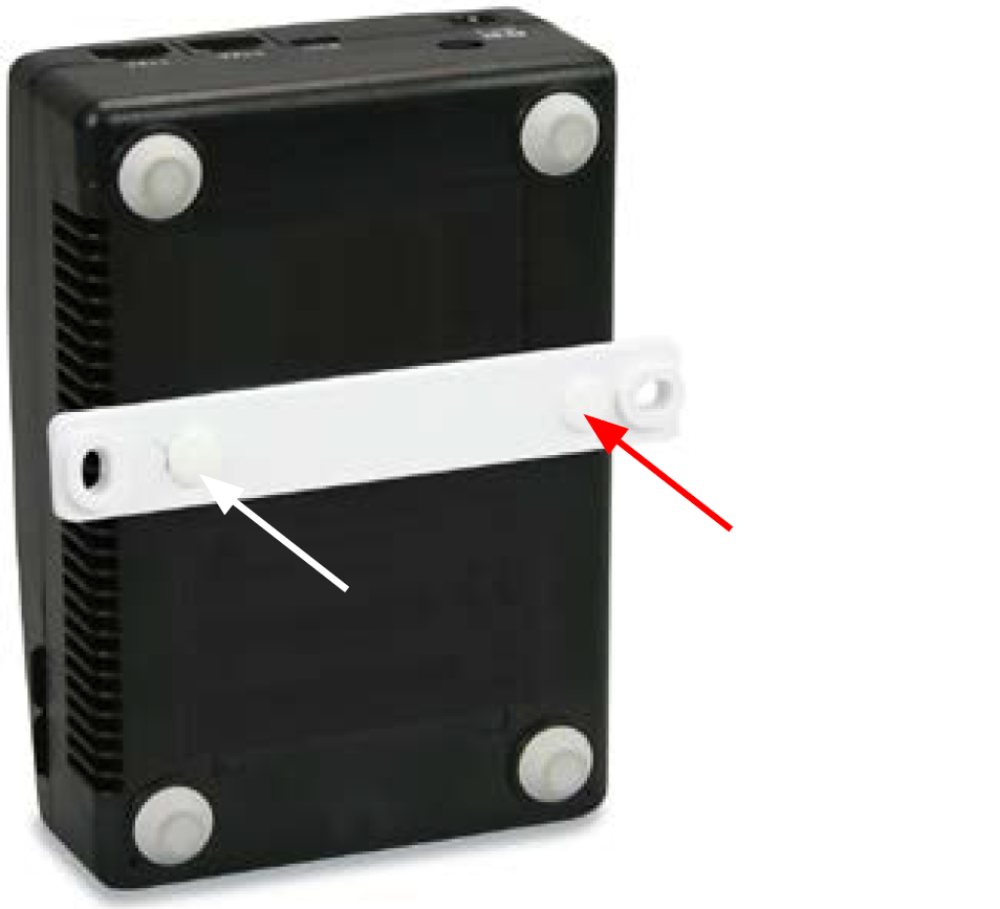
4) Insert the two caps by pressing them until you hear the closing click.
Remote control via SMS
The device configuration can be performed via SMS; so you can remotely manage the device. It will be possible at any time to remotely enquery the device to know the battery status and the quality of Network signal.
Only authorized users can remotely manage Amigo GSM 2G/4G; for every message received it will check the calling number ID.
You can remotely manage and set the following:
- Phonebook with 4 users authorized to configure the device.
- Phonebook with 4 users authorized to receive the informative messages from Amigo GSM 2G/4G .
- Battery Low message when the Backup battery has about 90 to 60 minutes autonomy.
- Reception of “shutdown in progress” message when the Backup battery has about 30 to 5 minutes autonomy.
- Remote reboot to force a new registration to the mobile network.
- Status request to check the Backup battery status and the NETWORK signal quality.
List of authorized users
The first programming SMS must be the list of users authorized to remotely configure the device and the list of users that should receive messages from the device.
CONFIGURATION
*1 # ID # conf1 , conf2 , conf3 , conf4 # dest1 , dest2 , dest3 , dest4
| Item | Description |
|---|---|
| *1 | Key of message to configure the list of authorized users |
| # | Separator |
| ID | Device ID. Max: 8 alphanumeric characters Default: 4GLIFT |
| # | Separator |
| conf1 | Phone number enabled to configure and manage Amigo GSM 2G/4G |
| , | Separator |
| conf2 | Phone number enabled to configure and manage Amigo GSM 2G/4G |
| , | Separator |
| conf3 | Phone number enabled to configure and manage Amigo GSM 2G/4G |
| , | Separator |
| conf4 | Phone number enabled to configure and manage Amigo GSM 2G/4G |
| # | Separator |
| dest1 | Phone number enabled to receive the informative message from Amigo GSM 2G/4G |
| , | Separator |
| dest2 | Phone number enabled to receive the informative message from Amigo GSM 2G/4G |
| , | Separator |
| dest3 | Phone number enabled to receive the informative message from Amigo GSM 2G/4G |
| , | Separator |
| dest4 | Phone number enabled to receive the informative message from Amigo GSM 2G/4G |
Note:
- You can configure a minor number of users.
- It is possible not to set the list of authorized users; in this case you must respect the sequence of # (hash) Separators.
- The phone numbers can be set with or without international prefix. You can use numbers from 0 to 9 and the symbol + as first symbol for international prefix. Each phone number must be composed of maximum 17 digits including the + symbol
- If no list of authorized users is set, then anyone can remotely manage the device.
Examples:
*1#4GLIFT#+393351234567,+393409876543#+393351234567,+393409876543
*1#4GLIFT##+393351234567,+393409876543
CONFIGURATION ACKNOWLEDGE MESSAGE
When Amigo GSM 2G/4G receives a message, it will check if the message is coming from an authorized user, otherwise the message will be ignored. If the message comes from an authorized user, but the text message is incorrect, then the device will answer with a NACK message. In case of correct configuration the device will answer with an ACK message.
If the list of phone numbers enabled to configure and manage the device is empty (confx), anyone can configure and manage the device.
All the messages sent from Amigo GSM 2G/4G , included the ACK and NACK message, will begin with an SMS index (Idx_Sms) and a separation symbol (#). The maximum index value is 255, then it will resume from 0.
Example:
12#*1#4GLIFT#ACK
CHECK THE CONFIGURATION
To check the phonebook configuration send the following message:
*1?
The user will receive the answer in the same format, with the Sms index and hash (#) character.
Example:
13#*1#4GLIFT#+393351234567,+393409876543#+393351234567,+393409876543
Low battery
Amigo GSM 2G/4G is supplied with an internal rechargeable battery, in case of main power black-out, the device will operate using the Backup battery. When the remaining battery is about 90 to 60 minutes*, the device will send a “Low Battery” message.
In case of prolonged black-out, before powering off (about 30 to 5 minutes autonomy*), the device will send a “Shutdown in progress” message.
The message is sent to the phone numbers configured in the authorized users list (destx).
*: The battery lifetime depends on several factors, i.e. the device status (standby mode or conversation mode), the operating temperature, the quality of Network signal.
CONFIGURATION
The user can customize the text “Low Battery” and “Shutdown in progress” with the following message:
*2 # First msg text , 60 # Second msg text , 5 # N retry , Time retry
| Item | Description |
|---|---|
| *2 | Message key to configure the text for low battery |
| # | Separator |
| First msg text | Text for the first message (i.e. Low Battery); the users will receive the message when there are about 90 – 60 minutes of battery autonomy left. Max: 30 characters / Default: Low Battery |
| , | Separator |
| 60 | Fixed value |
| # | Separator |
| Second msg text | Text of the second message (i.e. Shutdown in progress); the users will receive the message when there are about 30 – 5 minutes of battery autonomy left. Max: 30 characters / Default: Shutdown in progress |
| , | Separator |
| 5 | Fixed value |
| # | Separator |
| N retry | Number of attempts to send SMS to users in case the transmission fails. Values: from 0 to 9 / Default: 2 |
| , | Separator |
| Time retry | Waiting time before new sending attempt Values: from 0 to 9 min. / Default: 1 |
Note: By factory default, in order to enable the automatic messages indicating the battery status, it will be sufficient to configure the receiving users list,(destx) with the configuration message *1.
Example:
*2#Battery low,60#Shutdown in progress,5#2,1
CONFIGURATION ACKNOWLEDGE MESSAGE
When Amigo GSM 2G/4G receives a configuration message, it will behave as described above, sending the ACK or NACK messages.
Example:
16#2#4GLIFT#ACK
17#2#4GLIFT#NACK
CHECK THE CONFIGURATION
To check the configuration send the following message:
*2?
The user will receive the answer in the same format, with the Sms index and hash (#) character.
Example:
18#*2#4GLIFT#Battery low,60#Shutdown in progress,5#2,1
WARNING MESSAGES
When the above mentioned situations occur, if Amigo GSM 2G/4G is correctly configured, it will send the following messages:
14#*B#4GLIFT#Battery Low (Approximately 90 – 60 minutes* of battery autonomy)
15#*B#4GLIFT#Shutdown in progress (Approximately 90 – 60 minutes* of battery autonomy)
Key of Battery low message: *B
*: The battery life time depends on several factors, i.e. the device status (standby mode or talking mode), the operating temperature of the device, the quality of Network signal.
Configuration reset
To recover the factory default configuration for *1 and *2 messages, send the following SMS:
*9 # ID
| Item | Description |
|---|---|
| *9 | Message key to recover the factory default configuration |
| # | Separator |
| ID | Device ID |
This command will restore all the default values of the SMS configuration.
Example:
*9#4GLIFT
Device reboot
Authorized users can remotely reboot the device with the following message:
RESET
After the reception of the message, the device answers with an ACK message then it re-boot for a new mobile network search.
Example:
18#RESET#4GLIFT#ACK
Information request
Authorized users can request information about the Network operator, the quality of Network signal and the Backup battery status with the following SMS:
INFO
Amigo GSM 2G/4G will answers with the following message:
| Item | Description |
|---|---|
| Idx_SMS | Increasing index of SMS sent by Amigo GSM 2G/4G. |
| # | Separator |
| INFO | Answer Keyword to an INFO request |
| # | Separator |
| ID | Device ID: default 4GLIFT |
| # | Separator |
| Operator | Name of current Network operator. E.g. Vodafone, Movistar |
| , | Separator |
| Signal | Network signal level, indicated with a letter and a value from 1 to 31: H = excellent signal level (High); M = good signal level (Medium); L = low signal level (Low) |
| # | Separator |
| Battery status | Backup battery status: Absent = battery not present or damaged Charge = battery present and main power connected In use = battery present and main power not connected Low = main power not connected and battery life lower than 60 minutes |
| # | Separator |
| Micro firmware | Firmware version of the system |
| # | Separator |
| Firmware | Firmware version of the Mobile Network module |
| , | Separator |
| IMEI | Network module: IMEI |
| # | Separator |
| YYMMDD | Current system date YY = year MM = month DD = day |
| , | Separator |
| hhmm | Current system hour hh = hour mm = minutes |
| # | Separator |
| Autotest SMS: frequency | Periodicity for autotest SMS sending: 0 = Autotest disabled 1 = every day; 2 = every 2 days; etc. |
| , | Separator |
| Autotest SMS: hour | Hour of sending autotest SMS |
| , | Separator |
| Autotest SMS: Receiver 1 | Recipient #1 of autotest SMS |
| , | Separator |
| Autotest SMS: Receiver 2 | Recipient #2 of autotest SMS |
| , | Separator |
| Autotest SMS: Receiver 3 | Recipient #3 of autotest SMS |
| Separator | |
| Autotest SMS: Receiver 4 | Recipient #4 of autotest SMS |
Baby call
Amigo GSM 2G/4G does support a special calling functionality named “BABY CALL” which does allow to automatically dial a configurable phone number by simply off-hooking the handset connected to the FXS port. The outgoing call is dialed automatically after a configurable delay.
The functionality configuration is carried out by sending an SMS message like described below:
#+DGBABY=Param1, Param2, Param3#
| Item | Description |
|---|---|
| # | Separator |
| Param1 | activate or deactivate the ’BABY CALL’ mode 0: Baby call not active 1: Baby call active |
| , | Separator |
| Param2 | delay before starting the outgoing call (seconds) 1-20 allowed values from 1 to 20 |
| , | Separator |
| Param3 | xxxxxxxx : phone number to be dialed |
| # | Separator |
E.g.:
Activation
#+DGBABY=1,2,+39848484848#
Deactivation
#+ DGBABY =0,2,#
The status of the BABY CALL functionality can be read by sending the following SMS message:
#+DGBABY?#
The answer will be like:
+DGBABY: Param1, Param2, Param3
Where:
Param1 : Ativation status
Param2 : Delay before calling
Param3 : Destination phone number
E.G.:
+DGBABY: 1,2,0331702999
1 : BABY CALL is active
2 : Wait 2 seconds before dialing
+390331702999 : Dialed phone number
Download
| Reference | Version | Link |
|---|---|---|
| Amigo GSM 2G/4G Italian | 1.0 | Download PDF |
| Amigo GSM 2G/4G English / Français | 1.0 | Download PDF |