(v 2.8)
EN81-28:2018 compliant
Safety and usage cautions
Before installing our products, we recommend you to consult the section about safety and usage cautions at the link below

Product description
AMIGO is a programmable phone dialler for lifts, complying with EN 81-28 norm requirements.
Main functions
- 1 phone number dedicated to service calls.
- Messages preloaded for 6 languages.
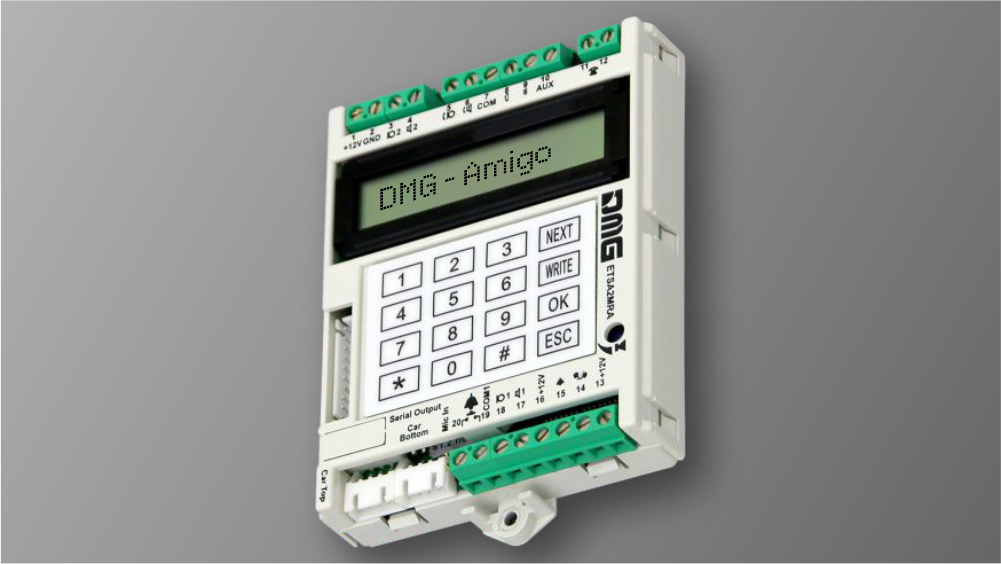
- Programmation unit with LCD screen and keyboard (16 keys).
- Dialler status visible on LCD display.
- Two-way communication time programmable by the user.
- Service call to/from external call center.
- Manual dialing feature to check phone line availability.
- Interphone system between machine room and devices.
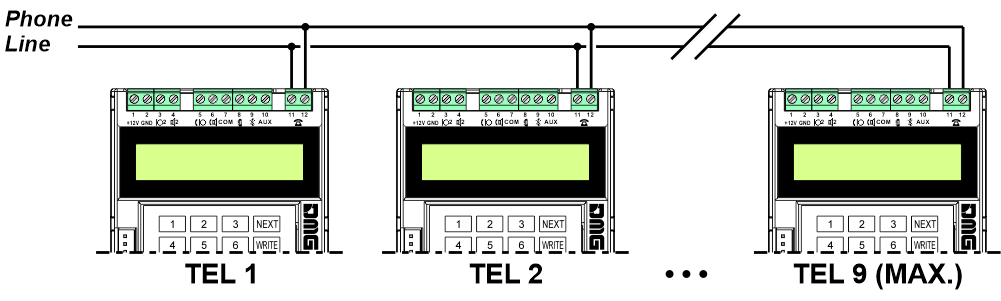
- Possibility of connecting two or more devices on the same phone line.
- Remote programming.
EN81-28 functions
- Store capacity up to 6 phone numbers for emergency calls – EN81-28 § 4.2.1
- Possibility of recording ten customized messages: “Site identification”, “Low battery charge”, “Regular operation”, “No-panic message”, “Rescue message”, “Filter on alarm message”, “End alarm message”, “Alarm message”, “Technical test message”, “Instructions message” – EN81-28 § 4.1.6.
- Automatic test – EN81-28 § 4.2.1.
- Manual test – EN81-28 § 5.2.
- End of alarm mode – EN81-28 § 4.1.2.
- Power supply test – EN81-28 § 4.1.3.
- Alarm filters management in case of working system or open doors with elevator car at floor (EN81-28 § 4.1.5).
- On-board “Alarm sent” / “Communication established” indicators (EN81-28 § 4.1.4)
- Local or remote alarm reset management (EN81-28 § 4.1.2)
Description of alarm cycle
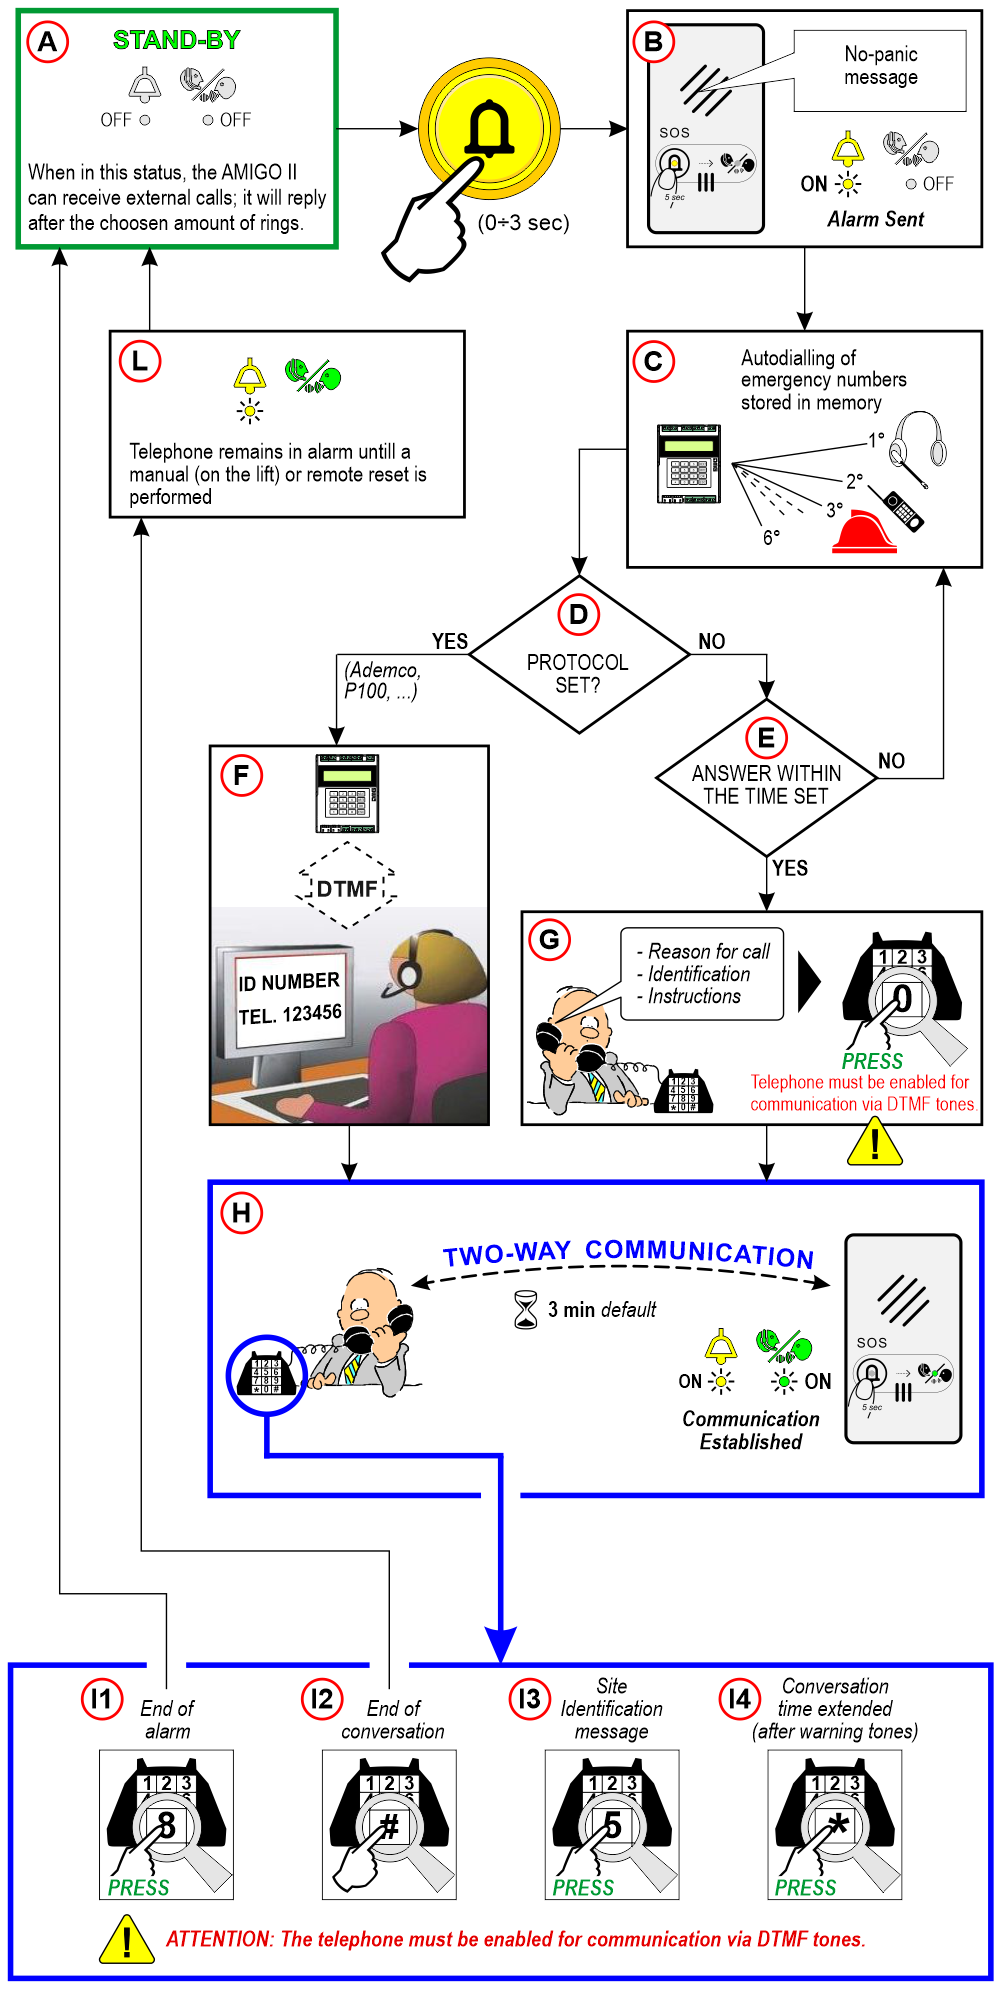
A) – Stand-By: When in this status, the AMIGO telephone can receive external calls; it will reply after the choosen amount of rings.
B) – No-panic message.
C) – Autodialling of emergency numbers stored in memory. If all programmed numbers are called without reply for the programmed number of times, the line is disconnected, the “alarm sent” LED stays on and the Emergency Telephone returns to the stand-by mode, ready to start a new alarm cycle.
D) – Protocol set ? (Yes / No).
E) – Answer within the time set (Yes / No).
F) – If the Amigo II is connected to a DTMF tones enabled communication center, all service messages and the system ID will be sent as DTMF tones. Voice messages are therefore disabled.
G) – Reason for call / Identification / Instructions. Attention: The telephone must be enabled for communication via DTMF tones.
H) – Two-way communication.
I) – Attention: The telephone must be enabled for communication via DTMF tones.
I1) – End of alarm
I2) – End of conversation.
I3) – Site Identification message.
I4) – Conversation time extended (after warning tones).
L) – Telephone remains in alarm untill a manual (on the lift) or remote reset is performed.
Installation
Configurations
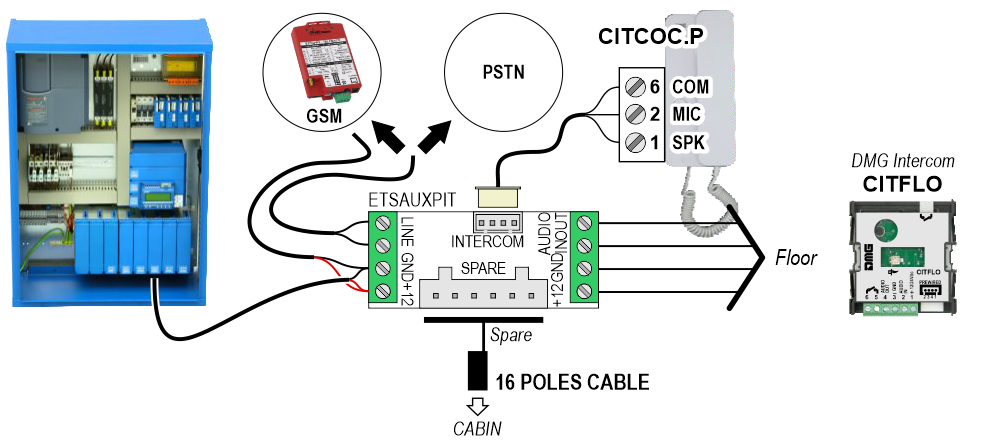
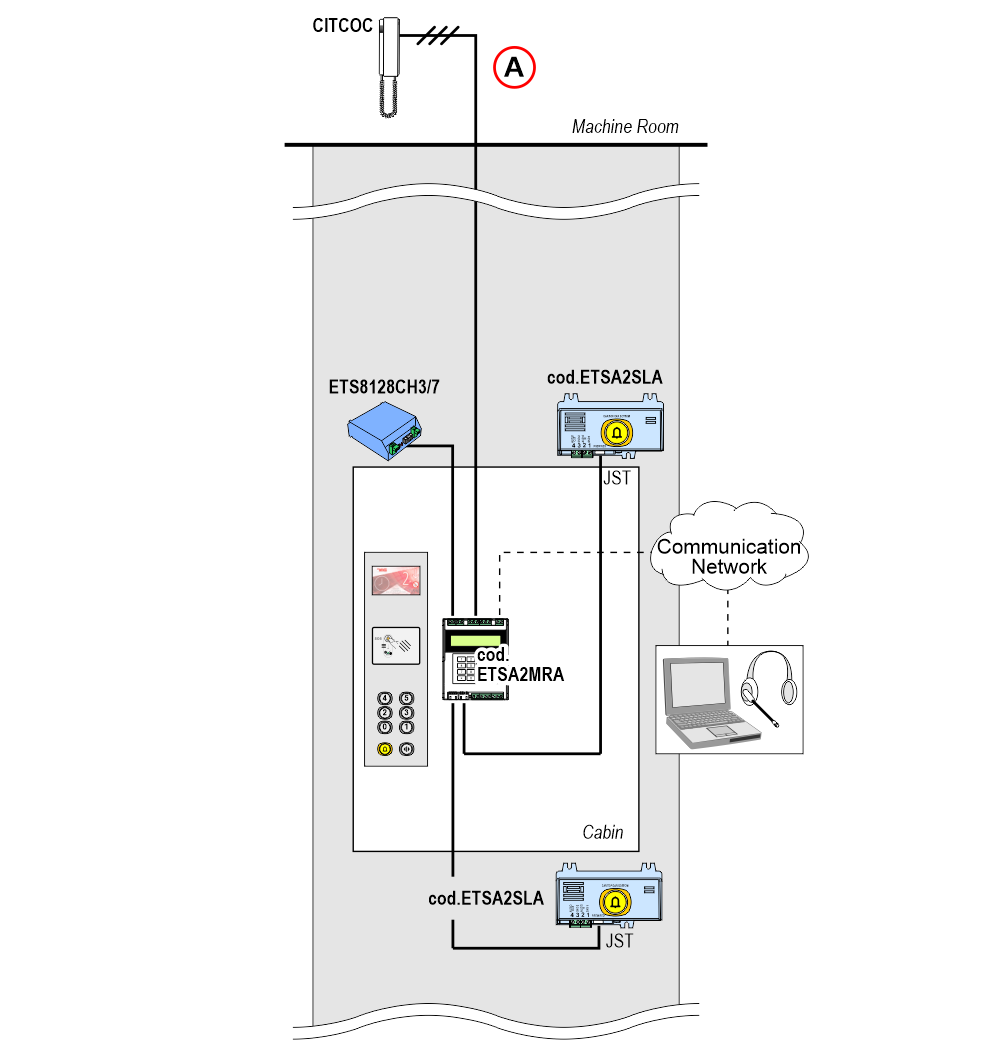 A) – Just pick up the handset to talk to the other installed devices.
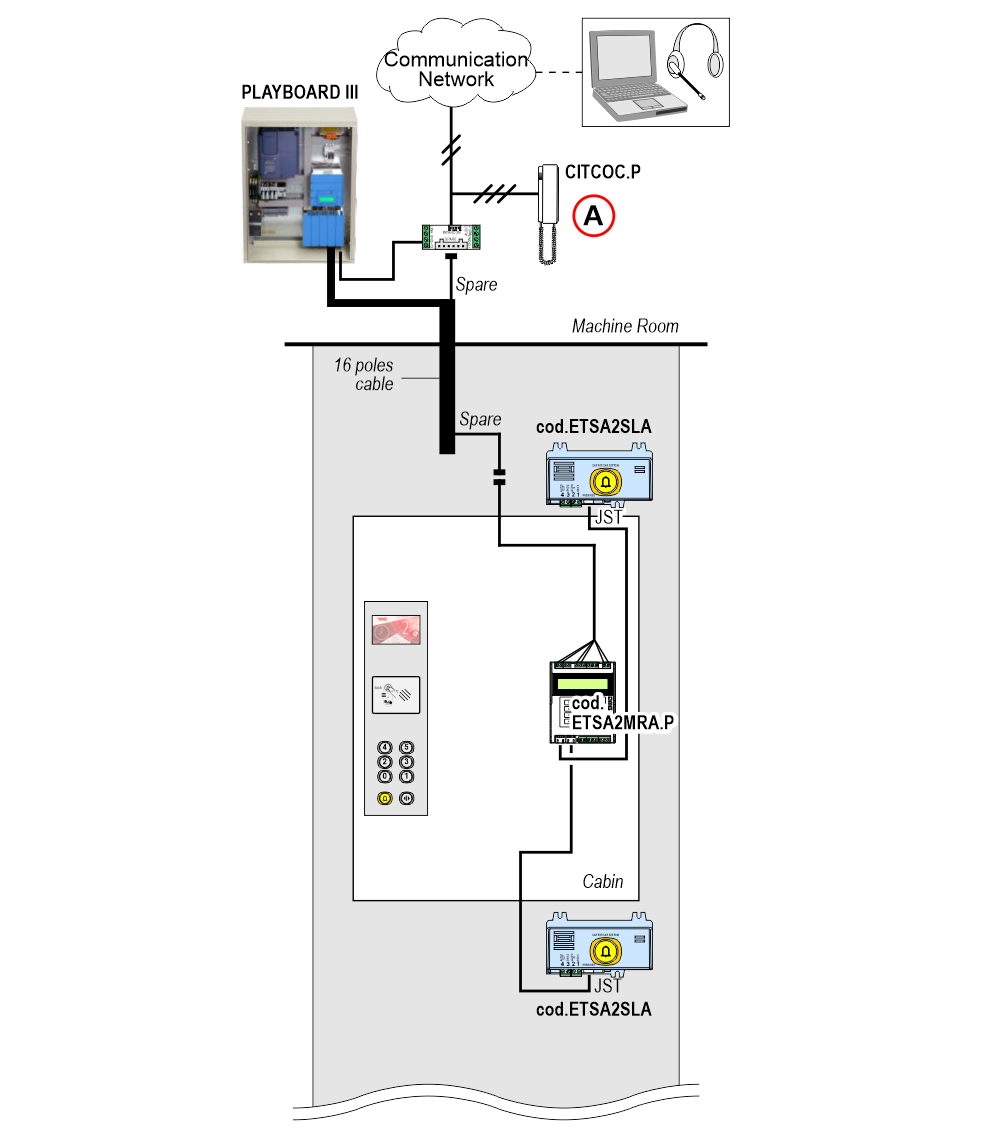 A) – Just pick up the handset to talk to the other installed devices.
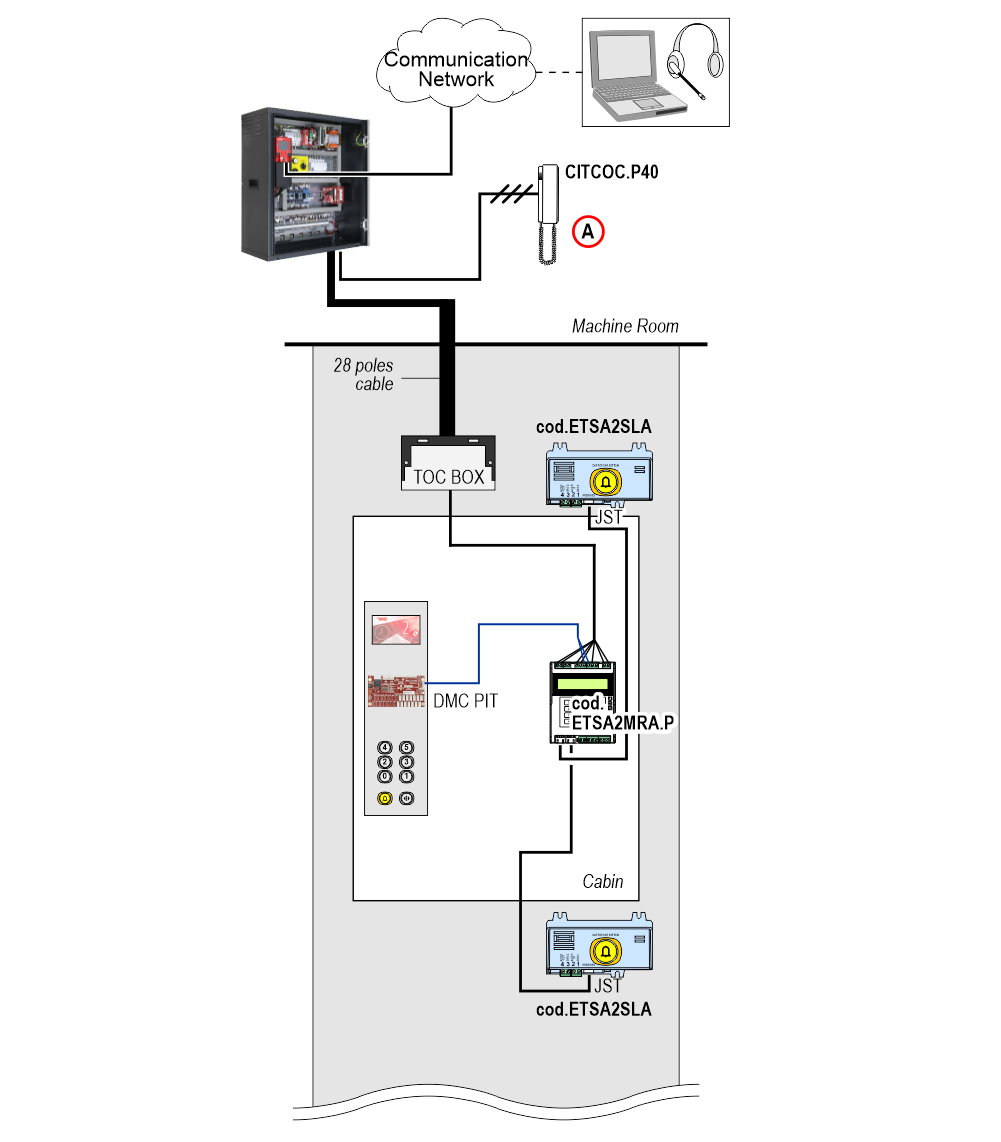 A) – Just pick up the handset to talk to the other installed devices.
Detail of connection
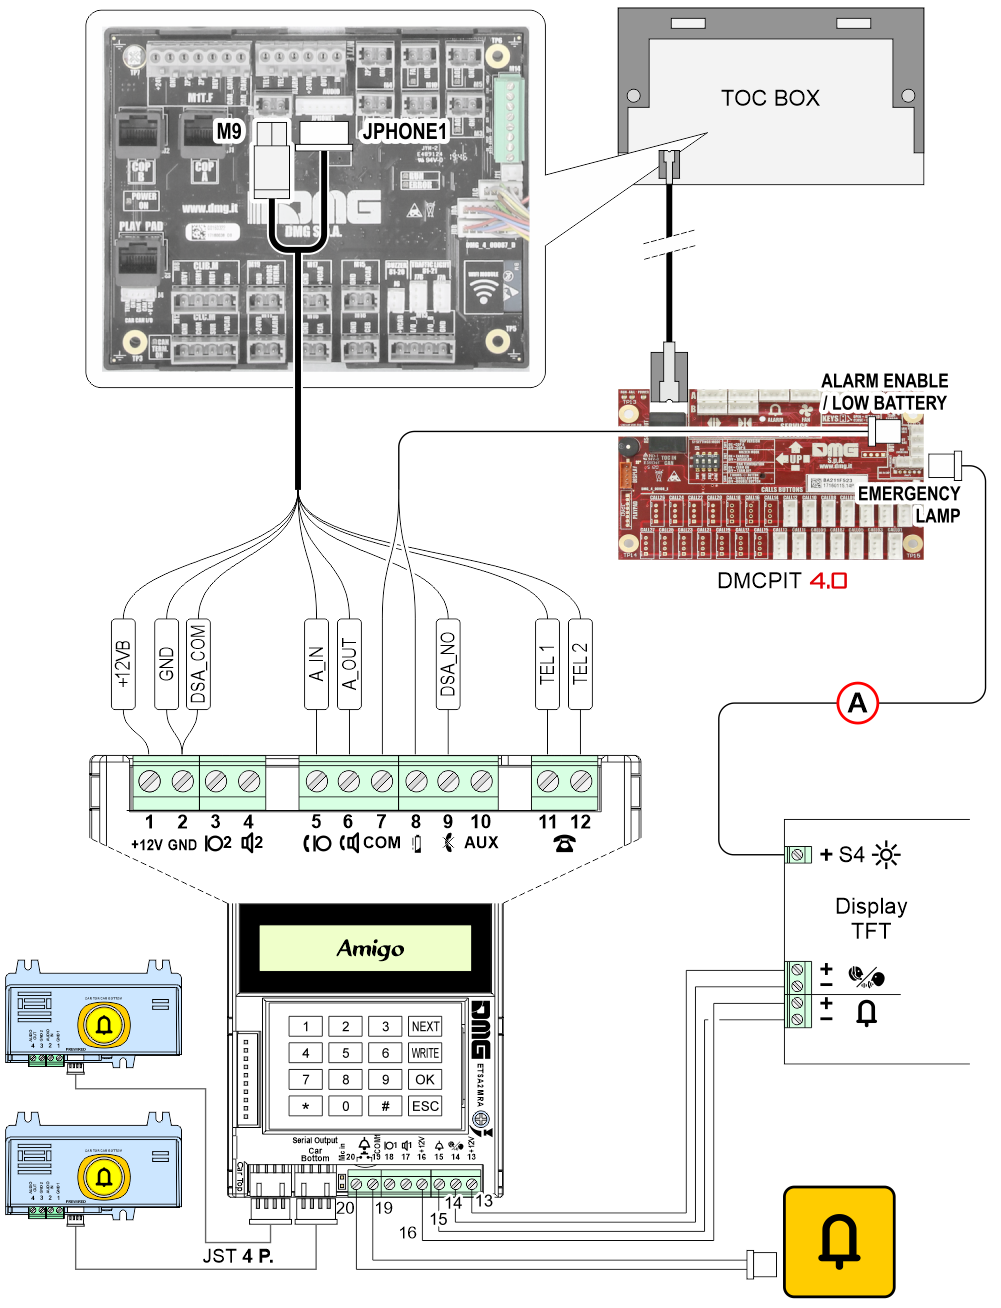 A) – Connection required because the display must remain on even in the event of a blackout in order to view the telephone signals.
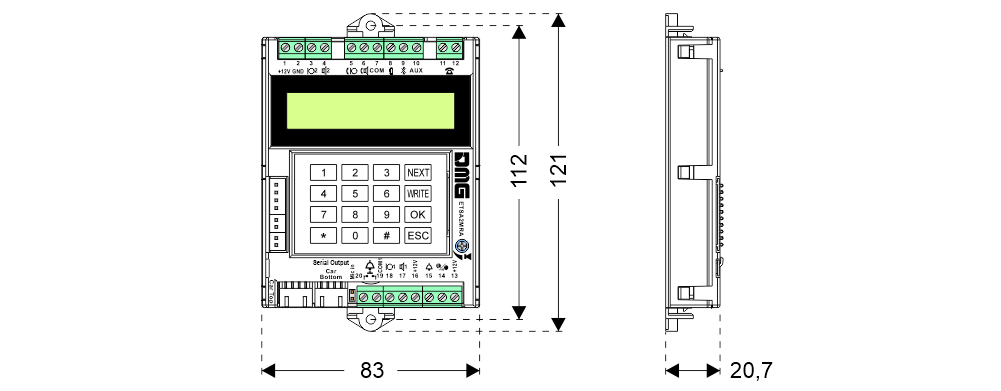
Dimensions
(ETSA2MRA)
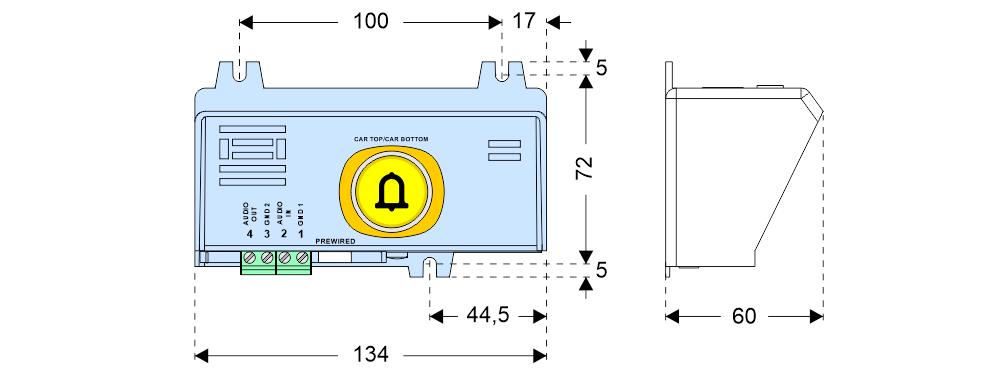
(ETSA2SLA)
Mounting
mounted directly on the plate

A) Pins M3x12
B) Important: The 2 holes for the light guides may not be made but additional signalizations 81-28 must still be present. Furthermore, in the case of a TFT display, it MUST be powered by battery in the event of a power failure.
on supporting plate

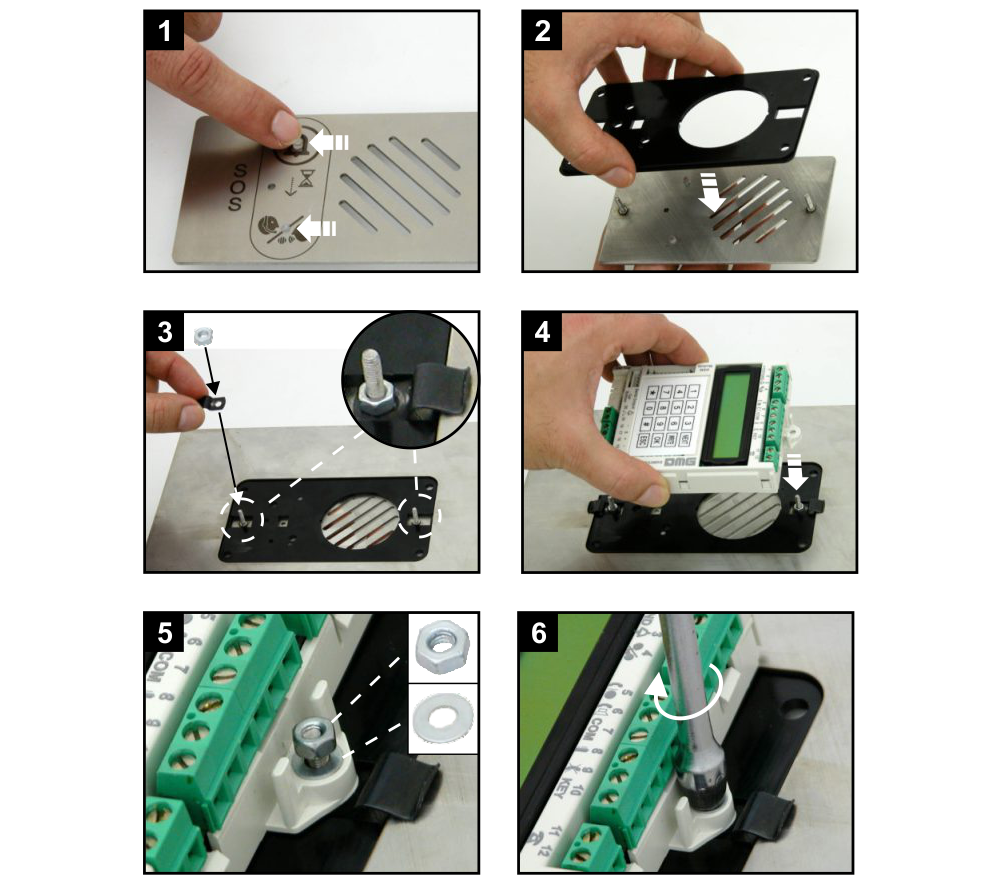
1) – Insert the light guides
2-6) – Continue with the assembly as shown in the images.
– Follow the inverse procedure to dismantle
on capacity plate TD5

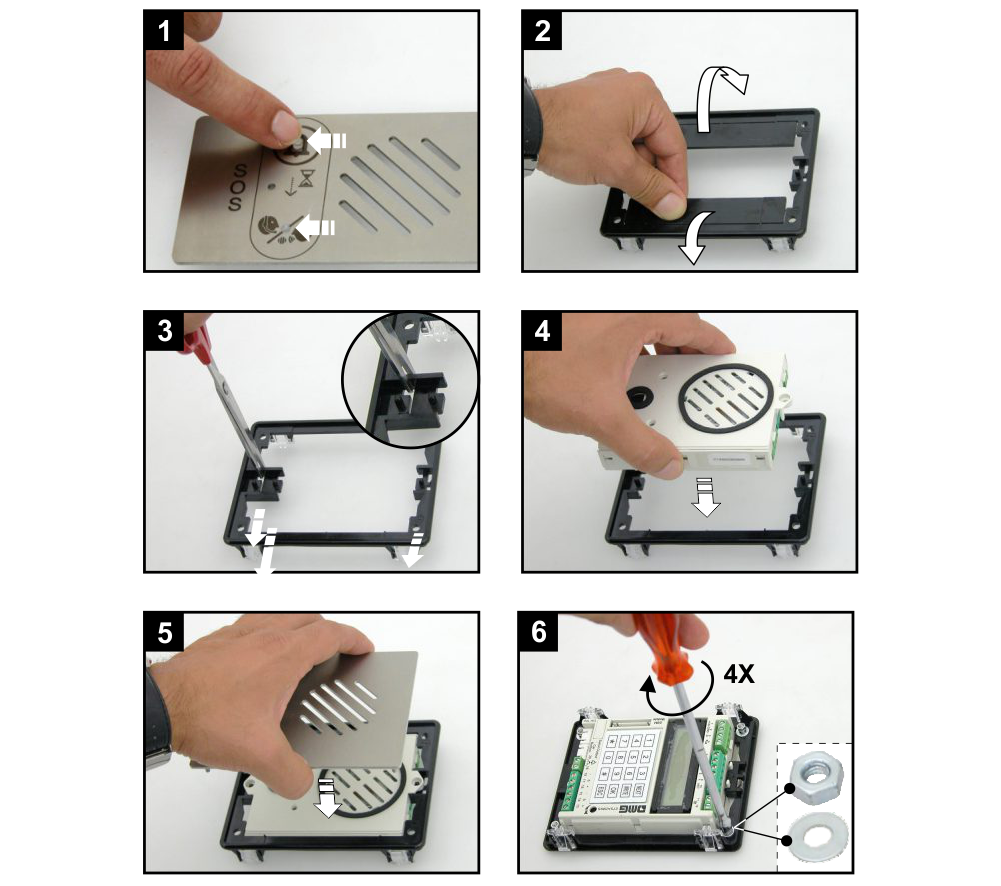
1) – Insert the light guides
2) – Remove the two breakable parts
3-6) – Continue with the assembly as shown in the images.
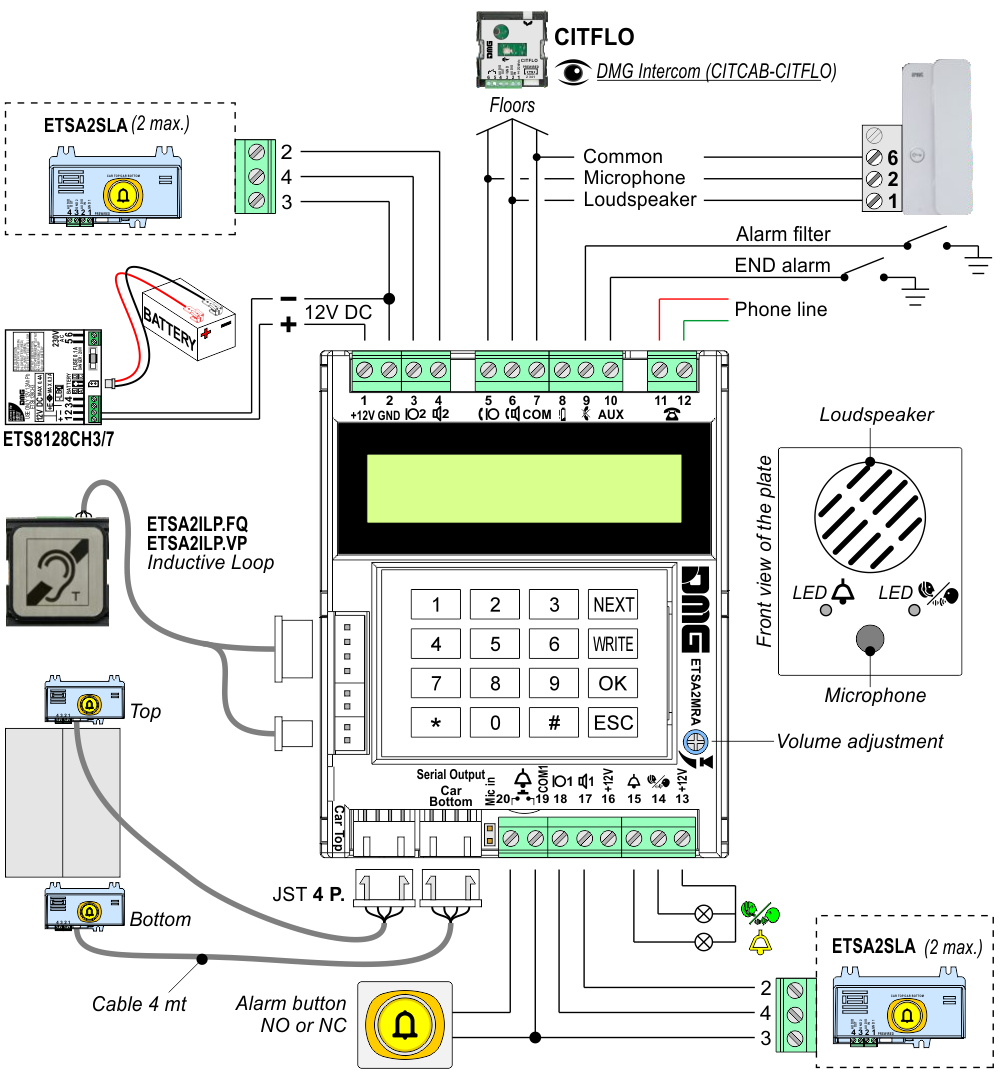
Wiring Instructions
Basic wirings
2) – Connect the phone line to terminals 11 and 12.
3) – Connect the alarm pushbutton (NO/C or NC/C ) to its input (see Programming menù) .
4) – Connect the 12V DC power source to terminals 1(+) and 2(-); power up the Emergency phone subsequently.
5) – Make sure the screen shows “DMG – AMIGO2” followed by software version number (ex. “v.2.2”).
6) – To make sure the telephone line is present, perform the basic programming and press the Alarm button.
7) – To end the alarm cycle test, press the (*) key.
Detail of connection with Pitagora 4.0 system
A) – Connection required because the display must remain on even in the event of a blackout in order to view the telephone signals.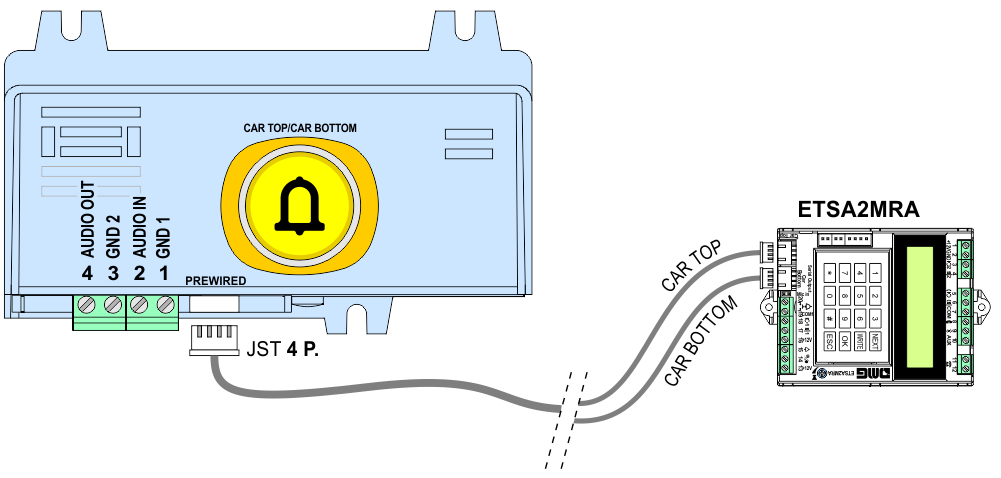
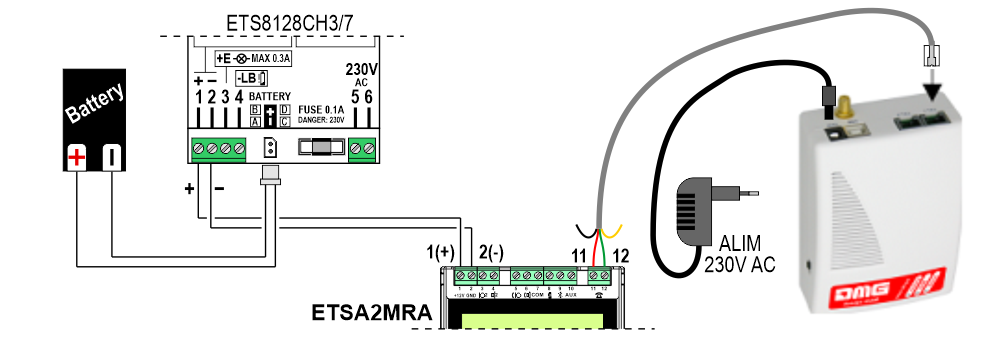
The external module AMIGO GSM allows to connect the AMIGO to GSM network, thereby avoiding the need of the fixed phone line.
When power in tension falls below 10V, Amigo sends out a service call with the “Low battery charge” message. When the 12V line in is restored, a service call with the “Regular operation” message is sent (see Programming menù).
If the emergency telephone has firmware 2.5.0 or higher, for ETS8128CH2 power supply compatibility set the parameter “ETS8128CH3 = 0” (see Programming menù)
In case of low battery, the alarm signalization and communication established signalization blink simultaneously (1 sec. ON / 1 sec. OFF).
Advanced wirings
For this purpose, connect the potential-free contact between the ALARM FILTER input of the Emergency Telephone and the screw terminal n°7 (COM/GND).
Full compliance to EN81-28 norm shall be achieved by connecting AMIGO Telephone to an external Rescue Service (Call Center or the like).

A) – Alarm Reset
The message “END OF ALARM” will be played and a call (data / voice) of “End of alarm” will be made to the service center in order to be able to record the intervention time. However, the remote RESET function remains available (see Remote parameters’ setting table – code 20).
B) – Manual Test
It is possible to bypass the alarm filter by pressing and holding the alarm button for 20 ÷ 30 sec (see Remote parameters’ setting table – code 11).
Advanced Functions
telephone’s ID number.
Selection is needed when operator calls the telephone on the lift and is performed by just selecting the Unit ID on his keypad.
There must be a telephone with ID1; all ID’s must be different.
– Courtesy Car Message
– End Alarm Message
– Technical test Message
– Alarm filter Message
The frequency of the self-test can be programmed between 24, 48 or 72 hours; when the timer expires, the phone will make a call to the service number. If a communication protocol is set, the listening unit will reply with codes specific to that protocol to signal the success of the test to the Amigo; in case the protocol is set to “none”, a voice call will be made and the operator who answers the call will be required to press the “8” key to end the call successfully.
Should the call fail for any reason, the Amigo would signal the event by turning on the Alarm Sent (yellow) and Communication Established (green) LEDs in an alternating pattern, until the next successful call (either self-test or emergency call).
In order for the self-test to work correctly, these parameters must be set:
(3) Service call number
(4) Address message (only in case of operation with “no protocol”)
(5) Self Test (set a timing between 24-48-72 hours)
(6) ID number: in case of operation using a protocol, this number is supplied by the call center; in case of operation with “no protocol” a number is still required (user choice, maximum 16 digits).
(7) Protocol type: set the protocol used by the call center or “None” to have the Amigo make standard voice calls.
(EXPERT USER menu) Automatic identity message: this parameter must be enabled in case of operation with “no protocol”, otherwise the self-test call will automatically fail.
Programming
[NEXT] = Menu browsing and start programming
[WRITE] = Enters menu to modify data and starts programming
[OK] = Validates changes
[ESC] = Exits current menu, returns to main, cancel last input
Basic alarm cycle programming
| 1) | DMG - Amigo2 Rev. X.X.X | [NEXT] > | Enter Password (default: 1 2 3 4) | [1][2][3][4] > | Languages English | [WRITE] > |
| 1-Français 2-Deutsch 3-Italiano 4-Russkiy 5-English 6-Portugues | [OK] > [NEXT] > | Device profile Basic functions | [WRITE] > | 0 (*) 1 (*1) | [OK] > [NEXT] > [NEXT] > | |
| (*) Without communication service central (basic functions) (*1) With communication service central (advanced functions) |
||||||
| 2) | Record all phone numbers to be called in case of emergency; if a service contract with a call center is in place, enter the relevant service number . WARNING: At least one phone number must be recorded, otherwise the alarm cycle will not be activated. |
|||||
| Emergency Call Numbers | [OK] > | 1st Number None | [WRITE] | 1st Number XXXXXXX_ | [OK] > [ESC] > [NEXT] > | |
| 3) | Record the phone number (*2) to be called for service calls. | |||||
| Service Call Number None | [WRITE] > | Service Call Number XXXXXXX_ | [OK] > [NEXT] > | |||
| (*2) If call center doesn't support different numbers for alarms and service calls, you can configure same number for both. | ||||||
| 4) | Record ID message for service and emergency calls. | |||||
| Address message | [OK] > | Address Msg Rec=1 Play=2 | [1] > | Are You Sure? Yes=OK / No=ESC | [OK] > | |
| Recording...(16 sec.) Stop=ESC | [ESC] > [NEXT] > | |||||
| 5) | (EN 81-28) - Set the periodic test call interval. | |||||
| Self Test 72h (default) | [WRITE] > | [0] - None [1] - 24h [2] - 48h [3] - 72h | [OK] > [NEXT] > | |||
| 6) | Enter the "ID number": If Amigo telephone has to be connected to a call center, the number must be supplied by the same call center (Anep: 8 digits - Ademco: 4 digits - P100: 8 digits - DMG 4/10: 4/10 digits). Otherwise, a 16 digits max. ID personal code must be entered. |
|||||
| ID Number XXXXX | [WRITE] > | ID Number XXXX_ | [OK] > [NEXT] > | |||
| 7) | If Amigo telephone is connected to a DTMF tone communication service central, set the communication protocol. Otherwise leave the default value (none). |
|||||
| Protocol Type None (default) | [WRITE] > | 0 - None 1 - Anep 2 - Ademco 3 - P100 4 - DMG 4 Digits 5 - DMG 10 Digits | [OK] > | |||
| If the protocol setting is "0" (no protocol), the self test call must be terminated by the operator who receives it, by pressing the "8" key. | ||||||
Programming menu
| Device profile: BASIC FUNCTIONS | |||||
| DMG-Amigo2 Rev. X.X.X | [NEXT]> | Enter 1234 | [1][2][3][4]> | (The safety code is not a password but just a filter to unwanted access to the menu) | |
| Languages English | [WRITE]> | [1]-Français [2]-Deutsch [3]-Italiano [4]-Russkiy [5]-English [6]-Portugues | [OK]> | ||
| [NEXT] | |||||
| Device profile Basic functions | [WRITE]> | 0-Basic functions 1-Advanced functions 2-Expert user | [OK]> | ||
| [NEXT] | |||||
| Reset to default config. Reset = WRITE | [WRITE]> | Atre you sure? Yes=OK No=ESC | [OK]> | ||
| [NEXT] | |||||
| (*1) Emergency Call Numbers | [OK]> | 1st Number None | [ESC]> | ||
| [WRITE]> | 1st Number XXXXXXX_ | [OK]> | |||
| [NEXT]> | .......... Number None | ||||
| (*1) Recording of phone numbers (max.6) to be called during the alarm cycle. | |||||
| [NEXT] | |||||
| (*2) Service Call N° None | [WRITE]> | Service Call N° XXXXXXX_ | [OK]> | ||
| (*2) Recording of the service call number for service messages. | |||||
| [NEXT] | |||||
| (*3) Address message | [OK]> | Address Msg Rec=1 Play=2 | [1]> | Atre you sure? Yes=OK No=ESC | [OK] 16 sec. > |
| Recording... Stop=ESC | |||||
| (*3) Site ID message recording | |||||
| [NEXT] | |||||
| (*4) Self Test (0-3) 72h (default) | [WRITE]> | [0] - None [1] - 24h [2] - 48h [3] - 72h | [OK]> | ||
| (*4) Setting the self-test call cycle (§ 4.2.1 of EN 81-28 norm). For the correct management of this function (standard EN81-28:2018), the "Protocol Type" (see the advanced functions of the menu) must be set to one of the values: - 3 (P100 protocoll) - 4 (DMG 4 digits) - 5 (DMG 10 digits) If no protocol (value = 0 ), the "Automatic Identify Message" (see the expert user profile of the menu) must be enabled. If the automatic call is not successful (no answer by the receiver), the signalizations (alarm and communication established) blink alternately. The normal state will be restored at the next connection. |
|||||
| [NEXT] | |||||
| Device profile: ADVANCED FUNCTIONS | |||||
| (*5) ID Number XXXXX | [WRITE]> | ID Number XXXX_ | None: 16 digits max. Anep: 8 digits Ademco: 4 digits P100: 8 digits DMG 4 Digits: 4 digits DMG 10 Digits: 10 digits | [OK]> | |
| (*5) Recording of unique ID number (supplied by the call center) to be sent out in case of alarm. | |||||
| [NEXT] | |||||
| Protocol Type None (default) | [WRITE]> | [0]-None [1]-Anep [2]-Ademco [3]-P100 [4]-DMG 4 Digits [5]-DMG 10 Digits | [OK]> | ||
| [NEXT] | |||||
| (*6) Max Conversation time 3 (default) | [WRITE]> | 3-9 choose & OK (3÷9) | [OK]> | ||
| (*6) Setting of max. conversation time (3÷9 min.) - renewable. | |||||
| [NEXT] | |||||
| (*7) Alarm calls cycles count. 3 (default) | [WRITE]> | 1-9 choose & OK (1÷9) | [OK]> | ||
| (*7) Setting of max. number (1÷9) of attempts for the alarm cycle to before the system returns to stand-by mode. | |||||
| [NEXT] | |||||
| (*8) Alarm button delay. 3 (default) | [WRITE]> | 0-3 choose & OK (0÷3) | [OK]> | ||
| (*8) Setting of the minimum time (0÷3 sec.) for the alarm button to be pressed before the alarm cycle is triggered. | |||||
| [NEXT] | |||||
| Manual Test Time 1 (default) | [WRITE]> | [1]-20 sec. [2]-25 sec. [3]-30 sec. | [OK]> | ||
| [NEXT] | |||||
| (*9) Alarm Contact 0 (default) | [WRITE]> | [0] Normally open [1] Normally closed | |||
| (*9) Type of contact (NO/NC) setting on the alarm button connected to ETSA2MRA. | |||||
| [NEXT] | |||||
| Device profile: EXPERT USER | |||||
| Automatic Identity Message Disabled | [WRITE]> | [0] Disabled [1] Enabled | [OK]> | ||
| [NEXT] | |||||
| Password setup 1234 | |||||
| [NEXT] | |||||
| (*10) Mess. recordings | [OK]> | Instructions Msg (16sec.) Rec=1 Play=2 | [1]> | Atre you sure? Yes=OK No=ESC | [OK]> |
| [NEXT]> | Low Battery Message (4 sec.) Regular Working Msg (4 sec.) Courtesy Car Message (8 sec.) End Alarm Msg (4 sec.) Waiting Rescue Msg (4 sec.) Automatic call istruction message (4 sec.) Alarm Messsage (4 sec.) Alarm filter Msg (8 sec.) | ||||
| Recording... Stop=ESC | |||||
| (*10) Through this menu it is possible to overwrite messages in the selected language. (Attention: Preloaded messages will be definitively erased) |
|||||
| [NEXT] | |||||
| Automatic call closed recognition Disabled | [WRITE]> | [0] Disabled [1] Enabled | [OK]> | ||
| [NEXT] | |||||
| Rings before answer 3 Rings | [WRITE]> | [1] 1 ring ...[9] 9 rings | [OK]> | ||
| [NEXT] | |||||
| Call center reply timeout 30 seconds | [WRITE]> | [1] 10 seconds ...[9] 90 seconds | [OK]> | ||
| [NEXT] | |||||
| Audio Messages playback Playback Enabled | [WRITE]> | [0] Playback Disabled [1] Playback Enabled [2] Playback only in cabin | [OK]> | ||
| [NEXT] | |||||
| Double Language Messages Disabled | [WRITE]> | [0]-Disabled [1]-Français [2]-Deutsch [3]-Italiano [4]-Russkiy [5]-English [6]-Portugues | [OK]> | ||
| [NEXT] | |||||
| Unit ID in multiline configuration Disabled | [WRITE]> | [0] Disabled [1] Master [2] 2 ... [9] 9 | [OK]> | ||
| [NEXT] | |||||
| ETS8128CH3 battery mode CH3 Mode | [WRITE]> | [0]-CH2 mode [1]-CH3 mode | [OK]> | ||
Remote programming
| 1 |  | Remotely dial the phone number connected to Amigo telephone and wait for the 4 DTMF tones. |  |
| 2 | | Type * PASSWORD # (default *1234#) and wait for the 2 DTMF tones to access the menu. |  |
| 3 | | Type the parameter [CODE] followed by the [VALUE] to be set. | See Remote parameters' setting table |
| 4 |  | Type # to confirm the values entered, followed by 2 tones: | Confirmed programming |
Wrong programming |
|||
| 5 |  | As soon as the parameter is set, the system will return in "conversation" mode. Repeat steps 3, 4, 5 to set each new parameter. | |
| 6 |  | Type 8 to end the program and shut the line. |
Remote parameters’ setting table
| Description / Parameter | Code | DTMF Values | |
|---|---|---|---|
| Recording of unique ID number (supplied by the call center) to be sent out in case of alarm | 00 | 123456789 (default) - 16 digits maximum | |
| Recording of phone numbers (max.6) to be called during the alarm cycle | 1st number | 01 | 123456789 (default) - 16 digits maximum |
| 2nd number | 02 | None (default) - 16 digits maximum | |
| 3rd number | 03 | None (default) - 16 digits maximum | |
| 4th number | 04 | None (default) - 16 digits maximum | |
| 5th number | 05 | None (default) - 16 digits maximum | |
| 6th number | 06 | None (default) - 16 digits maximum | |
| Recording of the service call number for service messages | 07 | 123456789 (default) - 16 digits maximum | |
| Setting of communication protocol | 08 | [0] = None (default) [1] = Anep [2] = Ademco [3] = P100 [4] = DMG 4 Digits [5] = DMG 10 Digits |
|
| Setting of max. number (1÷9) of attempts for the alarm cycle to before the system returns to stand-by mode | 09 | [1] = 1 time [2] = 2 times ... [9] = 9 times |
|
| Setting of the minimum time (0÷5 sec.) for the alarm button to be pressed before the alarm cycle is triggered | 10 | [0] = 0 sec. (default) [1] = 1 sec. [2] = 2 sec. [3] = 3 sec. [4] = 4 sec. [5] = 5 sec. |
|
| Manual test time | 11 | [1] = 20 sec. (default) [2] = 25 sec. [3] = 30 sec. |
|
| Set the periodic test call intervall (EN_81-28) | 12 | [0] = None [1] = 24h [2] = 48h [3] = 72h (default) |
|
| Reset to default config. | 13 | [0] = No Reset [1] = Reset |
|
| Language choice | 14 | [1] = Français [2] = Deutsch [3] = Italiano (default) [4] = Russkiy [5] = English [6] = Portugues |
|
| Password | 15 | ||
| Setting of max. conversation time (3÷9 min.) | 16 | [3] = 3 min. (default) [4] = 4 min. ... [9] = 9 min. |
|
| Type of contact (NO/NC) setting on the alarm button connected to ETSA2MRA | 17 | [0] = Normally Open contact (default) [1] = Normally Closed contact |
|
| Audio Messages playback | 18 | [0] = OFF [1] = ON [2] = Playback only in cabin |
|
| Rings before answer | 19 | 1 ÷ 9 Rings | |
| Remote alarm reset | 20 | [0] = Reset | |
| Automatic call closed recognition | 21 | [0] = Disabled [1] = Enabled |
|
| Call center reply timeout | 22 | [1] = 0 seconds ...[9] = 90 seconds |
|
| Automatic Identity Message | 23 | [0] = Disabled [1] = Enabled |
|
| Unit ID in multiline configuration | 24 | [0] = Disabled [1] = Master [2] 2 ... [9] 9 |
|
| Double Language Messages | 25 | [0] = Disabled [1] = Français [2] = Deutsch [3] = Italiano (default) [4] = Russkiy [5] = English [6] = Portugues |
|
| Power supply test | 26 | [0] = CH2 [1] = CH3 |
|
Datasheet
| Power supply voltage | 12Vdc +/- 15% |
| Absorption in stand-by | ETSA2MRA: 95mA +/- 5% ETSA2MRA + DEVICES: 115mA +/- 5% |
| Absorption during the call cycle | ETSA2MRA: 120 ÷ 250mA ETSA2MRA + DEVICES: 200 ÷ 400mA |
| Optional | Feeder/battery charger (code ETS8128CH3/7) – EN81-28 |
Download
| Reference | Version | Link |
|---|---|---|
| 2.7 | Download PDF (English) | |
| Connection detail with Pitagora 4.0 | 2.8 (current version) | Download PDF (English) |